
You can hatch eggs successfully with an incubator when you control four things that actually matter: steady temperature at egg height, a humidity trend that supports normal moisture loss, consistent turning, and minimal lid opening.
Answer Box:
Conclusion: Most first-timer failures come from tool errors, not “bad luck.”
- Wrong reading: the probe is not at egg height or tools are not calibrated.
- Too many peeks: frequent lid opening causes repeated temperature and humidity drops.
- Turning breaks: missed turns or late turning past lockdown increases hatch difficulty.
Key Takeaways
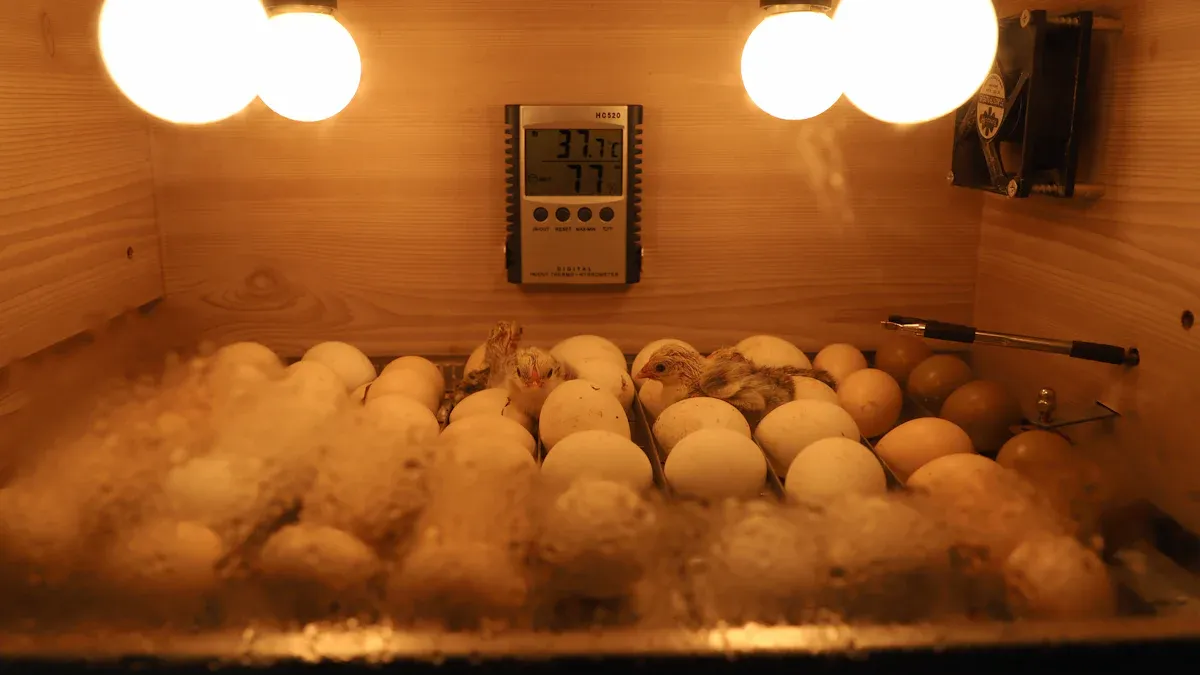
- Keep the temperature steady near 99.5°F at egg height for most forced-air incubators. Verify with a second thermometer before you set eggs.
- Use a simple humidity plan: 50–55% RH for days 1–17, then 65–70% RH for lockdown and hatch. Adjust based on air cell size, not guesswork.
- Turn eggs consistently until day 18. Stop turning for lockdown.
- Candle on day 7 and day 14, then keep the lid closed as hatch approaches.
- If you want to reduce missed turns, an Automatic Egg Incubator can help you keep routines consistent.
Choosing the Right Egg Incubator for Beginners
Features That Prevent First-Timer Mistakes
Conclusion: Pick features that reduce daily handling and prevent silent drift.
- Stable controls: temperature control you can verify at egg height with a second thermometer.
- Turning support: reliable turning helps you avoid missed turns, especially on busy days.
- Easy cleaning: smooth parts that come apart quickly make sanitation repeatable.
If turning is your biggest failure point, use this internal guide for a practical turning routine: Egg Incubator Automatic Turner: how it boosts hatch rates and cuts work.


Start Small on Your First Hatch
Smaller batches are easier to manage because you can keep eggs organized, candle quickly, and avoid long lid-open sessions. The goal of your first hatch is not a perfect percentage. The goal is to learn a repeatable routine.
Tip: A repeatable routine beats a complicated setup. Improve one variable per hatch.
Essential Preparation Guide
Cleanliness and Setup Before You Set Eggs
Conclusion: A clean, dry incubator protects eggs and makes readings more stable.
- Wash and dry: clean removable parts, then dry fully before reassembly.
- Keep residues away: avoid harsh fumes or residues that can linger inside the chamber.
- Clean after hatch: remove shell debris promptly and sanitize before the next batch.
48-Hour Dry Run Checklist
Conclusion: Run the incubator empty first so you do not troubleshoot with eggs inside.
- Probe placement: confirm readings at egg height, not near the lid or fan outlet.
- Tool accuracy: compare two thermometers and one hygrometer before you trust any number.
- Room stability: keep the incubator away from drafts and direct sun so you avoid daily swings.
Before you load eggs, use a clean handling routine and a simple storage plan. This internal guide helps you choose and prep eggs correctly: Egg selection and handling: the key to successful hatching.
Step-by-Step Guide to Hatching Eggs with an Incubator
Incubation Baseline Settings
Conclusion: Keep one baseline and avoid frequent resets.
- Temperature: aim near 99.5°F at egg height for most forced-air incubators. Verify with a second thermometer.
- Humidity trend: hold 50–55% RH for days 1–17, then move to 65–70% RH for lockdown and hatch.
- Turning: turn consistently through day 18, then stop turning for lockdown.
Turning Eggs Properly
Turning reduces the risk of the embryo sticking and supports normal positioning. If you turn by hand, mark each egg with a pencil so you can confirm turns quickly.
Conclusion: Consistency matters more than chasing a perfect schedule.
- Minimum routine: turn at least 3 times per day through day 18.
- Better routine: 4 to 6 turns per day is easier to keep consistent if your day allows it.
- Stop on time: stop turning at day 18, then do not move eggs during lockdown.
Managing Humidity Without Over-Opening the Lid
Humidity problems are usually caused by frequent lid opening or by changing too many things at once. Use a simple stage plan, then confirm with air cell size checks during candling.
Conclusion: Humidity works when it is stable and verified.
- Early to mid-run: keep 50–55% RH and keep checks brief.
- Lockdown: move to 65–70% RH and avoid opening once pipping begins.
- Verification: use air cell size during candling to confirm your trend.
Candling Eggs to Check Progress
Candling is useful when it is fast and scheduled. The goal is to remove non-viable eggs early and confirm development without turning incubation into daily handling.
Conclusion: Two candling sessions are enough for most beginners.
- Day 7: look for veins and a developing embryo. Remove clear eggs.
- Day 14: confirm growth and a clear air cell. Remove blood-ring eggs.
- After day 14: reduce handling and keep lid openings short.
Lockdown Phase and Hatch Day Guide
What Lockdown Means
Lockdown is the last three days before hatch. You stop turning, raise humidity, and keep the incubator closed so membranes do not dry and trap chicks.
Conclusion: Lockdown success comes from not interfering.
- Stop turning: stop at day 18 and keep eggs stable.
- Raise humidity: move toward 65–70% RH.
- Keep it closed: avoid opening once pipping begins.
For a dedicated lockdown walkthrough, read: Egg incubation lockdown: how to prepare eggs for successful hatching.
Hatch Day Tips
Conclusion: Most hatch day problems are caused by low humidity from lid openings.
- Watch through the window: observe without opening.
- Give time: a chick can take many hours from first pip to fully hatch.
- Only intervene with a plan: if you assist, document what you did and why so you learn from it.
Common Pitfalls and How to Avoid Them
Conclusion: Avoiding mistakes is mostly about repeatability.
- Probe errors: place sensors at egg height and verify with a second thermometer.
- Over-checking: schedule candling, then stop “just looking.”
- Too many changes: change one variable, then observe for a full day before changing again.
Top 10 practical pitfalls checklist:
- Probe not at egg height.
- Thermometer or hygrometer never checked for accuracy.
- Lid opened frequently for curiosity.
- Humidity adjusted by guessing instead of air cell checks.
- Turning missed or turning continued into lockdown.
- Eggs loaded without marking or batch organization.
- Incubator placed near drafts or direct sun.
- Eggs mixed from different start dates without tracking.
- Incubator opened during pipping and hatch.
- No notes taken, so each hatch repeats the same mistakes.
Learning from a Failed Hatch
If a hatch fails, the most useful outcome is a clear record of what happened. Instead of a large table, use three buckets that guide your next change.
Conclusion: Sort failures by stage, then change one variable.
- No development: likely fertility, storage, or shipping damage issues. Improve egg sourcing and storage routine.
- Mid-term loss: often linked to repeated drift, inconsistent turning, or ventilation issues. Focus on stability and routine.
- Late loss and pip issues: commonly linked to lockdown humidity drops or opening during hatch. Keep it closed and stabilize late humidity.
If you want a deeper troubleshooting reference for hatch failures, use this internal table-style guide: Chicken egg incubation troubleshooting master table.
Daily Record Template
Copy and paste this one-line log:
- Date and day:
- Egg-height temp:
- Humidity trend: morning and evening
- Turning: manual turns completed or auto turn confirmed
- Lid openings: how many and why
- Candling notes: day 7, day 14 only
Quick reference: Set a stable baseline, turn consistently until day 18, candle day 7 and day 14, then keep the incubator closed through lockdown and hatch.
Conclusion: This is the simplest plan that stays realistic for beginners.
- Temperature: about 99.5°F at egg height for most forced-air incubators.
- Humidity: 50–55% RH for days 1–17, then 65–70% RH for days 18–21.
- Turning: 3 to 6 turns per day until day 18, then stop turning for lockdown.
FAQ
How long does it take to hatch chicken eggs in an incubator?
Chicken eggs commonly hatch in about 21 days. Turn through day 18, then stop turning and follow lockdown through hatch.
Can you open the incubator during hatching?
Avoid opening during lockdown and hatch. Opening drops humidity and increases the risk of chicks getting stuck during hatch.
What should you do if the power goes out during incubation?
Keep the lid closed to hold heat and humidity. When power returns, confirm egg-height temperature and write down what happened so you can interpret results accurately.
How do you know if an egg is developing properly?
Candle on day 7 and day 14. Look for veins and growth, and remove clear or blood-ring eggs early.
Data authenticity note: This guide is based on practical at-home incubation workflows for chicken eggs. Results vary with egg fertility, storage and shipping conditions, incubator airflow design, sensor placement at egg height, room temperature swings, cleanliness, and how often the lid is opened. For best learning, change one variable at a time and keep a simple daily log.


0 Comments