
You want the best chance for your call duck hatching project. This step by step guide helps you feel confident when air-cell assisted hatching becomes necessary. Remember, always check temperature, humidity, and egg position first. Most duck hatching attempts go smoothly with the right care. Under ideal conditions, some people see 81–83% hatch rates with their eggs. You may notice that call ducks sometimes need help, but with the right method, air-cell assistance can be safe. Keep your eggs in the right environment, watch them closely, and know when to act.
Quick Take: Call duck hatching works best when you monitor eggs daily and respond only if you see delays or distress.
Key Takeaways
-
Check your call duck eggs every day. Watch for signs like loud peeping or no movement. Only help if you clearly see they need it.
-
Keep the right temperature and humidity during incubation. Set the temperature at 99.5°F for the first 25 days. Lower it to 98.5°F when hatching starts.
-
Use candling to watch egg growth. Candle your eggs on days 4, 7, 14, and 21. This helps you find problems early and check the air cell.
-
Be careful if you help with hatching. If you see blood or bad smells, stop right away. Put the egg back in the incubator. Always keep the duckling safe.
-
Give gentle care after hatching. Keep ducklings warm and dry. Watch their health closely. Make sure they have shallow water to help them drink.
Call Duck Hatching: When to Assist
Signs a Duckling Needs Help
You want to know when your duck hatching project needs a little help. Most call duck hatching attempts go well if you keep eggs at the right temperature and humidity. Sometimes, though, you notice signs that a duckling is struggling. Look for these common indicators:
|
Indicator Description |
Action Needed |
|---|---|
|
More than 24 hours since internal pip without external pip |
Assist |
|
Duckling has pipped on the small end |
Might need to assist |
|
Duckling is malpositioned |
Might need to assist |
|
Duckling is trapped in its membrane |
Assist |
|
Duckling has stopped moving and peeping |
Investigate (not always assist) |
|
Duckling started zipping but didn’t finish |
Might need to assist |
If you see a duckling stuck in its membrane, you may have a shrink wrap duckling. This happens when the membrane dries out and traps the duckling. You should act quickly in these cases. For other signs, like a duckling pipping on the small end or showing no progress after internal pip, you might need to help, but always check the environment first.
Timing: Internal Pip and Delays
Timing matters in duck hatching. Call duck eggs usually start hatching around day 26. Sometimes, you notice that internal pip happens, but there is no progress for over 24 hours. This is called "internal pip no progress." You should wait and watch for strong breathing or loud peeping. If you see these signs but no external pip, consider assisted hatches. Some call duck eggs take longer than others, so patience helps. If you see delays with no movement or sound, check your incubator settings before you assist.
-
Call duck eggs often show more variability in timing than other breeds.
-
You may see a duckling peeping loudly for hours before it breaks through.
-
If you notice long delays, review your humidity and temperature settings.
Red Flags and Stop Criteria
You need to know when to stop and seek help. Some signs mean you should not continue assisted hatching. Watch for these red flags:
Bleeding is an immediate danger. If you see steady bleeding from a blood vessel, stop and treat the area. A small nick can bleed for a long time and put your duckling at risk.
-
Foul odor from the eggs
-
Green leakage or extra liquid inside the egg
-
No breathing or movement from the duckling
If you notice any of these, stop your intervention. Sometimes, too much moisture causes problems, so keep your humidity in check. When you see these warning signs, ask for advice from someone with experience. This helps you protect your duck hatching project and aim for improved hatch rates and successful hatching.
Prep & Safety for Collecting Call Duck Eggs
Collecting Call Duck Eggs
When you start collecting call duck eggs, you want to use best practices for collecting to keep your eggs healthy. Always choose fertilized eggs and avoid washing them. The natural bloom protects the shell and helps with maintaining egg quality. You should store collected call duck eggs in a cool, dry place. Place the pointy end down and let them rest for 7-10 days if needed. This helps with handling call duck eggs after transport and reduces stress on the embryos. Wash your hands before and after handling call duck eggs to prevent contamination. Dropping eggs can ruin your duck hatching plans, so handle them gently. Storing call duck eggs properly is key for call duck incubation success.
Tip: Candle your eggs on days 4, 7, 14, and 21. This lets you check development and spot any problems early.
Incubation: Temperature & Humidity
Setting up an incubator is a big part of call duck incubation. You need to keep temperature steady at 99.5°F from Day 1 to Day 25. Lower it to 98.5°F from Day 26 to 28. Incubating call duck eggs works best when you monitor humidity closely. Keep humidity at 55-58% for the first 25 days. Raise it to 65% on Day 26, and then 70-80% during hatching. Turning eggs regularly for the first 25 days helps with maintaining egg quality. Stop turning during the last three days. Track weight loss during incubation. Aim for about 12–14% weight loss to make sure the air cell grows right. If you see small air cells, adjust humidity down to help with evaporation. Monitoring eggs and adjusting practices helps with successful duck hatching.
Tools & Hygiene
You need the right tools for safe air-cell assisted hatching. Gather gloves, tweezers, fine scissors, saline, and iodine. Dry paper towels help manage bleeding. A sharp screw can make a safety hole in the egg after internal pip. Coconut oil keeps the membrane moist and supports maintaining egg quality. Clean tools and hands before handling call duck eggs. Setting up an incubator with clean equipment and good hygiene practices protects your eggs and improves call duck incubation results.
Air Cell & Position Check in Duck Hatching

Candling for Air Cell Mapping
Candling is a key part of monitoring egg development during duck hatching. You want to check your eggs daily, especially as hatching time gets close. Hold each egg up to a bright light in a dark room. Look for the air cell at the blunt end. By halfway through incubation, you should see the air cell getting bigger and changing shape. This shows the egg is losing moisture at the right rate. Place your eggs on their sides with the blunt end slightly raised, about 20–30 degrees. This helps the duckling move into the best position for hatching. Watch for shadows inside the air cell. These shadows mean the duckling is moving and getting ready to break through. If you see eggs with odd air cell shapes or the air cell floating, you need to pay extra attention. Misaligned air cells can make hatching harder, so keep monitoring and adjust temperature and humidity if needed.
Tip: Daily candling helps you spot problems early and supports safe assisted hatch steps.
Marking Beak and Blood Vessels
When you see movement in the air cell, you can start marking the beak start air cell spot. Use a pencil to gently mark where you see the duckling’s beak pressing against the membrane. This helps you know where to assist if needed. Next, look for blood vessels. These show up as red lines near the air cell edge. Mark these areas so you avoid them during any safe assisted hatch steps. If you notice eggs with detached or misaligned air cells, handle them with care. These eggs may have the beak in the wrong spot or blood vessels in unexpected places. Keep monitoring egg development and check temperature often. If you see eggs rocking but no external pip, watch for signs of malposition. Careful marking and monitoring help you protect your duck hatching project and give each duckling the best chance.
Hatching Call Duck Eggs: Stepwise Assistance
Hatching call duck eggs can feel stressful, but you can follow a step by step guide to make the process safer. Here’s how you can use air-cell assisted hatching techniques to help your ducklings when they need it most.
Making the Air Cell Window
You want to start by making a small window in the air cell. This is the first step in hatching call duck eggs when a duckling is stuck after internal pip. Use a sterile tool, like a sharp screw or tweezers, to gently tap a hole at the top of the egg where the air cell is. Make sure you avoid any blood vessels you marked earlier. The window should be just big enough to see the membrane and the duckling’s beak.
Checklist:
-
Wash your hands and wear gloves.
-
Use only clean, sterile tools.
-
Make the window at the air cell end, not near the pointed end.
-
Avoid cracking the shell too wide at first.
After you make the window, return the egg to the incubator right away. This keeps the temperature and humidity stable. You want to keep the environment as close to natural as possible during hatching.
Monitoring Membrane & Vessels
Now, you need to watch the membrane and blood vessels closely. Shine a light through the window to check for active blood vessels. If you see red, thick vessels, the duckling is not ready for more help. Wait until the vessels shrink and turn pale.
Hatching fertilized Call Duck Eggs is a little bit more challenging than hatching other breeds of duck eggs. Call ducks sometimes need a little assistance getting out of their shell. [...] Just watch for blood vessels when doing so and make sure the eggs do not get too dried out after assistance.
Keep checking every hour or two. If you see any bleeding, stop right away and put the egg back in the incubator. Bleeding means the duckling is not ready for more hatching steps. Record what you see and what you do. This helps you learn and improve your techniques for future duck hatching.
Moisture: Saline & Coconut Oil
The membrane can dry out fast, especially after you open the shell. You want to keep it moist so the duckling does not get stuck. Use sterile saline or warm water to gently dab the membrane. You can also use a little coconut oil to keep the membrane soft. Do not soak the egg. Just keep the membrane damp, not wet.
Tip:
If you see the membrane turning white or papery, add a drop of saline. This helps prevent shrink-wrapping and supports safe assisted hatch steps.
Keep the humidity in your incubator high—at least 70%. This helps the membrane stay moist and makes hatching call duck eggs easier for the duckling.
Widening the Window
When the blood vessels have faded and the membrane looks clear, you can make the window a little bigger. Use your sterile tool to gently chip away more shell along the edge of the air cell. Always work away from any remaining vessels. Never pull on the membrane or the duckling. If you see the yolk sac is not absorbed, stop and wait.
Step-by-step:
-
Check the membrane for vessels and yolk sac.
-
If vessels remain, pause and return the egg to the incubator.
-
If vessels are gone and the yolk is absorbed, gently widen the window.
-
Keep the membrane moist with saline.
-
Watch for any signs of distress or bleeding.
Return the egg to the incubator after each step. This keeps the temperature and humidity steady and gives the duckling time to finish hatching on its own.
Pause or Continue?
You need to decide if you should keep helping or wait. Use this decision box to guide you:
|
Situation |
Action |
|---|---|
|
Blood vessels still visible |
Pause, return to incubator |
|
Membrane dry or white |
Add saline, monitor |
|
Yolk sac not absorbed |
Pause, wait |
|
No bleeding, vessels gone, yolk in |
Continue, widen window |
|
Bleeding starts |
Stop, return to incubator |
If you ever feel unsure, pause and let the duckling rest. Hatching call duck eggs takes patience and careful monitoring. You want to give the duckling every chance to finish hatching on its own. Only step in when you see clear signs that help is needed.
Keep the humidity and temperature steady. Write down each action you take. This helps you learn and gives you a record for your next call duck assisted hatching. With these techniques, you can support your ducklings through duck hatching day 27 and beyond.
Aftercare for Call Ducklings
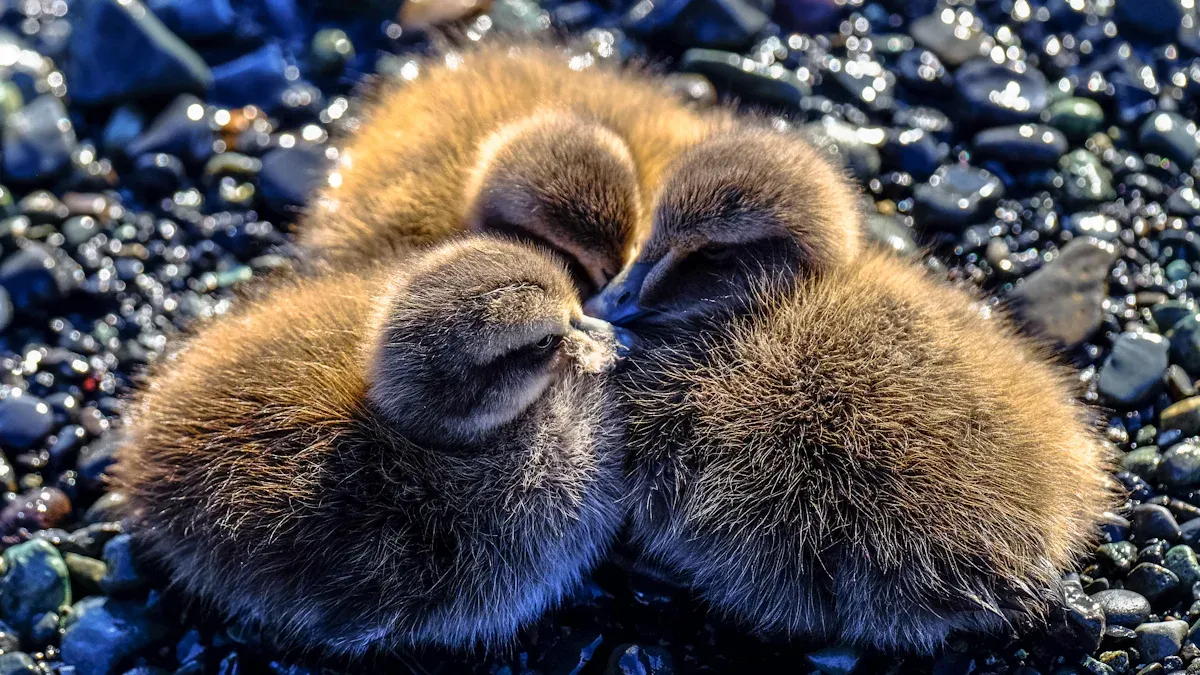
Drying & Warming
Once your ducklings finish hatching, you want to help them dry and warm up quickly. Place them under a heat lamp set to about 90°F. This temperature keeps them comfortable right after hatching. Each day, lower the temperature by about one degree. By the end of the first week, aim for 83°F. As the weeks go by, keep reducing the heat. At the end of week two, 76°F works well. By week three, 69°F is usually enough. Watch your ducklings closely. If they huddle together and peep loudly, they need more warmth. If they spread out and pant with open mouths, the area is too hot. Adjust the lamp as needed to keep them happy and safe after transferring to brooders.
Navel & First 24 Hours
During the first 24 hours, focus on gentle post-hatch care. Check each duckling’s navel for any signs of bleeding or swelling. Sometimes, a bit of yolk may not absorb right away. If you see this, avoid pulling or touching it. Wait for advice before taking action. Keep the brooder and ducklings clean to prevent infection. Dip each duckling’s beak in water to encourage drinking, but only offer water at first. Avoid giving food until they are fully dry and alert. If a duckling looks sleepy with squinty eyes, it may need to drink more. Make sure the water dish is shallow so they cannot get chilled. Transferring to brooders with proper humidity and warmth supports healthy recovery.
Monitoring for Issues
Keep an eye out for health considerations during the first day. Watch for signs like sticky amber fluid on the duckling, cloudy or red eyes, or a navel that smells bad. These can signal problems. If you notice bloody or mucous-filled droppings, fluffed-up posture, or a duckling that refuses to eat or drink, seek help. Other warning signs include rapid weight loss, labored breathing, or eyes that swell shut. If a duckling cannot stand or walk, or if you see foul-smelling discharge, contact a vet. Early attention to these health considerations gives your ducklings the best chance for a strong start after duck hatching. Good post-hatch care helps you spot issues early and support each duckling’s growth from eggs to healthy birds.
You need to be patient when hatching ducks. Watch your eggs closely every day. Only help if you see clear signs that help is needed. Following each step makes hatching more likely to work. Turning eggs at a 75° angle for the first 15 days helps ducklings grow best and hatch well:
|
Egg Turning Angle |
Late Embryo Mortality (%) |
Hatchability (%) |
Growth Performance |
|---|---|---|---|
|
75° (first 15 d) |
3.88 ± 0.47 |
96.58 ± 0.68 |
Highest |
You can learn more about call duck hatching by doing activities. Try candling eggs, watching videos, and doing simple experiments:
|
Day |
Activity Description |
|---|---|
|
2 |
Candle eggs, write down what you see, talk about which eggs are best for incubating. |
|
5 |
Watch a video about how embryos grow, talk about important steps in development. |
Keep asking questions and try to get better at hatching. Each egg teaches you something new. With more practice, you will get better and enjoy hatching even more.
FAQ
How do I know when to help with call duck assisted hatching?
You should watch for signs like loud peeping, long internal pip no progress, or a shrink wrap duckling. If your eggs show no movement or the duckling seems stuck, you may need to assist. Always check temperature and humidity first.
What should I do if my duckling pips but does not hatch?
If you see internal pip no progress for over 24 hours, check your eggs for breathing and movement. Keep humidity high. You can make a small air cell window to help, but wait for blood vessels to fade before widening it.
Why do call duck eggs sometimes need more help than other breeds?
Call duck eggs are smaller and have thicker shells. Ducklings may struggle to break through, especially if the air cell is misaligned. Careful monitoring and gentle assisted hatching steps can help your ducklings hatch safely.
How can I prevent shrink wrap duckling during hatching?
You can keep the membrane moist by using saline or coconut oil. Make sure your eggs stay in a humid incubator. If you notice the membrane drying out, add moisture right away to help the duckling finish hatching.
Is it safe to assist ducklings if I see bleeding?
If you see steady bleeding from your eggs, stop assisted hatching immediately. Return the egg to the incubator and let the duckling rest. Bleeding means the duckling is not ready. Wait until blood vessels fade before you continue.


0 Comments