
To hatch button quail eggs, use the right species. Choose Blue-Breasted or King Quail, not Turnicidae. Set the temperature to 99.5°F (37.5°C). Keep humidity between 45% and 55% until day 13. On day 13, raise humidity to 65–75% for lockdown. Turn the eggs 3 to 5 times each day. Stop turning eggs on day 13. Keep the temperature steady. Do not open the incubator lid a lot. If you keep good temperature and humidity, about 75–80% of eggs will hatch. These steps help beginners hatch healthy quail.
Key Takeaways
-
Pick the right species for incubation. Blue-Breasted or King Quail work best.
-
Keep the temperature steady at 99.5°F (37.5°C). Keep humidity between 45% and 55% until day 13. Raise humidity to 65–75% for lockdown.
-
Turn the eggs 3 to 5 times each day until day 13. Stop turning the eggs on day 13 to get ready for hatching.
-
Store eggs the right way before incubation. Keep them pointy end down at 55–60°F (15–18°C). Keep humidity at 70–75%.
-
Use checklists for every stage of incubation. Check every day to make sure temperature and humidity are correct.
Species Clarification
Button Quail vs Buttonquail
You may hear people use the name "button quail" for small pet birds. In most pet and hobby circles, "button quail" means the Blue-Breasted or King Quail (Synoicus chinensis). These birds are true quail. They belong to the same family as Japanese Quail and Northern Bobwhites. The name "buttonquail" refers to birds in the Turnicidae family. These are not true quail. Turnicidae species have different care needs and incubation rules.
Tip: Always check the scientific name before you start incubation. Synoicus chinensis is the species you want for pet or small-scale hatching.
If you mix up these species, you may set the wrong temperature or humidity. This can cause poor hatch rates or unhealthy chicks. For example, Turnicidae eggs need a different incubation period. Captive Turnicidae eggs hatch in 15–16 days. Wild Turnicidae eggs take 18–21 days. Blue-Breasted Quail eggs hatch in 16–18 days. You must use the right settings for each species.
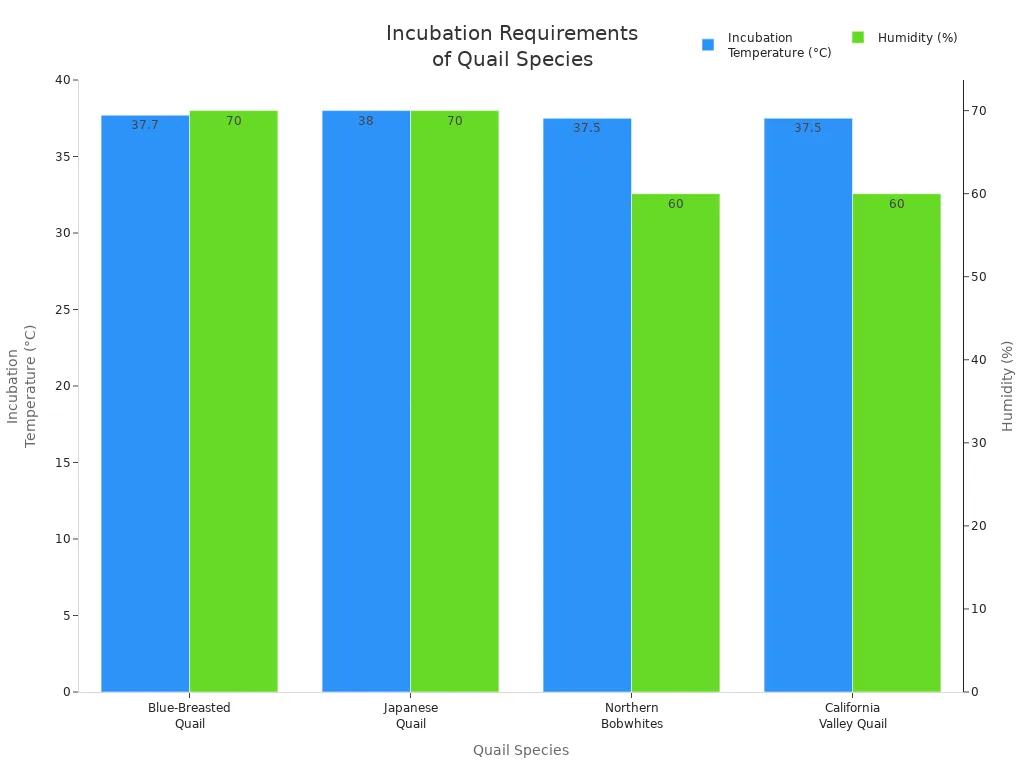
Here is a table showing the differences in incubation temperature and humidity for several quail species:
|
Species |
Incubation Temperature (°C) |
Humidity (%) |
|---|---|---|
|
37.7 |
70 |
|
|
Japanese Quail |
38 |
70 |
|
Northern Bobwhites |
37.5 |
60 |
|
California Valley Quail |
37.5 |
60 |
Blue-Breasted/King Quail
You should focus on Blue-Breasted or King Quail for your incubation project. These birds need a steady temperature of 99.5°F (37.5°C) and humidity between 45% and 55% until day 13. On day 13, raise humidity to 65–75% for lockdown. Turn the eggs 3–5 times daily. Stop turning on day 13. Place your sensor at egg height for best results. Accurate settings help you hatch healthy chicks.
If you use the right species and follow these steps, you will get reliable results. You will avoid confusion and give your button quail the best start.
Incubation Basics
Key Points for Safe and Accurate Incubation:
You can raise humidity by adding more water or a wet sponge.
Put the incubator in a room that does not get too hot or cold.
Keep it away from heaters, air conditioners, and sunlight.
Make sure the incubator sits flat so heat spreads evenly.
The temperature between trays should not change more than 1.0°F (0.6°C).
If the power goes out, keep eggs warm first, then fix the humidity slowly.
Incubator Types
There are different incubators you can use for quail eggs. Each one has special features, good points, and some downsides. The table below shows the most common choices for Blue-Breasted/King Quail:
|
Incubator Type |
Features |
Pros |
Cons |
Best For |
|---|---|---|---|---|
|
High capacity, automated controls, ideal for large-scale operations |
Consistent temperature and humidity, durable |
Higher cost, needs space, learning curve |
Experienced breeders, large coveys |
|
|
Compact, affordable, suitable for small-scale hatching |
Good for beginners, easy to use |
Limited capacity, fewer advanced features |
Beginners, small-scale breeders |
Forced-air incubators have a fan that moves air around inside. This helps keep the temperature and humidity the same everywhere. Still-air incubators do not have a fan, so the top and bottom trays can be different temperatures. Forced-air models work better for button quail because they keep things steady. This helps more eggs hatch.
Measuring Temperature & Humidity
You need to check temperature and humidity at the same height as the eggs. This helps you keep the right conditions for the quail embryos. Put your sensor at egg level inside the incubator.
-
Checking temperature at egg height keeps the heat just right for the embryos. This stops problems like chicks not growing right or dying.
-
Watching humidity at egg level helps you control how much water leaves the eggs. The right humidity lets the air cell grow, so the chick can breathe when it hatches. If humidity is too high or low, chicks may not hatch.
Keep the temperature at 99.5°F (37.5°C) and humidity between 45% and 55% until day 13. On day 13, raise humidity to 65–75% for lockdown. Always check temperature and humidity at egg height. These steps help you get the best results when hatching your quail eggs.
Pre-Incubation Steps
Storing Eggs
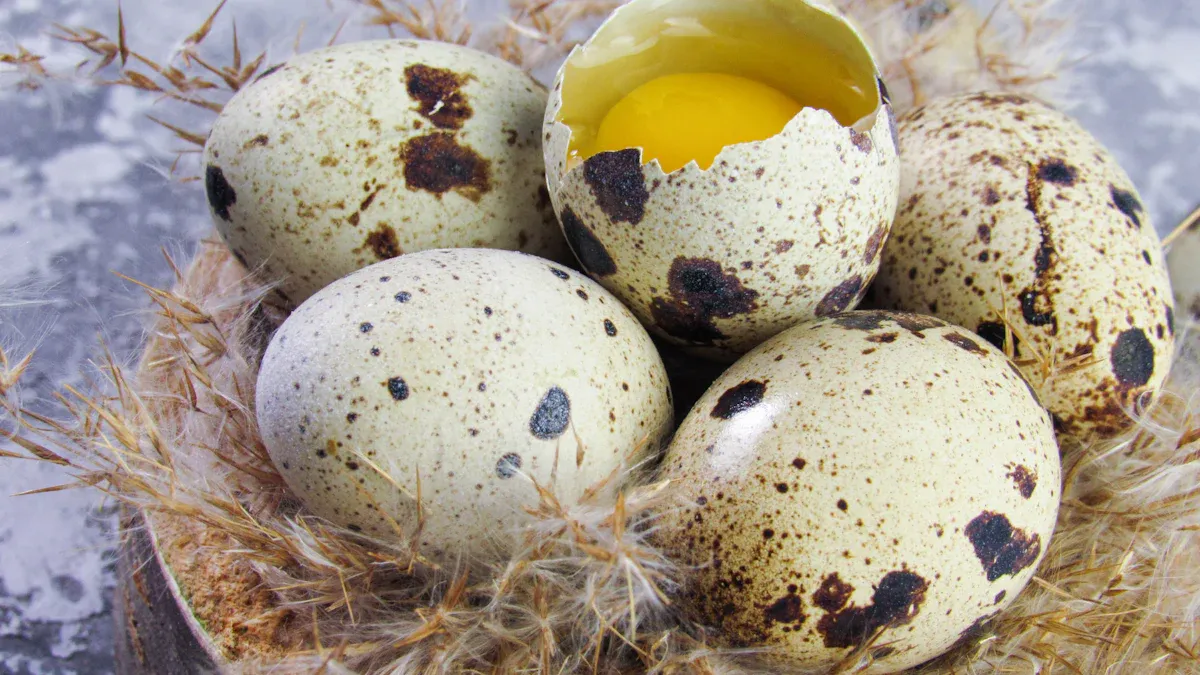
When you start with purchasing fertile hatching eggs, you need to store them correctly before incubation. Keep the eggs at a temperature between 55–60°F (15–18°C) and a relative humidity of 70–75%. Place the eggs with the pointy end down and the large end up. This position helps protect the air cell inside each egg. If you receive eggs by mail, let them rest for 12–24 hours before you prepare the eggs for incubation. This resting period allows the contents to settle and increases your chances of a successful hatch.
Tip: Store eggs in a cool, stable place. Avoid sudden temperature changes. Only let the eggs cool down once after collection and warm up once when you set them in the incubator.
-
Collect eggs daily.
-
Store eggs small end down on quail flats.
-
Set eggs within 7 days for best hatch rates.
Positioning & Resting
You should change the angle of the eggs each day during storage. This gentle movement keeps the yolk centered and prevents it from sticking to the shell. Always avoid shaking or rough handling. Resting the eggs after shipping is important. Place them in a quiet spot and let them sit undisturbed for at least 12 hours. This step helps the eggs recover from transport stress.
|
Step |
Action |
Why It Matters |
|---|---|---|
|
Positioning |
Pointy end down |
Protects air cell |
|
Angle Change |
Tilt daily |
Keeps yolk centered |
|
Resting |
12–24 hours after shipping |
Reduces transport shock |
Batch Records
Keep a simple record for each batch of eggs. Write down the date you collected or received the eggs, the number of eggs, and the date you set them in the incubator. Tracking these details helps you spot patterns and improve your hatch rates over time. You can use a notebook or a spreadsheet for this purpose.
📝 Good records help you learn from each hatch and make better choices next time.
Remember to set the eggs in the incubator within 7 days for the best results. Use a preheated incubator set to 99.5°F (37.5°C) and 45–55% humidity. Place your sensor at egg height for accurate readings. These steps help you start strong and give your quail chicks the best chance to thrive.
How to Incubate and Hatch Quail Eggs
Setting Eggs
Get your incubator ready before adding button quail eggs. Warm it up to 99.5°F first. Set humidity between 45% and 55%. Put a sensor at the same height as the eggs. This helps you check the temperature and humidity. Place eggs so they are all at the same level. Do not put eggs close to the heating part. Leave space between each egg for air to move. Good airflow helps the chicks grow and hatch.
📝 Tip: Always clean the incubator before using it. Wash trays and wipe all surfaces. This lowers the chance of germs and helps more chicks hatch.
Never stack eggs or pack them too close together. Each egg needs room for air to flow around it. This keeps heat and humidity even for all eggs. If you use a cabinet incubator, put eggs in layers but do not fill it too much. Put a sensor on each layer to check if the temperature is the same.
Egg Turning
Turning eggs is very important during incubation. You need to turn eggs 3 to 5 times every day. Turn them gently to a new angle each time. This keeps the yolk in the middle and stops the chick from sticking to the shell. Stop turning eggs on day 13. After day 13, leave eggs still so they can hatch.
How often you turn eggs changes how many will hatch. Turning more often means more chicks hatch and fewer die. The table below shows how turning eggs more or less affects hatch rates for Blue-Breasted/King Quail eggs:
|
Turning Frequency (times per day) |
Hatchability Rate (%) |
Mortality Rate (%) |
|---|---|---|
|
24 |
High |
Low |
|
12 |
Significant Loss |
Increased |
|
6 |
Significant Loss |
Increased |
|
3 |
Significant Loss |
Increased |
Try to turn eggs at least 3 to 5 times each day. Automatic incubators can help you turn eggs on time. If you turn eggs by hand, use a timer or checklist. Always wash your hands before touching eggs.
💡 Tip: Draw a mark on one side of each egg with a pencil. This helps you remember which eggs you have turned.
Temperature & Humidity
Keep the temperature and humidity steady the whole time. Set the incubator to 99.5°F (37.5°C) for all days. Keep humidity between 45% and 55% until day 13. On day 13, raise humidity to 65–75% for lockdown. This helps chicks break out of their shells.
Check temperature and humidity at egg height. Use a digital sensor for the best results. If the temperature drops or goes up, change the settings. If humidity is too low, add water or a wet sponge. If humidity is too high, let in more air or use less water.
Studies show that storing eggs at 21°C can make fewer chicks hatch. Storing eggs at 16°C helps more chicks hatch. Keeping eggs too long before setting them makes more chicks die early. For best results, set eggs within 7 days after collecting them.
Check and keep track of conditions every day. Write down temperature and humidity numbers. If you see changes, fix them right away. Good notes help you get better at hatching eggs.
📝 Note: The best temperature and humidity for button quail eggs are 99.5°F and 45–55% RH until lockdown. During lockdown, raise humidity to 65–75%. This helps chicks hatch well and gives you more healthy chicks.
If you follow these steps, about 75–80% of eggs will hatch. Keeping temperature and humidity steady helps chicks grow strong. Careful settings and gentle handling give you the best chance for success.
Candling Schedule
First Check (Day 7–9)
You should candle your eggs between day 7 and day 9. This step helps you check for fertility and early development. Hold each egg up to a bright light. Look for veins and a dark spot inside. These signs show that the embryo is growing well. If you see only a clear yolk, the egg may not be fertile.
Here is a table showing what you might see during the first candling check:
|
Day |
Signs of Development |
|---|---|
|
0 |
Yolk visible, no embryo visible |
|
2 |
Blood island formation |
|
3 |
Limb buds and heartbeat visible |
|
5 |
Increased veining and limb development |
|
7 |
Difficult to see clearly |
You want to see veins and a shadow of the embryo. If you do, keep the egg in the incubator at 99.5°F and 45–55% humidity. Place your sensor at egg height for the most accurate readings.
Second Check (Day 12–14)
You should candle again between day 12 and day 14. This check helps you find eggs that are not developing. Remove any eggs that look clear inside. These eggs do not show veins or movement. A dark appearance means a chick is growing.
-
Clear eggs show no vessels or movement.
-
Uniform glow means the egg is not viable.
-
Dark eggs suggest a developing chick.
Take out non-viable eggs to prevent bacteria from spreading. Keep the remaining eggs at the correct temperature and humidity.
Pre-Hatch Confirmation
Before hatching, confirm that you have stopped turning the eggs. Lockdown starts at day 13. Raise humidity to 65–75%. Make sure the air cell is large enough for the chick to breathe. Candle one last time to check for movement and air cell growth. Healthy chicks move inside the shell. You should see a large air cell and a dark mass.
Tip: Handle eggs gently during candling. Use a warm, quiet room to avoid chilling the embryos.
Lockdown & Hatching Quail Eggs
Lockdown Period
You start lockdown for Blue-Breasted/King quail on day 13. At this stage, you stop turning the eggs. The embryos need to settle so they can position themselves for hatching. Keep the temperature steady at 99.5°F (37.5°C). Some breeders lower the temperature to 98.5°F (36.9°C) during lockdown. This small drop can help the chicks hatch more easily. Avoid opening the incubator lid. Each time you open it, you lose heat and humidity. This can slow down hatching or harm the chicks.
Tip: Mark your calendar for day 13. This helps you remember when to stop turning and start lockdown.
Raising Humidity
During lockdown, you must raise humidity to 65–75%. This higher humidity during hatching keeps the inner shell membrane soft. Chicks can break through the shell more easily. You can add water or place a wet sponge inside the incubator. Make sure the water surface is large enough to reach the right humidity. Maintaining humidity above 50% is usually safe for quail. If you use too much water, you might see 'stuck' chicks. These chicks cannot move well because the shell becomes too slippery. Watch the humidity closely. Adjust as needed to keep it in the target range.
-
Add water trays or sponges to increase humidity.
-
Check the digital sensor at egg height.
-
Avoid letting humidity drop below 65% during hatching.
Ventilation
Good airflow is important during hatching. Chicks need fresh air to breathe as they break out of the shell. Open the incubator’s vents fully during lockdown. This lets carbon dioxide escape and brings in oxygen. Do not block the vents with water trays or sponges. If you use a cabinet incubator, make sure each layer has space for air to move. Keep the incubator in a room with stable temperature. Avoid drafts or direct sunlight.
📝 Note: Careful control of temperature, humidity, and ventilation during lockdown gives your quail the best chance to hatch strong and healthy.
Troubleshooting Incubation
Sticky Chicks
Sticky chicks can be a common problem when you hatch quail. This issue often happens if you keep humidity too high during incubation. When humidity stays above the recommended 45–55% before lockdown or goes much higher than 65–75% during lockdown, the chick cannot lose enough moisture. The extra liquid makes it hard for the chick to move and hatch. Sometimes, low temperature or not turning the eggs enough can also cause sticky chicks. Old or oversized eggs may also lead to this problem. You can prevent sticky chicks if you:
-
Keep humidity at 45–55% until day 13, then raise it to 65–75% for lockdown.
-
Set the incubator temperature to 99.5°F (37.5°C) and check it at egg height.
-
Turn eggs 3–5 times daily until day 13.
-
Use only fresh, fertile eggs for best results.
If you follow these steps, you give your quail chicks the best chance to hatch strong and healthy.
Air Cell Issues
Air cell problems can lower hatch rates in quail. The air cell forms at the large end of the egg and grows as water leaves the egg during incubation. If you store or set eggs with the sharp end up, the air cell may not form correctly. This can make it hard for chicks to breathe and hatch. Always place eggs with the pointy end down. The table below shows how egg position affects hatch rates:
|
Experiment |
Eggs Set Sharp-End-Up |
Eggs Set Normal Position |
Hatch Rate Difference |
|---|---|---|---|
|
Turkey 2016 |
300 |
300 |
12.7 – 21.0% lower |
|
Hungary 2019 |
162 |
N/A |
39 saleable chicks (sharp-end-up with in-ovo vaccination) |
Check air cell growth during candling on days 7–9 and 12–14. If the air cell is too small, lower humidity a bit. If it is too large, raise humidity. This helps your fertile quail eggs develop properly.
Temperature Fluctuations
Stable temperature is key for healthy quail incubation. Fluctuations can harm embryo growth and lower hatch rates. You can manage temperature by:
-
Keeping the incubator in a room with steady temperature and no drafts.
-
Avoiding frequent lid openings.
-
Using heat sinks, like covered jars of water, to help keep temperature steady.
-
Checking temperature at egg height and keeping it at 99.5°F (37.5°C).
If you lose power, keep the eggs warm and restore the correct temperature as soon as possible. Careful control of temperature and humidity helps you hatch more healthy quail chicks.
Checklists for Incubating and Hatching Quail Eggs
Pre-Incubation
You can set yourself up for success by following a simple checklist before you start incubation.
-
Run your incubator for 24 hours to make sure temperature and humidity stay steady. Use a separate thermometer and hygrometer at egg height for accuracy.
-
Preheat the incubator to 99.5°F (37.5°C) and set humidity to 45–55%.
-
Place a small medicine cup filled with water inside to help keep humidity stable.
-
Let shipped eggs rest with the pointed end down for at least 12–24 hours before you start.
-
Discard any cracked eggs to prevent bacteria from spreading. If you find small cracks, you can seal them with melted candle wax.
-
Record the date, number of eggs, and source in your batch log.
-
Store eggs at 55–60°F (13–16°C) and 70–75% humidity if you need to wait before setting.
Tip: Always monitor and maintain conditions closely during this stage for the best hatch rate.
Daily Checks
During incubation, you need to check your setup every day.
-
Confirm the temperature stays at 99.5°F (37.5°C).
-
Keep humidity between 45–55% until day 13.
-
Turn the eggs 3–5 times daily, or check that your automatic turner works.
-
Make sure the sensor stays at egg height for accurate readings.
-
Check water levels and refill as needed to keep humidity steady.
-
Candle eggs on days 7–9 and 12–14 to track development and remove any non-viable eggs.
-
Write down any changes or problems in your log.
Lockdown
Lockdown is the final stage before hatching. Follow these steps to help your quail hatch safely:
-
On day 13, stop turning the eggs or remove the egg turner.
-
Raise humidity to 65–75% by adding water or a wet sponge.
-
Keep the incubator closed as much as possible until most chicks have hatched (usually day 16–17).
-
Open all vents for good airflow and oxygen.
-
Lower the temperature slightly to 98.5°F (36.9°C) if needed.
-
Watch for pipping and hatching, but avoid opening the lid unless necessary.
📝 Note: Following these checklists for incubating and hatching quail eggs helps you achieve strong results and healthy chicks.
Resources & Guides
Egg Incubator Tips
You can get better hatching results by using simple tips. Always wash your incubator before putting in eggs. Warm it up to 99.5°F before you start. Make sure humidity stays between 45% and 55% until lockdown. Put a sensor at the same height as the eggs for good readings. Use both a thermometer and a hygrometer to check the conditions. Turn the eggs 3 to 5 times each day. Stop turning them on day 13. Keep the incubator in a room where the temperature does not change much. Do not put it near windows or heaters. These steps help you make a good place for your quail eggs.
📝 Tip: Use a small tray of water or a sponge to change humidity. Add more water to make it higher, or open vents to lower it.
Cabinet Incubator Advice
A cabinet incubator lets you hatch more eggs at once. Put eggs in layers, but do not pack them too close. Each layer needs space so air can move around. Place sensors on every tray to check the temperature and humidity. Keep the temperature at 99.5°F and humidity at 45–55% until day 13. On day 13, raise humidity to 65–75% for lockdown. Open all the vents during hatching so chicks get enough air. Get a brooder ready before the chicks hatch. Cabinet incubators are good for people who want to hatch many eggs at the same time.
|
Step |
Action |
|---|---|
|
Preheat |
99.5°F, 45–55% humidity |
|
Layer Loading |
Avoid overcrowding |
|
Sensor Placement |
At egg height on each tray |
|
Lockdown |
Raise humidity to 65–75% |
|
Ventilation |
Open vents fully |
Incubation Guides
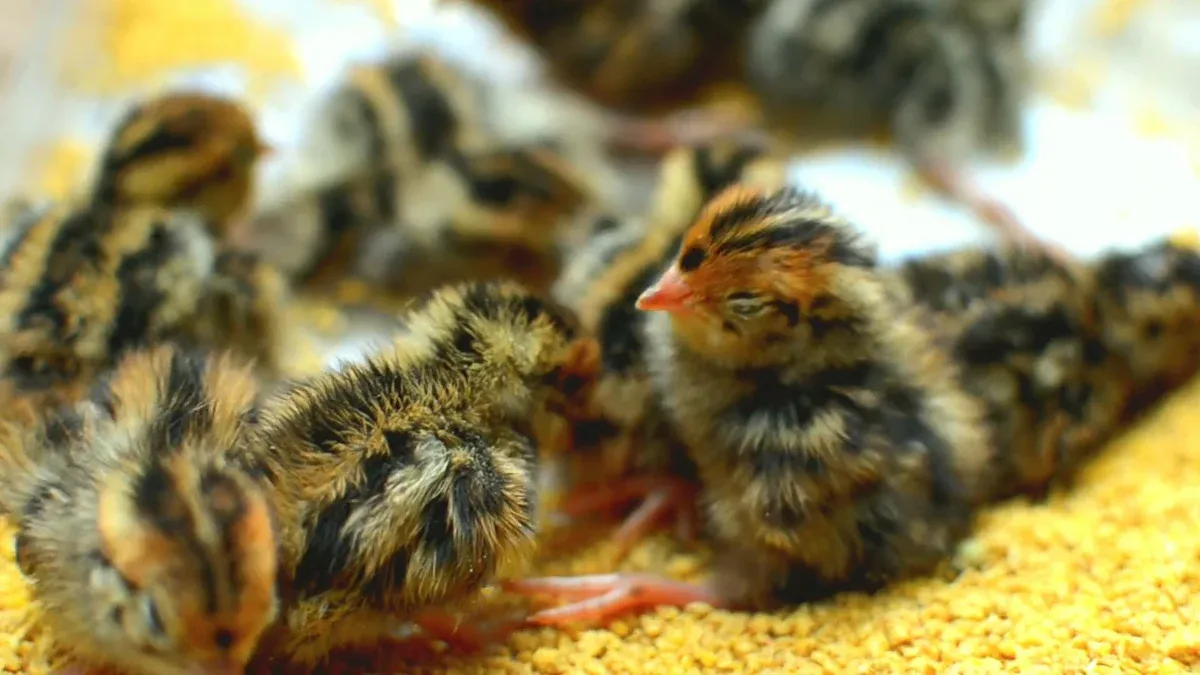
You can find helpful guides online for every step of incubation. These guides show how to set up the incubator, collect and store eggs, and place eggs the right way. They tell you how to watch temperature and humidity, turn eggs, candle eggs, and get ready for hatching. Most guides say to use a thermometer, hygrometer, egg turner, and candler. They explain how to set the right temperature and humidity, and how to care for chicks after they hatch. You can learn about the timeline, which is usually 16–18 days for Blue-Breasted quail. Keeping temperature and humidity steady helps you get healthy chicks.
📚 For more information, look for resources about egg incubators, poultry incubators, cabinet incubators, and step-by-step incubation guides.
You can achieve reliable button quail hatching by following these steps:
-
Gather an incubator, thermometer, hygrometer, and fresh quail eggs.
-
Preheat the incubator to 99.5°F (37.5°C) and set humidity to 45–55%.
-
Place eggs pointy side down, use a sensor at egg height, and turn eggs 3–5 times daily.
-
On day 13, stop turning and raise humidity to 65–75% for the final process.
-
Handle eggs gently and avoid opening the incubator during hatch.
Accurate incubation and careful handling help you get healthy chicks. Use the checklists and resources for the best results.
FAQ
What is the difference between Button quail and Buttonquail, and why does it matter for incubation?
Button quail are true quail (Synoicus chinensis). Buttonquail belong to Turnicidae and need different incubation settings. You must use 99.5°F, 45–55% humidity, and a 16–18 day period for button quail eggs. Using the wrong settings lowers hatch rates.
What should I do if 55% humidity still causes sticky chicks?
Check egg weight loss and air cell size. If eggs lose too little weight or air cells look small, lower humidity to 45%. Increase ventilation. Sample egg weights at setting and day 13 to track moisture loss. Adjust water surface or add a sponge if needed.
When do I start lockdown, and how do I change turning and humidity?
Begin lockdown on day 13. Stop turning eggs. Raise humidity to 65–75%. Keep temperature at 99.5°F. Open vents for airflow. Do not open the lid often. These steps help chicks hatch safely.
How can I judge development in thick-shelled or speckled eggs?
Use a strong candler in a dark room. Look for movement, veins, or air cell growth. If you cannot see inside, weigh eggs at setting and day 13. Compare weight loss to expected values. Healthy eggs lose about 12–14% of their starting weight.
Why should I place sensors at egg height during incubation?
Sensors at egg height give you the most accurate readings for temperature and humidity. This helps you keep conditions steady at 99.5°F and 45–55% humidity. Accurate sensor placement improves hatch rates for button quail.


0 Comments