
You want more chicks to hatch. You wonder why your quail egg incubation fails sometimes. For a complete step-by-step overview from egg to hatch, see our Ultimate Quail Incubation Guide. Choosing eggs from a healthy, well-fed breeding flock and storing them correctly makes a big difference. Avoid odd shapes, dirty shells, and over-aged eggs to give embryos the best start.
Key Takeaways
-
Pick quail eggs around 10–14 grams (typical coturnix range) and normal oval shape. Discard cracked, very dirty, jumbo or tiny eggs.
-
For best hatchability, set within 7 days of lay; 7–10 days is acceptable with mild decline; after 14 days the drop becomes pronounced.
-
Storage: keep at 50–60°F (10–16°C) with roughly 70–80% relative humidity, small end down, and gentle turning if stored more than a few days.
Why Selection and Storage Matter
Impact on Quail Egg Incubation
Hatch rates often rise or fall based on pre-incubation handling. Correct selection and storage preserve albumen integrity, stabilize the air cell, and reduce early embryo loss.
-
Egg size & shape: very small or jumbo eggs and extreme shapes tend to hatch less reliably than mid-sized, normally shaped eggs.
-
Storage time: prolonged storage increases albumen thinning and air-cell growth, elevating early embryonic losses.
-
Moisture & CO2 balance: excess dehydration or CO2 loss shifts albumen pH and stresses embryos.
-
Best results: set within 1–7 days after lay when possible.
Common Pitfalls to Avoid
Small mistakes compound quickly during incubation. Avoid the following to protect viability:
-
Letting eggs age beyond 14 days before setting (hatchability declines sharply).
-
Storing outside the 50–60°F / ~70–80% RH window for long periods.
-
Rough handling and temperature swings during transport and storage.
Tip: Treat every egg as if it contains a developing chick. Careful selection and storage are your first wins. For more options, visit our poultry incubator collection to compare models for quail, chicken, and other poultry.
Select Quail Eggs
Picking the right coturnix quail eggs matters. Follow simple selection rules to start strong.
Size and Shape Criteria
Prefer mid-sized eggs with a normal oval profile. Use this quick reference for size:
|
Size Range (grams) |
|---|
|
10 – 14 |
Avoid extremes (very small or jumbo) and obvious shape defects (too round or too pointed). Normal, consistent shapes support better hatches.
-
Extremes in size/shape correlate with more early losses.
-
Uniform, mid-sized eggs are the safest choice for beginners and classrooms.
Tip: Keep a simple caliper/scale at collection; it pays off in consistency.
Shell Quality and Cleanliness
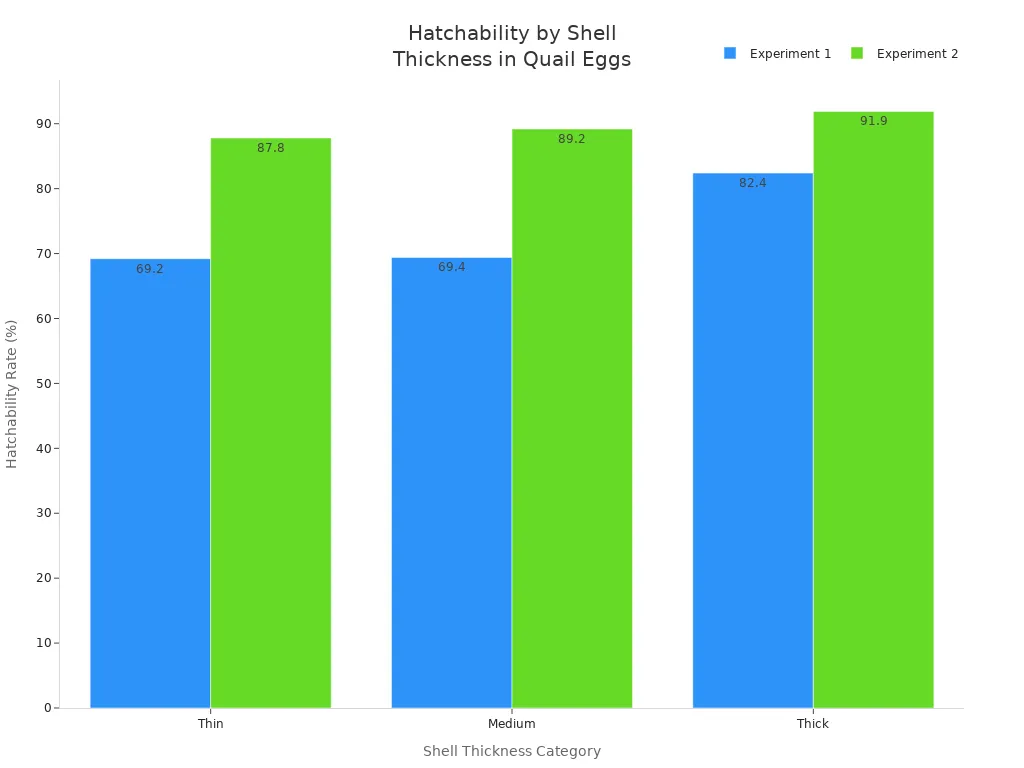
Shell integrity is critical. Favor smooth, clean shells with normal pigmentation. Avoid hairline cracks, thin spots, or rough-sanded areas.
|
Thickness Category |
Relative Hatchability (Trend) |
Notes |
|---|---|---|
|
Thin |
Lower |
Prone to cracks; more moisture loss |
|
Medium |
Moderate–Higher |
Most common, reliable choice |
|
Thick |
Higher (if normal shell quality) |
Watch for overly calcified “marble” shells |
Cleaning: avoid washing under water. Prefer dry-cleaning (soft brush or fine abrasive pad). If sanitation is necessary, use an approved egg-sanitizing method per label and avoid soaking; water should be warmer than the egg to reduce draw-in.
|
Sanitation Approach |
Guidance |
|---|---|
|
Dry clean only |
Use brush/emery to remove debris; avoid wet washing |
|
Labeled egg sanitizer |
Follow product directions; brief contact; water warmer than egg |
|
Avoid home remedies |
Unproven (e.g., spices/herbal rinses) and may harm the cuticle |
Note: Discard cracked or heavily soiled eggs to reduce bacterial risk.
Age and Freshness
Fresher is better. Aim to set within 7 days for peak results.
-
0–7 days: best hatch potential.
-
7–10 days: acceptable with mild decline.
-
>14 days: marked drop in viability; use only if necessary.
Collect at least twice daily in warm seasons to reduce heat stress and contamination.
Fertile vs. Infertile Eggs
You cannot reliably confirm fertility before incubation. After setting, candle around day 7–10 to look for veins and embryo development. Remove clears (no development) to prevent spoilage.
-
Candling is for development checks, not pre-incubation fertility proof.
-
Balanced breeder nutrition and proper male-to-female ratios drive fertility.
|
Trait |
Fertile Eggs (after set) |
Infertile Eggs |
Early Embryonic Loss |
|---|---|---|---|
|
Hatchability |
Higher (visible veins) |
None (clear) |
— |
|
Candling at day 7–10 |
Embryo/veins seen |
No growth |
— |
Tip: Keep records (lay date, set date, breeder pen) to correlate outcomes.
By following these steps, you build consistency and reduce waste.
Store Quail Eggs
Get storage right by managing temperature, humidity, positioning/turning, duration, and gentle handling.
Managing Temperature and Humidity
Maintain a steady 50–60°F (10–16°C) and roughly 70–80% RH. Cooler than 50°F risks chilling and condensation on warm-up; warmer than 60°F advances development prematurely. Too dry accelerates weight loss; too wet encourages condensation and surface contamination.
-
Check room conditions with a reliable thermometer + hygrometer.
-
Stability matters as much as the target numbers.
Tip: A small insulated cabinet with water trays (for RH) can smooth swings.
Positioning and Turning Eggs
Store with the small end down to stabilize the air cell. If storage exceeds a few days, tilt/turn 1–2× daily (gentle 45° tilt is sufficient). This helps prevent the embryo from adhering to membranes. Once storage is complete, moving eggs into a reliable automatic egg incubator ensures consistent temperature and humidity for better hatch rates.
-
Pointy end down = more stable air cell.
-
Light, regular tilting helps if you must store beyond 7 days.
|
Position |
Hatchability (Trend) |
|---|---|
|
Vertical (small end down) |
Higher |
|
Horizontal + gentle turning |
High (with consistent tilt) |
Note: If using an automatic cradle, set slow periodic tilts rather than aggressive flips.
Storage Duration
Time is critical. Aim to set within a week.
-
≤7 days: best practice.
-
7–10 days: still workable; expect mild decline.
-
10–14 days: noticeable drop; compensate by optimizing incubator control.
-
>14 days: strong decline; use only if unavoidable.
Tip: Collect daily and plan regular set days to keep storage short.
Handling and Transport
Be gentle. Minimize shocks and temperature spikes. After shipping or long transport, allow eggs to rest 12–24 hours before setting.
-
Use insulated containers; monitor temperatures in transit.
-
After arrival, inspect for cracks or sweating; let eggs settle before incubation.
Tip: Clean, padded trays reduce micro-cracks from vibration.
Keep routines simple and repeatable: steady climate, correct orientation, brief storage, and careful handling.
Preparing for Incubation
Resting Eggs Before Hatching
Before setting, let stored or shipped eggs come to room temperature (≈68–75°F / 20–24°C). Place large end up during this rest. Allow 4–12 hours for locally collected eggs; 12–24 hours for shipped eggs.
-
Gradual warm-up reduces condensation and thermal shock.
-
Gentle tilts during the rest are optional; avoid vigorous turning.
Proper warm-up supports membrane integrity and embryo comfort.
Bringing to Room Temperature
Do not move cold eggs directly into a warm incubator. Rapid temperature jumps cause shell condensation, inviting bacteria and uneven starts.
Let cool eggs warm slowly before loading. Avoid visible moisture on shells.
Warm-up is especially important after refrigerated shipping lanes or winter transits.
|
Findings |
Description |
|---|---|
|
Gradual warming |
Protects albumen structure and reduces contamination risk |
|
Sudden temperature change |
Triggers condensation; associated with poorer starts |
Final Checks Before Incubation
Run this quick checklist:
-
Candle to spot cracks/air-cell abnormalities; remove defects.
-
Dry-clean shells; avoid washing. Wash hands/tools before handling.
-
Confirm incubator calibration (separate thermometer/hygrometer).
Attention to detail now prevents big losses later.
Hatching Quail Eggs: Final Tips
Incubation Setup
Place the incubator in a draft-free room away from sun and vents. Set 99.5°F (37.5°C) with 45–55% RH for the first 14 days. Arrange eggs small end down (vertical racks) or on their sides (roller/turner). Turn at least 3× daily (or use automatic turning) until day 14.
Tip: Verify temperature at egg height, not just the display.
Monitoring Progress
Check temperature and humidity daily. Candle around day 7–10 to confirm development. On day 14, stop turning (“lockdown”) and raise humidity to 65–70% RH for hatch.
-
Open the incubator only when necessary (water, removing clears).
-
Keep notes of adjustments and observations for future batches.
Consistency beats perfection: steady control and gentle handling yield healthier chicks.
You can hatch more chicks by following simple, repeatable steps from selection to storage and incubation. Use a short checklist for every batch:
|
Step |
Description |
|---|---|
|
1 |
Collect sound, clean eggs; target 10–14 g. |
|
2 |
Store at 50–60°F / ~70–80% RH; small end down; brief daily tilt if stored >3–4 days. |
|
3 |
Set within 7 days (7–10 acceptable; >14 shows decline). |
|
4 |
Pre-warm to room temperature before loading the incubator. |
|
5 |
Incubate at 99.5°F; 45–55% RH; turn until day 14. |
|
6 |
Lockdown on day 14 at 65–70% RH; avoid opening during hatch. |
Keep it clean, calm, and consistent. That’s the formula for better hatch rates.
Use a repeatable checklist and your results will become more predictable.
|
Aspect of Practice |
Importance for Long-term Success |
|---|---|
|
Genetic Selection |
Sets the ceiling for performance traits (fertility, vigor) |
|
Environmental Management |
Protects viability through stable storage and precise incubation |
FAQ
How do I know if my quail eggs are too old to hatch?
Track collection dates. Aim to set within 7 days. Past 14 days, expect a marked decline in hatchability.
Tip: Date-stamp trays and schedule regular set days.
What should I do if an egg cracks during storage?
Remove it immediately. Cracks invite bacteria and lower overall hatch success.
Can I store quail eggs in the refrigerator?
Not recommended. Household fridges are too cold and variable. Use a cool room at 50–60°F instead.
|
Storage Method |
Hatch Rate Impact |
|---|---|
|
Refrigerator |
Very Low |
|
Cool Room (50–60°F) |


0 Comments