
Incubating ducklings requires careful control of temperature and humidity. Most domestic ducks hatch in about 28 days, while Muscovy ducks need around 35 days. Set your incubator to 99.5°F if you use forced air or 101–102°F for still air, always measuring at the top of the egg. Keep humidity between 55%–60% for most of the process, then raise it to 65–70% in the last three days. Turn the eggs 4–6 times each day, but stop turning them two to three days before hatch. Success rates can reach 90% under ideal conditions, though 50–60% is more common, especially if you receive eggs by mail. Watch for common issues like high humidity in the early days, uncalibrated thermometers, or not tracking egg weight. If you want a reliable day-by-day guide to hatching, learn how to hatch duck eggs with the right incubation steps.
Key Takeaways
- Choose healthy, fertile duck eggs from a male and female pair. Fresh eggs, less than one week old, have the best chance of hatching successfully.
- Store duck eggs at 55°F to 65°F with 75% humidity. Position eggs with the pointed end down to support embryo development.
- Preheat your incubator for 24 to 48 hours before adding eggs. This ensures stable temperature and humidity for the best hatching conditions.
- Turn duck eggs 4–6 times a day to prevent embryos from sticking to the shell. Stop turning 2-3 days before hatching to allow ducklings to settle.
- Monitor temperature and humidity closely. Keep temperature at 99.5°F for forced air incubators and humidity between 55%–60% for most of the incubation period.
Selecting Hatching Eggs for Incubating Ducklings
Choosing Healthy and Fertile Duck Eggs
You want the best start for incubating ducklings. Begin your checklist by choosing eggs from healthy ducks. Make sure a male duck (drake) lives with the females so the eggs are fertile. Eggs should be less than one week old for the highest hatch rates. Older eggs lose moisture and nutrients, which lowers success. If you follow a beginners guide, you will see that flock age matters. Eggs from younger ducks (25–35 weeks) need 60% humidity. Eggs from older ducks (36–65 weeks) need more humidity, up to 70%. This difference affects the yolk and albumen, which changes how ducklings grow inside the egg.
Tip: Always ask about the age of the flock when buying hatching eggs. Add this to your checklist for better results.
Egg Appearance, Shape, and Shell Quality
Check each egg carefully before you set it in the incubator. Use this checklist to spot healthy eggs:
- No cracks or chips on the shell.
- Shell feels solid and not thin.
- Dirt is fine on duck eggs because their shells are tougher than chicken eggs.
- Eggs should not be frozen or overheated.
- Eggs must have a normal shape, not too round or too pointed.
Here is a table to help you remember what to look for:
| Characteristic | Description |
|---|---|
| Fertile | Must have a male duck (drake) with females for fertile eggs. |
| Uncracked | Eggs should be solid with no cracks. |
| Dirt is Fine | Dirt on duck eggs is less of a concern due to tougher shells. |
| Not Frozen or Too Hot | Eggs should not have been exposed to freezing or excessive heat. |
| One Week Old Max | Hatching eggs should be no more than one week old for optimal success rates. |
During candling, add to your checklist: look for blood rings or cloudy eggs. Remove any eggs with these signs to prevent problems.
Resting and Short-Term Storage After Shipping
If you order eggs online, let them rest before incubating. Place eggs with the pointed end down in a cool room (55–65°F) with about 75% humidity. This helps the eggs recover from shipping stress. Wait 4–8 hours for eggs to warm up to room temperature before setting them in the incubator. Add this step to your checklist for how to hatch duck eggs. Resting eggs reduces condensation and helps embryos start strong.
Note: Always use a checklist for every step. This keeps your process organized and improves your chances of success with incubating ducklings.
Storing Duck Eggs Before Incubation
Ideal Storage Temperature and Humidity for Duck Egg Incubation
You need to store duck eggs in the right environment before incubation. The best temperature for storing duck hatching eggs is between 55°F and 65°F (13–18°C). Humidity should stay close to 75%. Place each egg with the pointed end facing down. This position helps keep the air cell stable and supports healthy embryo development.
- Store eggs at 55°F (13°C) to 65°F (18°C)
- Keep humidity near 75%
- Always set eggs with the pointed end down
If you keep eggs at higher temperatures, embryos may not survive. Lower temperatures help preserve the eggs’ vitality. You can store eggs for up to 10 days without a big drop in hatch rates. After 10 days, hatchability starts to decline. If you store eggs for 14 days, you may see more embryo deaths and fewer ducklings hatching.
Tip: Write down the date you collect each egg. This helps you track freshness and improves your incubating ducklings step by step process.
Resting Eggs After Transport
Eggs shipped by mail or moved long distances need time to rest. Let the eggs sit in a cool room for several hours before incubation. This resting period allows the contents to settle and reduces stress from transport. Place eggs with the pointed end down during this time.
| Step | Action |
|---|---|
| After arrival | Rest eggs 4–8 hours |
| Room conditions | 55–65°F, 75% humidity |
| Position | Pointed end down |
Resting eggs helps prevent condensation when you move them to a warm incubator. This step supports embryo health and increases your chances of a successful hatch.
Warming Eggs to Room Temperature Before Setting
Before you set duck eggs in the incubator, let them warm up to room temperature. Cold eggs placed directly into a warm, humid incubator can develop condensation. This moisture may lead to shell problems or bacterial growth. Allow eggs to reach room temperature over 4–8 hours.
You can check the eggs by gently touching the shell. If the shell feels cool, wait a bit longer. Once the eggs feel like the room air, you can start the incubation process. Careful warming helps you maintain stable duck egg temperature and humidity, which is key for healthy ducklings.
Note: Following these storing duck hatching eggs conditions gives your ducklings the best start. Each step supports embryo development and improves hatch success.
Incubator Setup for Incubating Duck Eggs
Preheating the Incubator
Before you start incubating duck eggs, you need to preheat the incubator. Turn on the incubator 24 to 48 hours before placing any eggs inside. This step helps you stabilize the temperature and humidity. You want the temperature to reach 99.5°F for forced air models or 101–102°F for still air models. Always measure at the top of the egg, not near the heating element or the wall. Let the incubator run empty during this time. Check that the turning mechanism works smoothly if your incubator has one. Preheating also gives you time to adjust humidity. Aim for 55–60% relative humidity at the start.
Tip: Preheating helps you spot any problems with the incubator before you add eggs. This step can prevent sudden drops or spikes in temperature that may harm the embryos.
Placing Thermometers and Hygrometers at Egg Height
You need to know the real conditions inside the incubator. Place your thermometer and hygrometer at the same height as the eggs. For still‑air temperature checks, read at the top of the egg; for general sensor placement, set probes at egg height in the center. This position gives you the most accurate reading of the environment the embryos will experience. Avoid placing sensors near the heating element or the incubator walls. These spots can show false readings.
- Use at least one thermometer and one hygrometer.
- Check both devices daily.
- Calibrate your tools before use to ensure accuracy.
A table can help you remember where to place your sensors:
| Device | Placement | Purpose |
|---|---|---|
| Thermometer | Egg height, center | Measures true egg temperature |
| Hygrometer | Egg height, center | Tracks humidity near embryos |
Note: Accurate readings help you maintain the right duck egg temperature and humidity for healthy development.
Choosing the Best Location for Your Incubator
Where you put your incubator matters. Choose a sturdy table away from direct sunlight, windows, or heat sources. Sunlight and drafts can cause temperature swings. Place the incubator in a room with stable temperatures, ideally between 68°F and 75°F. Avoid kitchens or garages, which often have big temperature changes.
Follow these steps for the best results:
- Find a flat, stable surface.
- Keep the incubator away from vents and doors.
- Make sure the area is easy to clean.
"Place the incubator on a sturdy table away from direct sunlight or heat sources to maintain consistent temperatures."
By setting up the incubator in the right spot, you help keep the environment steady. This step supports a higher hatch rate and healthier ducklings.
Setting Up Ventilation and Airflow
Ventilation plays a key role in the success of your incubator. Duck eggs need fresh air to develop strong embryos. You must balance airflow with humidity and temperature to create the best environment for incubating ducklings step by step.
Start by checking the air vents on your incubator. Most models have adjustable vents. Open them slightly during the first days of incubation. This allows enough oxygen in while keeping humidity stable. As you reach the final days—day 25 for domestic ducks or day 32 for Muscovy ducks—increase ventilation. Ducklings need more oxygen as they prepare to hatch.
Tip: Always follow the manufacturer's instructions for your incubator. Each model has different vent settings.
You can use this table to guide your adjustments:
| Incubation Stage | Vent Position | Purpose |
|---|---|---|
| Early (Days 1–24/31) | Partially open | Maintain humidity, allow air |
| Lockdown (Last 3 days) | Fully open | Maximize oxygen, prevent CO₂ buildup |
When you open the vents, watch the humidity. Too much airflow can lower humidity below the recommended 65–70% during the hatch window. If you see humidity dropping, add water trays or wet sponges to your incubator. This helps keep duck egg temperature and humidity in the right range.
You should avoid opening the incubator lid often. Each time you open it, you lose heat and moisture. Rely on the vents for airflow instead. If your incubator has a fan, make sure it runs smoothly. Fans help distribute air evenly and prevent hot or cold spots.
Note: Strong ventilation supports healthy ducklings, but you must not let humidity drop too low. Adjust vents and water trays together for the best results.
By setting up ventilation and airflow correctly, you give your ducklings the oxygen they need and keep conditions stable for a successful hatch.
Core Settings for Duck Egg Incubation
Temperature Settings for Forced Air and Still Air Incubators
You need to set the right temperature for duck egg incubation. The proper temperature for hatching duck eggs depends on your incubator type. Forced air incubators use fans to move air, while still air incubators do not. Always measure temperature at egg height, away from the heating element and walls.
Here is a table to help you remember the settings:
| Incubator Type | Optimal Temperature (°F) |
|---|---|
| Still Air | 101–102 (at top of egg) |
| Forced Air | 99.5 |
For forced air incubators, set the temperature to 99.5°F. For still air incubators, keep it at 101–102°F (measured at the top of the egg). You should check the temperature daily. Small changes in temperature can affect how ducklings grow and their ability to stay warm after hatching. If you use a still air incubator, watch for thermal stratification. The top of the egg may be warmer than the bottom. Place your thermometer at the same height as the eggs for the most accurate reading.
Tip: Stable temperature helps ducklings develop strong bodies and healthy organs. Always use a reliable thermometer and check it often.
Humidity Ranges and Adjustments During Incubation
Humidity plays a big role in duck egg incubation. The proper humidity for hatching duck eggs changes during the process. For most of the incubation period, keep humidity between 55%–60%. In the last three days, raise it to 65–70%. This helps ducklings hatch easily.
You can adjust humidity by adding water to the incubator or reducing ventilation. If humidity drops too low, embryos may lose too much moisture. If it gets too high, ducklings may have trouble hatching. You should watch the air cell size inside the egg. If the air cell grows too slowly, lower the humidity. If it grows too fast, increase humidity.
Here is a simple guide:
- Keep humidity at 55–60% for most of the incubation.
- Raise humidity to 65–70% for the last three days.
- Adjust water and airflow to control humidity.
- Check air cell growth during candling.
Maintaining the right humidity helps you get healthy ducklings. Small changes in humidity and temperature can change how ducklings grow and survive. You need to balance both for the best results.
Note: Use a hygrometer at egg height to track humidity. Adjust water and ventilation as needed.
Managing Water Surface Area and Airflow
You control humidity in your incubator by changing the water surface area. The amount of water surface, not the depth, affects humidity. If you want to increase humidity, add more water trays or use wet sponges. If you need to lower humidity, remove some water or use smaller trays.
- The water reservoir is the main factor for humidity.
- More surface area means higher humidity.
- Less surface area means lower humidity.
Airflow also matters. Good airflow brings fresh oxygen to the eggs and helps keep temperature and humidity even. Open vents slowly at first. Increase airflow during the last days before hatching. Strong ventilation helps ducklings breathe as they hatch, but too much airflow can lower humidity. You need to watch both water and airflow to keep duck egg temperature and humidity in the right range.
Tip: Adjust water trays and vents together. This keeps humidity stable and helps ducklings hatch safely.
Duck egg incubation works best when you manage temperature, humidity, and airflow carefully. You give ducklings the best chance to grow strong and healthy.
Egg Turning Angle and Frequency
Turning duck eggs is a key part of incubating ducklings step by step. You need to turn the eggs to keep the embryo from sticking to the shell. Turning also helps the blood vessels and membranes grow evenly. If you skip this step, the ducklings may not develop well.
Why You Must Turn Duck Eggs
Duck eggs need movement. In nature, a mother duck shifts her eggs many times each day. You must copy this action in your incubator. Turning keeps the yolk centered and helps the embryo get enough nutrients. It also stops the embryo from sticking to the shell membrane.
Tip: Turning eggs helps you get stronger, healthier ducklings.
How Often to Turn Duck Eggs
You should turn duck eggs at least 4 times every day. Many automatic incubators turn eggs once every hour. If you turn eggs by hand, try to do it in the morning, at noon, in the evening, and before bed. This routine keeps the embryo safe and growing well.
| Method | Frequency | Best Practice |
|---|---|---|
| Automatic turning | Every hour (24x/day) | Set and check the timer |
| Manual turning | 4–6 times/day | Morning, noon, evening, before bed |
If you forget to turn the eggs, the embryo may stick to the shell. This can cause weak or deformed ducklings.
The Right Angle for Turning
You should turn each egg about 45 degrees each time. Do not spin the eggs all the way around. Instead, gently roll them from side to side. This angle copies the way a mother duck moves her eggs. Too much turning or spinning can harm the embryo.
- Turn eggs 45 degrees each time.
- Roll gently, do not shake or spin.
- Keep the pointed end slightly down.
Note: Mark one side of each egg with an "X" and the other with an "O." This helps you track which eggs you have turned.
When to Stop Turning
You must stop turning duck eggs 2–3 days before they hatch. For most domestic ducks, stop turning on day 25. For Muscovy ducks, stop on day 32. This period is called "lockdown." The ducklings need to settle into hatching position. If you keep turning, you may harm the ducklings as they get ready to break out of the shell.
| Duck Type | Total Incubation Days | Stop Turning On Day |
|---|---|---|
| Domestic ducks | 28 | 25 |
| Muscovy ducks | 35 | 32 |
After you stop turning, do not open the incubator unless needed. Stable conditions help the ducklings hatch safely.
Quick Checklist for Turning Duck Eggs
- Turn eggs at least 4 times daily.
- Use a 45-degree angle for each turn.
- Mark eggs to track turning.
- Stop turning 2–3 days before hatch.
- Keep the incubator closed during lockdown.
Turning eggs the right way supports healthy development. You give your ducklings the best chance to grow strong and hatch safely. For more tips on incubating ducklings step by step, check out our duck egg incubation chart and candling fertile duck eggs guide.
Candling & Monitoring Duck Egg Development
When and How to Candle Duck Eggs
Candling lets you check the progress of your duck eggs without opening them. You can use a regular flashlight for this task. Hold the flashlight against the large end of the egg and cup your hand around the light and egg to control the beam. This helps you see inside the shell.
To candle, I just use a regular “Mag” flashlight, and cup my hand around the top of the light and the bottom of the egg to control the light beam so I can see.
You should candle your eggs several times during incubation. Most people check on day 7 and day 14 (day 21 optional). This schedule helps you spot problems early and avoid disturbing the eggs too often. Use the table below as a guide:
| Day | What to Look For |
|---|---|
| Day 7 | Look for blood vessels and a small embryo moving. |
| Day 14 | The embryo should be larger, with visible movement. |
| Day 21 | The duckling fills most of the egg; air cell is larger. |
| Day 25 (Lockdown) | Stop turning, increase humidity, and prepare for hatching. |
🚫 Remove any eggs that are clear or show no development after 10–14 days to prevent bacterial contamination.
Interpreting Signs of Development
When you candle, you want to see healthy signs inside the egg. Look for these features:
- A dark spot that shows the embryo.
- Spider-like blood vessels spreading from the embryo.
- The yolk's shadow in infertile eggs.
If you see a blood ring, this means the embryo has died. Healthy embryos show a network of blood vessels and movement. As the days pass, the embryo grows and fills more of the egg. By day 21, the duckling should take up most of the space.
- Blood rings are indicators of embryo death.
- Live embryos have a more extensive vasculature spread over the egg.
If you use a modern camera or deep learning tool, you can classify eggs as fertilized, unfertilized, or rotten. Most people find a flashlight and careful observation work well at home.
Adjusting Humidity Based on Air Cell Growth
You must watch the air cell inside each egg as you candle. The air cell grows as water leaves the egg during incubation. If the air cell is too small, your humidity is too high. If it is too large, your humidity is too low.
- Lower humidity levels during incubation are suggested to be more effective for successful hatching.
- High humidity can result in smaller air cells, which may hinder the ducklings' ability to hatch.
- Many hobbyists find lower humidity works better for duck egg incubation.
Adjust the water surface area in your incubator to control humidity. If you see slow air cell growth, reduce humidity by increasing airflow or using less water. If the air cell grows too fast, add more water to raise humidity. Checking air cell size helps you keep the right duck egg temperature and humidity for healthy development.
Minimizing Incubator Opening for Stable Conditions
You want to give your ducklings the best chance to hatch strong and healthy. One key step in incubating ducklings step by step is keeping the incubator closed as much as possible. Every time you open the lid, you let out warm air and moisture. This can cause sudden drops in duck egg temperature and humidity. Embryos need stable conditions to develop well.
During the first weeks, you may need to open the incubator for candling or turning eggs. Try to plan these tasks together. For example, candle on day 7 and day 14 when you turn the eggs. This reduces the number of times you disturb the environment. Always work quickly and gently. Place your thermometer and hygrometer at egg height so you can check readings without opening the lid.
As you reach lockdown—day 25 for domestic ducks and day 32 for Muscovy ducks—stop turning the eggs and avoid opening the incubator. Ducklings need steady warmth and high humidity (65–70% RH) to hatch safely. Opening the lid during this time can cause the shells to dry out or make it harder for ducklings to break free.
Tip: Use a clear incubator window or built-in viewing panel to monitor progress without opening the lid.
Here is a quick checklist to help you minimize incubator opening:
- Combine candling and turning tasks.
- Check sensors through the window.
- Avoid opening the lid during lockdown.
- Adjust water trays and ventilation before lockdown.
| Stage | Action | Reason |
|---|---|---|
| Early incubation | Open only for turning/candling | Maintain stable conditions |
| Lockdown | Keep lid closed | Support hatching environment |
Stable conditions help ducklings grow and hatch successfully. By limiting lid openings, you protect the delicate balance of temperature and humidity inside your incubator. For more tips, visit our duck egg incubation chart and candling fertile duck eggs guide.
Lockdown & Hatch Window for Hatching Duck Eggs
Stopping Egg Turning Before Hatch
You need to stop turning duck eggs before the ducklings begin pipping. This step helps the embryos settle into the right position for hatching. Move the eggs to a hatching area or stop hand turning. Increase humidity by adding warm water to the incubator’s water tray. Raise humidity to 65–70% during this stage. Here is what you should do:
- Stop turning eggs before pipping starts.
- Move eggs to the hatching area or stop manual turning.
- Add warm water to the incubator to boost humidity.
Duck eggs for domestic breeds reach lockdown on day 25. Muscovy duck eggs reach lockdown on day 32. This timing supports healthy hatching methods and improves your chances when you hatch duck eggs.
Adding Non-Slip Liner for Hatching Ducklings
Place a non-slip liner in the hatching area. This liner helps ducklings stay stable as they hatch. You can see benefits in temperature consistency and humidity control. The liner also keeps eggs organized, which may help with pipping and zipping. Review these observations:
| User | Observation |
|---|---|
| Accidental Farm | Noticed that using a non-slip liner helped maintain constant temperatures and improved humidity levels. |
| JillsChicks | Found that the non-slip liner allowed for better organization of eggs, which may contribute to stability. |
| Accidental Farm | Surprised by the effect of the liner on temperature consistency, indicating its potential benefits. |
A non-slip liner supports ducklings as they begin zipping and moving around. This simple step can make hatching duck eggs easier and safer.
Increasing Humidity for the Hatch Window
Raise humidity in the incubator during the hatch window. Higher humidity helps ducklings pip and zip through the shell. You can see how different humidity levels affect hatching methods and outcomes:
| Humidity Level (%) | Egg Weight Loss | Embryonic Mortality | Hatchability | Duckling Weight at Hatching |
|---|---|---|---|---|
| 60 | Decreased | Lowest | Best | Highest |
| 65 | Decreased | Moderate | Good | High |
| 70 | Decreased | Higher | Acceptable | Moderate |
Adjust ventilation to manage carbon dioxide levels. Good ventilation during the hatch window leads to better hatching rates and healthier ducklings. You support strong pipping and zipping when you keep humidity and airflow balanced. These hatching methods help you learn how to hatch duck eggs successfully.
Boosting Ventilation and Limiting Lid Opening
When you reach the final days of hatching, you need to boost ventilation in your incubator. Ducklings use more oxygen as they prepare to break out of their shells. Strong airflow helps them breathe and supports a safe hatching process. Most incubators have adjustable vents. You should open these vents wider during lockdown—day 25 for domestic ducks and day 32 for Muscovy ducks. This step keeps carbon dioxide from building up and helps ducklings hatch successfully.
You must also limit how often you open the incubator lid. Every time you lift the lid, you lose heat and moisture. Duck egg temperature and humidity can drop quickly, which may slow down hatching or cause problems for the ducklings. Try to plan all tasks, like adding water or checking sensors, before lockdown begins. After you stop turning the eggs, keep the lid closed as much as possible.
Tip: Use a viewing window or built-in panel to watch your ducklings without opening the incubator.
Here is a simple checklist for boosting ventilation and limiting lid opening:
- Open air vents fully during the last three days of hatching.
- Check humidity levels. Add water trays or wet sponges if needed.
- Avoid opening the lid after lockdown starts.
- Monitor ducklings through a window or panel.
| Action | Why It Matters |
|---|---|
| Open vents fully | Increases oxygen for hatching ducklings |
| Add water trays | Maintains high humidity for hatching |
| Keep lid closed | Prevents drops in temperature/humidity |
| Use viewing window | Lets you observe without disturbance |
You give your ducklings the best chance to hatch strong when you balance airflow and humidity. Careful ventilation and a closed lid help you create the ideal environment for hatching duck eggs.
Troubleshooting Duck Egg Incubation
Early or Late Hatching Issues
You may notice that ducklings hatch earlier or later than expected. Early hatching often happens when the incubator runs too hot. High temperatures can speed up development, but ducklings may hatch weak or with deformities. Late hatching usually points to low temperatures or old eggs. If you store eggs too long or keep them too cool, ducklings may take extra days to hatch. Sometimes, chilling eggs during transfer or turning eggs too long can also delay hatching.
- High incubator temperature causes early hatching and weak ducklings.
- Low temperature or old eggs lead to late hatching.
- Chilling eggs during transfer can delay hatching.
- Turning eggs too long or moving them late may cause late hatching.
Check your incubator settings often. Keep the temperature at 99.5°F for forced air models. For still air incubators, use 101–102°F measured at the top of the egg. Track the age and storage conditions of your eggs to avoid problems with hatching duck eggs.
Small or Large Air Cells in Duck Eggs
Air cell size tells you if humidity is right during incubation. Small air cells mean humidity is too high. Large air cells show humidity is too low. You can fix air cell problems by adjusting your incubator.
- Lower humidity toward ~50–55% for the first 18 days if air cells are too small.
- Keep temperature steady at 99.5°F.
- Know the moisture loss rate for your duck eggs.
- Position eggs correctly in the incubator.
- Turn eggs at least three times a day if you do not use an automatic turner.
Candling eggs helps you watch air cell growth. Adjust humidity by adding or removing water trays. Good air cell size supports healthy hatching.
Sticky Ducklings and Shell Problems
Sticky ducklings struggle to break free from their shells. This problem often comes from low humidity or poor shell quality during hatching. You can help ducklings by keeping humidity high in the incubator, especially during the last three days. If you see sticky areas on a duckling’s head or neck, gently clean them with a q-tip and water. Do not let water enter the shell. After hatching, bathe the duckling in warm water to remove any leftover stickiness. Make sure the yolk is absorbed by keeping the egg in a humid environment.
- Check ducklings for sticky spots during hatching.
- Clean sticky areas with a q-tip and water.
- Keep humidity high to prevent drying out.
- Bathe ducklings in warm water after hatching.
If you notice shell problems, review your humidity and ventilation settings. Increase humidity by adding water trays or sponges. Decrease humidity by removing water and improving airflow. Stable duck egg temperature and humidity help you avoid sticky ducklings and shell issues.
Adjusting for Temperature or Humidity Problems
You may face problems with temperature or humidity during duck egg incubation. Quick action helps you protect the embryos and improve your hatch results. Here is how you can spot and fix common issues:
1. Checking for Problems
- Use a thermometer and hygrometer at egg height. This gives you the true duck egg temperature and humidity.
- Candle your eggs on day 7 and day 14. Look for slow air cell growth (humidity too high) or fast air cell growth (humidity too low).
- Watch for early or late hatching. Early hatching often means the incubator runs too hot. Late hatching may mean low temperature or old eggs.
2. Fixing Temperature Issues
- If the temperature drops below 99.5°F (forced air) or 101–102°F (still air, measured at the top of the egg), adjust the incubator setting right away.
- Place the incubator in a room with stable temperature. Avoid windows, vents, and direct sunlight.
- Preheat the incubator for 24–48 hours before setting eggs. This step helps you keep the temperature steady.
3. Fixing Humidity Issues
- Keep humidity at 55–60% for most of the incubation. Raise it to 65–70% during the last three days (lockdown: day 25 for domestic ducks, day 32 for Muscovy).
- To increase humidity, add more water trays or place wet sponges inside the incubator.
- To lower humidity, remove some water or open the vents for better airflow. Do not let humidity drop too much during lockdown.
Quick Reference Table
| Problem | What to Do |
|---|---|
| Temperature too low | Raise incubator setting, check room temperature |
| Temperature too high | Lower setting, move incubator if needed |
| Humidity too low | Add water trays or wet sponges |
| Humidity too high | Remove water, increase ventilation |
Tip: Always check your sensors at egg height. Stable duck egg temperature and humidity help you hatch strong ducklings.
If you want more details, visit our duck egg incubation chart or read about storing duck hatching eggs conditions. Small changes make a big difference when you incubate ducklings step by step.
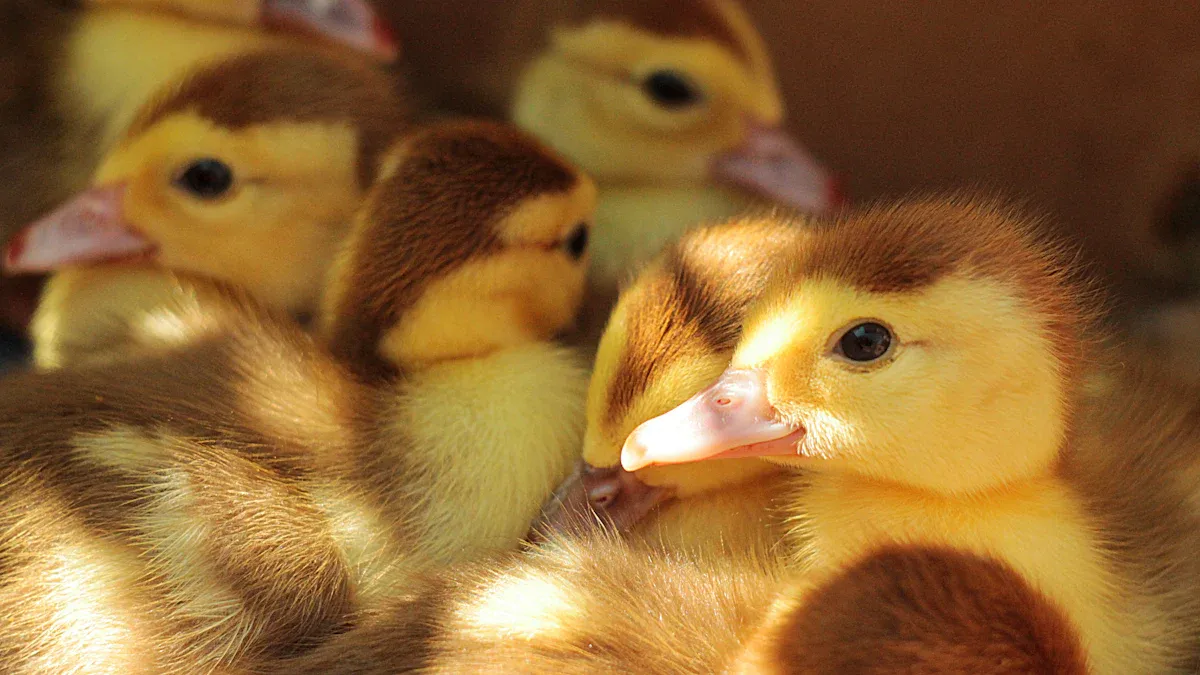
Brooder Setup & First 48 Hours After Hatching Duck Eggs
After hatching duck eggs, you need to move your ducklings from the incubator to a safe brooder. This space gives them warmth, protection, and easy access to food and water. Setting up a duckling brooder correctly helps you start raising ducklings with confidence. You can follow this beginners guide to ensure proper duckling care.
Creating Warm and Cool Zones in the Brooder
Ducklings need a warm area to stay healthy after hatching. You should set up a heat source, such as a brooder lamp or heat plate, in one part of the brooder. This creates a temperature gradient, so ducklings can choose where they feel most comfortable. Place the heat source at one end and leave the other end cooler.
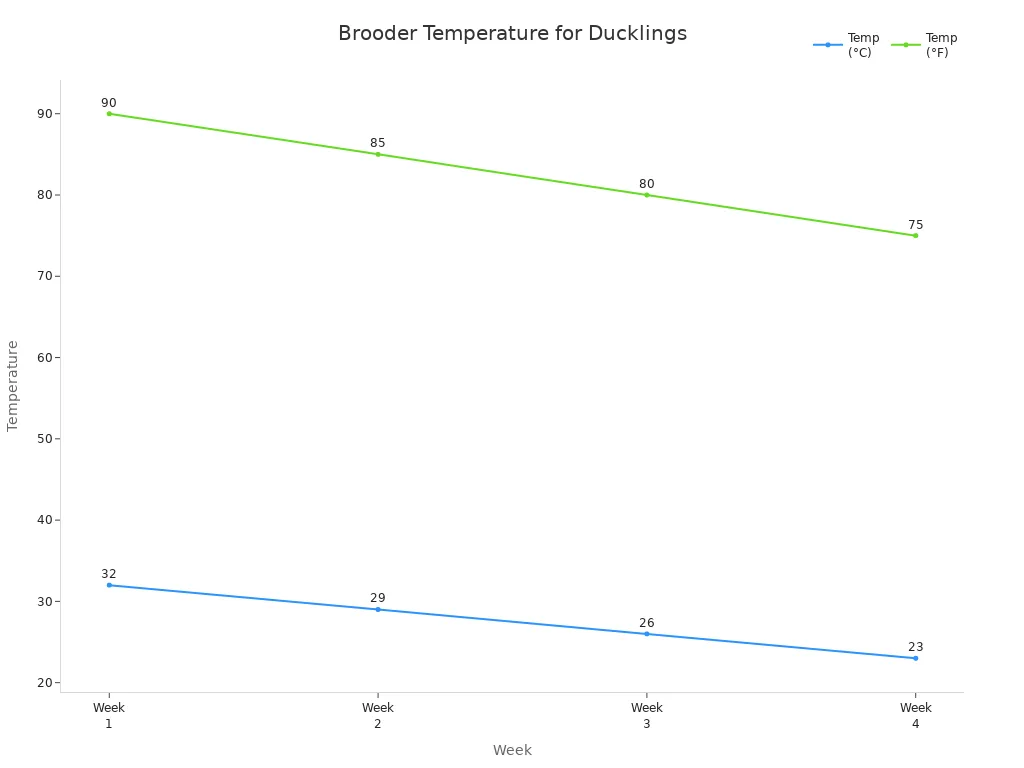
You must keep the temperature in the brooder within the recommended range. For the first week, aim for 90°F. Lower the temperature by 5°F each week. Ducklings grow quickly, so they need less heat as they get older.
| Week | Temperature (°C) | Temperature (°F) |
|---|---|---|
| 1 | 32 | 90 |
| 2 | 29 | 85 |
| 3 | 26 | 80 |
| 4 | 23 | 75 |
Ducklings show clear signs if they get too hot or too cold. Watch for panting, wings held out, or ducklings avoiding the heat source. These signs mean overheating. If you see ducklings huddling under the lamp, shivering, or lying still, they may be chilled. You can use this table to check for symptoms:
| Condition | Signs |
|---|---|
| Overheating | Panting, wings out, avoiding heat, sprawled legs, lethargy, loud peeping, pressing to cool sides |
| Chilling | Huddling under heat, shivering, cold beak/feet, refusing food/water, flattened posture, limp |
You should adjust the heat source if you notice these behaviors. Caring for the ducklings means checking them often and making changes as needed. Brooding ducks in a well-designed brooder helps you avoid problems and keeps ducklings healthy.
Bedding and Hygiene for Ducklings
Choosing the right bedding is important for duckling care. Good bedding absorbs moisture and keeps the brooder clean. You can use wood shavings (not cedar), paper towels, old towels, wood pellets, hay, or straw. Straw is popular because it is cheap and easy to find. Chopping straw helps it absorb more moisture and makes cleaning easier.
- Use wood shavings, paper towels, old towels, wood pellets, hay, or straw.
- Avoid cedar shavings and sawdust. Cedar can harm ducklings, and sawdust may cause digestive problems.
- Do not use newspaper. It gets slippery and can lead to leg issues.
- Change bedding often to prevent mold and mildew.
Ducklings make a mess, especially when feeding and drinking. You should clean the brooder daily. Remove wet bedding and replace it with fresh material. This routine keeps ducklings dry and reduces the risk of illness. Brooding ducks in a clean environment supports strong growth and healthy development.
Tip: Avoid slick surfaces in the duckling brooder. Ducklings need traction to stand and walk. Slick bedding can cause leg problems.
You can find more advice in our duckling care guide. Following these steps helps you maintain hygiene and supports brooding your healthy ducklings.
Water and Starter Feed for Ducklings
Ducklings need access to clean water and proper starter feed as soon as they move to the brooder. You should use shallow water dishes to prevent drowning. Place marbles or small stones in the dish to keep ducklings safe. Change the water often to keep it fresh.
For feeding ducklings, choose an unmedicated chick starter feed with 22% protein. Ducklings need extra niacin for strong legs and healthy growth. You can add brewer’s yeast or a niacin supplement to their feed. This step is important for duckling care in the first 48 hours.
- Use unmedicated chick starter feed.
- Make sure the protein content is 22%.
- Add niacin for healthy development.
- Provide fresh water at all times.
Ducklings eat and drink frequently. You should check their dishes several times a day. Feeding ducklings the right food helps them grow quickly and stay active. You can learn more about feeding ducklings and brooding ducks in our duckling care guide.
Note: Ducklings may splash water and spill feed. Place dishes away from the heat source and bedding to keep the brooder dry.
Caring for the ducklings in the first 48 hours sets the foundation for raising ducklings successfully. You can follow this beginners guide to ensure your duckling brooder supports healthy growth and development. Incubating ducklings requires attention to detail, but brooding ducks in a clean, warm, and safe environment helps you raise strong ducklings after hatching.
Recognizing Signs of Overheating or Chilling
After hatching, ducklings need a stable environment. You must watch for signs of overheating or chilling in the brooder. Both problems can harm duckling health and slow their growth. Recognizing these signs early helps you adjust your setup and keep your ducklings safe.
Signs of Overheating
Ducklings can overheat if the brooder is too warm or if the heat source is too close. Overheating often happens when the temperature stays above the recommended range. You may see these signs:
- Ducklings spread out away from the heat source.
- They pant or breathe with open mouths.
- Wings may stick out from their bodies.
- Ducklings look weak or move slowly.
- Some ducklings press against the sides of the brooder to find cooler spots.
- You may hear loud, distressed peeping.
Tip: If you see these signs, raise the heat lamp or lower the temperature. Give ducklings more space to move away from the heat.
Signs of Chilling
Chilling happens when the brooder is too cold or drafty. Ducklings cannot control their body temperature well in the first days after hatching. Watch for these symptoms:
- Ducklings huddle tightly under the heat source.
- They shiver or tremble.
- You may notice cold beaks or feet.
- Ducklings refuse to eat or drink.
- Some ducklings lie flat and look limp.
- They may peep softly or stay silent.
Note: If you see ducklings huddling or shivering, lower the heat lamp or add a second heat source. Block drafts and check the brooder temperature with a thermometer at duckling level.
Quick Reference Table
You can use this table to compare the signs of overheating and chilling:
| Condition | Duckling Behavior | What You Should Do |
|---|---|---|
| Overheating | Spreading out, panting, wings out, lethargy, loud peeping | Raise lamp, lower temperature, increase space |
| Chilling | Huddling, shivering, cold beak/feet, limp, silent | Lower lamp, add heat, block drafts |
Why Monitoring Matters
Incubating ducklings and hatching duck eggs require careful control of temperature and humidity. After hatching, you must continue to monitor the brooder. This step is just as important as the incubation process. If you follow a beginners guide, you will see that healthy ducklings move freely between warm and cool zones. They eat, drink, and explore the brooder. If you notice any warning signs, act quickly to adjust the environment.
Keeping a close eye on your ducklings helps you avoid problems and supports healthy growth. This attention to detail is key when raising ducklings, especially in the first 48 hours.
You can learn more about brooder setup and duckling care in our other guides. Good monitoring and quick action help you create the best conditions for your ducklings after hatching.
Keep Learning About How to Hatch Duck Eggs
Duck Egg Incubation Chart
You can use a duck egg incubation chart to track important settings and milestones. This chart helps you organize your process and avoid mistakes. Most domestic ducks need 28 days for incubation. Muscovy ducks require about 35 days. You should keep the temperature between 99.3°F and 99.6°F for forced air incubators.Humidity stays at 55–60% during most of the process, then rises to 65–70% for the hatch window. Turn eggs 3 to 7 times each day. Candle eggs on days 7 and 14 (day 21 optional) to check development.
| Parameter | Details |
|---|---|
| Incubation Period | 28 days (domestic), 35 days (Muscovy) |
| Optimal Temperature | 99.3°F – 99.6°F |
| Humidity Levels | 55%–60%, then 65%–70% at hatch |
| Egg Turning Frequency | 4–6 times a day |
| Candling Days | 7, 14 (optional 21) |
Tip: Mark your calendar with these days so you remember when to candle and adjust humidity.
Candling Fertile Duck Eggs Guide
Candling lets you see inside the egg and check if the embryo grows well. You should candle eggs after the first week, then again on days 7 and 14. Look for blood vessels and movement. Remove eggs that show no development. This step helps you keep only healthy eggs in the incubator.
- Hold a flashlight against the large end of the egg.
- Cup your hand around the light and egg.
- Check for veins and a dark spot (the embryo).
- Remove clear or cloudy eggs.
You can find more details in our candling fertile duck eggs guide. This resource supports you as you follow the beginners guide for hatching duck eggs.
Egg Incubator Product and Tutorial Page
You may want to explore different incubator models and learn how to set them up. Our egg incubator product and tutorial page gives you step-by-step instructions. You can find tips for adjusting temperature, humidity, and turning frequency. This page helps you compare features and choose the best incubator for your needs.
Note: Always place sensors at egg height for accurate readings. Follow the manufacturer’s instructions for ventilation and humidity control.
You can keep learning and improve your results by using these resources. Each step helps you master the incubation process and raise healthy ducklings.
You can achieve success by following each step for incubating ducklings. Start with careful egg selection. Store eggs at 55–65°F and 75% humidity. Preheat your incubator for 24–48 hours. Monitor duck egg temperature and humidity. Turn eggs 4–6 times each day. Stop turning two to three days before lockdown. Watch your duckling closely after hatching. Raising ducklings takes patience and attention. Every duckling hatch teaches you something new. Success comes from learning and improving your process. Celebrate each successful hatching and keep striving for more success.
Remember, success is a journey. Each duckling brings you closer to mastering the art of successful hatching.
FAQ
How long does it take to hatch duck eggs?
Most domestic duck eggs hatch in 28 days. Muscovy duck eggs take about 35 days. You should start lockdown on day 25 for domestic ducks and day 32 for Muscovy ducks. Always check your species before setting your incubation schedule.
What temperature and humidity should I use for duck egg incubation?
Set forced air incubators to 99.5°F. Use 101–102°F for still-air models, measuring at the top of the egg. Keep humidity between 55%–60% for most of incubation. Raise humidity to 65–70% during the last three days.
How often should you turn duck eggs during incubation?
Turn duck eggs 4–6 times each day. Automatic incubators usually turn eggs every hour. Stop turning two to three days before hatching. This step helps embryos develop evenly and prevents them from sticking to the shell.
When should you candle duck eggs?
You should candle duck eggs on day 7 and day 14. Look for blood vessels and movement. Remove eggs that show no development. Candling helps you track progress and supports healthy hatching. Learn more in our candling fertile duck eggs guide.
How do you store duck eggs before incubation?
Store duck eggs at 55–65°F and about 75% humidity. Place eggs with the pointed end down. Let eggs warm to room temperature for 4–8 hours before setting them in the incubator. Read more about storing duck hatching eggs conditions in our guide.


0 Comments