
How to Incubate Eggs Successfully Across Different Poultry Species
If you want to incubate eggs from chickens, ducks, or quail, you must know what each bird needs. You cannot use the same method for every bird. Changing your approach helps you hatch more eggs. Studies show hatch rates can be over 93% for layered eggs and almost 96% for fertilized eggs:
|
Type of Egg |
Hatch Rate (%) |
|---|---|
|
Layered Eggs |
93.05 |
|
Fertilized Eggs |
95.83 |
You will get the best results if you follow a beginner's guide and remember these tips:
-
Keep the temperature between 37.5 and 37.8°C and humidity at 55 to 60%.
-
Change the settings for each bird type.
-
Make sure there is good light and air.
If you use a beginner's guide and learn the main steps—picking eggs, setting up your incubator, and checking often—you can incubate eggs with confidence.
Key Takeaways
-
Each poultry species needs its own temperature and humidity. Set your incubator for each egg type.
-
Turn eggs often, at least five times each day. This stops embryos from sticking to the shell. It helps more chicks hatch.
-
Candle eggs three times while they incubate. This checks if embryos are growing well. Take out eggs that show no life.
-
Keep your incubator clean and steady. Check temperature and humidity often. This helps chicks stay healthy.
-
Get your brooder ready before chicks hatch. Make sure it is warm. Give chicks fresh water and food right away.
Egg Incubation Steps
Overview of Incubation
When you start the incubation process, you follow a few simple steps. First, you need to choose an incubator. You can buy one or make your own at home. Next, select fertilized eggs from your flock or a trusted farmer. Before you place the eggs inside, run the incubator for at least three days. This helps you spot any problems early.
Once you set the eggs inside, keep the temperature and humidity steady. Each poultry species needs its own settings. For example, quail eggs need 17 days at 99.5°F, with humidity at 45-60% for the first 14 days. Then, raise the humidity to 65-70% for hatching. Chicken eggs usually take about 21 days, while duck eggs need around 28 days. Keeping the right environment during incubation gives your chicks the best chance to hatch.
Here are the main steps you will follow during incubation:
-
Incubation: Keep eggs at a steady temperature for the right amount of time.
-
Final stages of embryo development: The chick grows an egg tooth to help break the shell.
-
Emerging from the eggshell: The chick starts to pip and break free.
-
Nest clean-up after hatching: The mother bird removes shell pieces from the nest.
Tip: Always check your incubator’s instructions. Each model may have special rules for temperature and humidity.
Why Adapt Methods
Not all birds need the same care during incubation. You must adjust your methods for each species. If you use the same settings for every egg, you may not get good results. For example, quail, chickens, and ducks all have different needs for temperature, humidity, and the incubation period.
|
Poultry Species |
Incubation Duration |
Temperature |
Humidity Levels |
|---|---|---|---|
|
Quail |
17 days |
99.5°F |
40-50% (first 14 days), 65-70% (hatch) |
|
Chickens |
21 days |
N/A |
N/A |
|
Ducks |
28 days |
N/A |
N/A |
When you match the incubation settings to the species, you help more chicks hatch. You also avoid problems like weak chicks or failed hatches. Always check what your eggs need before you start the incubation process.
Choose Hatching Eggs

Select Fertile Eggs
When you want to hatch healthy chicks, you need to pick the right hatching eggs. Not every egg will give you a strong chick. You should look for eggs that meet these simple rules:
-
The weight should be between 50 and 68 grams, depending on the age of your flock.
-
Each egg needs a clear round end and a pointed end.
-
The shell must be clean, have good color, and show no cracks or signs of infection.
-
Avoid dirty eggs, cracked eggs, or eggs with odd shapes. These can cause problems during incubation.
-
Never use double-yolked eggs. They will not hatch.
-
Collect eggs at least once a day. If it’s hot, check more often.
-
Keep nest eggs away from floor eggs to stop disease from spreading.
If you follow these tips, you will have a better chance of hatching strong chicks from chickens, turkeys, geese, or quail.
Tip: Never wash hatching eggs. Washing can let bacteria inside and lower hatch rates.
Store and Prepare Eggs
After you collect your eggs, you need to store them the right way before setting your eggs in the incubator. Eggs stay healthiest if you store them for less than five days. Longer storage can hurt the embryo and lower hatch rates. Keep your eggs at about 16°C. If you store eggs for ten days, you may see more embryo deaths and weaker chicks. Always use eggs of average size and discard any that are too big or too small. Thin-shelled eggs lose moisture and can spread disease, so it’s best to avoid them.
Species Differences
Eggs from different poultry species need special care. Chickens, turkeys, geese, and quail all have unique traits that affect incubation. Take a look at this table to see how egg characteristics change your approach:
|
Egg Characteristic |
Influence on Incubation Practices |
|---|---|
|
Egg Weight |
Heavier eggs hatch better, especially for geese. |
|
Shell Thickness |
Thick shells help embryos develop, key for turkeys and geese. |
|
Yolk Weight |
Bigger yolks help chicks grow strong. |
|
Albumen Quality |
Good albumen keeps embryos healthy. |
|
Shell Color |
Shell color can change how eggs hold heat. |
If you work with geese or turkeys, pay close attention to shell thickness and egg weight. These factors can make a big difference when you set up your incubator and start hatching eggs.
Incubator Setup
Types of Incubators
There are two main incubator types. Manual incubators need you to turn eggs by hand. You must do this several times each day. This is good for a small number of eggs. It takes a lot of time and focus. Automatic incubators turn eggs for you. They use rollers or moving floors. You set them up and let them work. Sometimes eggs bunch together and need fixing.
You can also pick forced-air or still-air incubators. Forced-air incubators have fans. Fans keep temperature and humidity steady. These incubators hold more eggs. They make it easier to control the environment. Still-air incubators cost less money. They work well for small batches. You must watch temperature and humidity more closely.
Tip: If you want to hatch many eggs, use automatic and forced-air incubators. These need less work from you. If you want to save money and hatch a few eggs, use manual and still-air incubators.
-
Forced-air incubators: steady temperature, hold many eggs, easy to use, but cost more and are noisy.
-
Still-air incubators: cheaper, simple, good for hobbyists, but less exact and need more watching.
-
Manual egg turning: hands-on, takes time, best for small groups.
-
Automatic egg turning: less work, needs some checking.
Preparing to Incubate Eggs
Pick a good spot for your incubator. Keep it away from sunlight and drafts. Make sure the room stays at one temperature. Clean the incubator and trays before adding eggs. Run the incubator for one or two days. Check that the temperature stays between 99–101ºF. Watch the humidity and make sure air can move in and out. Put eggs on plastic trays or moving floors so they turn evenly.
Here are some steps to follow:
-
Set up vents for air flow.
-
Adjust the temperature controls.
-
Set the humidity.
Note: Always read the incubator’s instructions before starting. Each incubator may have special rules for eggs from different birds.
Equipment List
You need a few important items for incubation. Here is a table to help you get ready:
|
Equipment Type |
Description |
|---|---|
|
Incubators |
Control temperature, humidity, egg turning, air flow, and cleanliness. |
|
Plastic Trays |
Hold eggs while they incubate. |
|
Moving Floors |
Help turn eggs for even heating. |
You also need a thermometer and a hygrometer. These tools check the incubator’s settings. Good air flow keeps eggs healthy. Clean trays and floors stop disease. With the right equipment and careful setup, your eggs have the best chance to hatch strong chicks.
Incubation Environment
Temperature and Humidity
Getting the right temperature and humidity in your incubator is the most important step for healthy chicks. If you set the temperature too high or too low, you can hurt the embryos. You might see weak chicks, low body weight, or even more diseases. Humidity control is just as important. If you miss the right humidity, you can get chicks with unhealed navels or trouble hatching.
You want to keep your incubator steady. For chickens, set the temperature between 99°F and 102°F. Most people use 99.5°F as the sweet spot. Keep the relative humidity at 35-55% for the first 17 days. Raise it to 55-75% for the last three days before hatching. Ducks need similar care. Hold the temperature at 99.5°F to 100°F. Keep the humidity at 40-60% during incubation, then bump it up to 65-75% for the final days. Quail eggs like 99.5°F to 100°F. Set the humidity at 40-50% for the first 15 days, then raise it to 70-80% for lockdown.
Here’s a quick list to help you remember:
-
Chickens: 99-102°F, 35-55% humidity for 17 days, 55-75% for last 3 days.
-
Ducks: 99.5-100°F, 40-60% humidity, 65-75% for last days.
-
Quail: 99.5-100°F, 40-50% humidity for 15 days, 70-80% for lockdown.
Tip: Always use a reliable thermometer and hygrometer in your incubator. Check them every day to make sure your eggs stay safe.
If you keep the temperature and humidity steady, you help the embryos lose just the right amount of water. This keeps the chicks healthy and strong. If you let the eggs dry out or get too wet, you can see problems like malformed chicks or stuck shells. Good humidity control makes a big difference.
Ventilation
Your incubator needs fresh air. Eggs breathe, and the embryos inside need oxygen. If you do not give enough ventilation, you can cause hypoxia. This means the chicks do not get enough oxygen, and they may not grow right. You also need to move air to keep the temperature and humidity even.
Here are some best practices for ventilation in your incubator:
-
Make sure air moves evenly. Do not let drafts hit the eggs.
-
Use the right size air handling units. Small units can overheat the embryos.
-
Check exhaust fans. They should not pull too much air out or create negative pressure.
-
Keep airflow moving from clean to dirty areas. This stops germs from spreading.
-
Seal the incubator doors well. This keeps the air volume steady and saves energy.
-
Watch rooftop units. Control the air temperature and speed.
-
Keep humidity levels stable. This stops cold spots and helps the embryos develop.
Different poultry species need different ventilation rates. Larger eggs, like those from ducks or geese, need lower ventilation. This helps stop too much moisture loss. Smaller eggs, like quail, need more airflow to keep up with their fast metabolism.
|
Factor |
Effect on Embryo Development and Hatch Rates |
|---|---|
|
Temperature |
Too high or low can cause weak chicks, low weight, and more disease. |
|
Humidity |
Wrong humidity can cause malformed chicks, hatching trouble, and unhealed navels. |
|
Ventilation |
Not enough air causes hypoxia and poor embryo growth. |
|
Water Loss |
Good humidity helps embryos lose water at the right rate. |
|
CO2 Levels |
High humidity with more CO2 helps chicks build strong bones. |
Note: Always check your incubator’s vents and fans. Clean them before each batch of eggs.
Species-Specific Settings
Every bird has its own needs. You cannot use the same settings for all eggs in your incubator. Chickens, ducks, and quail each need special care. If you match the settings to the species, you get better hatch rates and healthier chicks.
|
Poultry Type |
Incubation Period |
Temperature (°C) |
Humidity (%) |
Turning Frequency |
|---|---|---|---|---|
|
Chickens |
20-21 days |
38 |
60-80 |
Every 1-2 hours |
|
Ducks |
28 days |
37.5-38 |
60-80 |
Every 1-2 hours |
|
Quail |
17-17 days |
37.5-38 |
40-60 (first), 65-75 (last) |
Every 1-2 hours |
For chickens, keep the incubator at 38°C and relative humidity between 60-80%. Turn the eggs every 1-2 hours. Ducks need almost the same temperature, but watch the humidity control closely. Quail eggs need a bit less humidity at first, then more at the end. Always turn the eggs often. If your incubator turns eggs automatically, check it works right. If not, turn the eggs by hand at least five times a day.
Callout: Never let eggs sit in the same spot for more than eight hours during the first nine days. This helps the embryos grow strong.
If you follow these species-specific settings, you give your chicks the best start. Always write down your temperature, humidity, and turning schedule. This helps you spot problems early and fix them fast.
Turning and Monitoring Eggs
Turning Frequency
Turning your eggs is one of the most important steps in incubation. You help the embryos grow strong when you turn them often. If you leave eggs in the same position, the embryos can stick to the shell. This can cause deformities and early death. You want to turn eggs at least five times a day, but more is better. Some incubator models turn eggs automatically, which makes your job easier. If you use a manual incubator, set a timer so you do not forget.
Take a look at this table to see how turning frequency affects hatchability:
|
Turning Frequency (times/day) |
Early Mortality (%) |
Late Mortality (%) |
Hatchability Rates |
|---|---|---|---|
|
24 |
2.84 ± 1.89 |
3.57 ± 1.39 |
High |
|
12 |
N/A |
N/A |
Significant Loss |
|
6 |
N/A |
N/A |
Significant Loss |
|
3 |
N/A |
N/A |
Significant Loss |
If you turn eggs 24 times a day, you get the best results. Most incubators for chickens, ducks, and other poultry turn eggs every hour or two. This helps keep the embryos from sticking and improves hatch rates.
Tip: Regular turning also helps control temperature and humidity inside the incubator.
Candling Eggs
Candling your eggs lets you check if the embryos are growing well. You use a bright light to look inside each egg. You should candle eggs three times during incubation:
-
Day 7 – The First Check: Look for blood vessels, a dark spot, and movement.
-
Day 14 – Checking Progress: Check for a larger embryo, visible veins, and air cell growth.
-
Day 17 – Final Candling Before Lockdown: Make sure the embryo fills most of the shell and the air cell is clear.
When you candle eggs, handle them gently. Do not keep them out of the incubator for long. This keeps the temperature and humidity steady. Practice patience and you will get better at spotting healthy embryos.
Note: Candling your eggs helps you remove infertile or dead eggs, which keeps the incubator clean and safe for the rest.
Tracking Development
You want to track the development of your eggs during incubation. Watch for changes in temperature, humidity, and air flow in the incubator. Write down what you see each day. This helps you spot problems early.
Here is a table with key indicators to watch:
|
Indicator |
Findings |
|---|---|
|
Incubation Temperature |
Low temperatures reduce hatchability and increase chick weight. High temperatures decrease chick weight but increase chick length. |
|
Humidity |
Chicks need the right humidity to break through the shell. Too little humidity can stop hatching. |
|
Ventilation |
Good air flow keeps oxygen levels right. Low oxygen raises embryo death rates. |
|
Egg Turning |
Turning eggs stops embryos from sticking to the shell and lowers early death and deformities. |
You should also remember:
-
Proper humidity helps chicks hatch. Too much or too little can cause problems.
-
Good ventilation keeps oxygen and carbon dioxide balanced.
-
Turning eggs regularly is vital for healthy chicks.
If you keep a close eye on these factors, you give your chickens, ducks, and other poultry the best chance to hatch strong and healthy.
Hatching Process
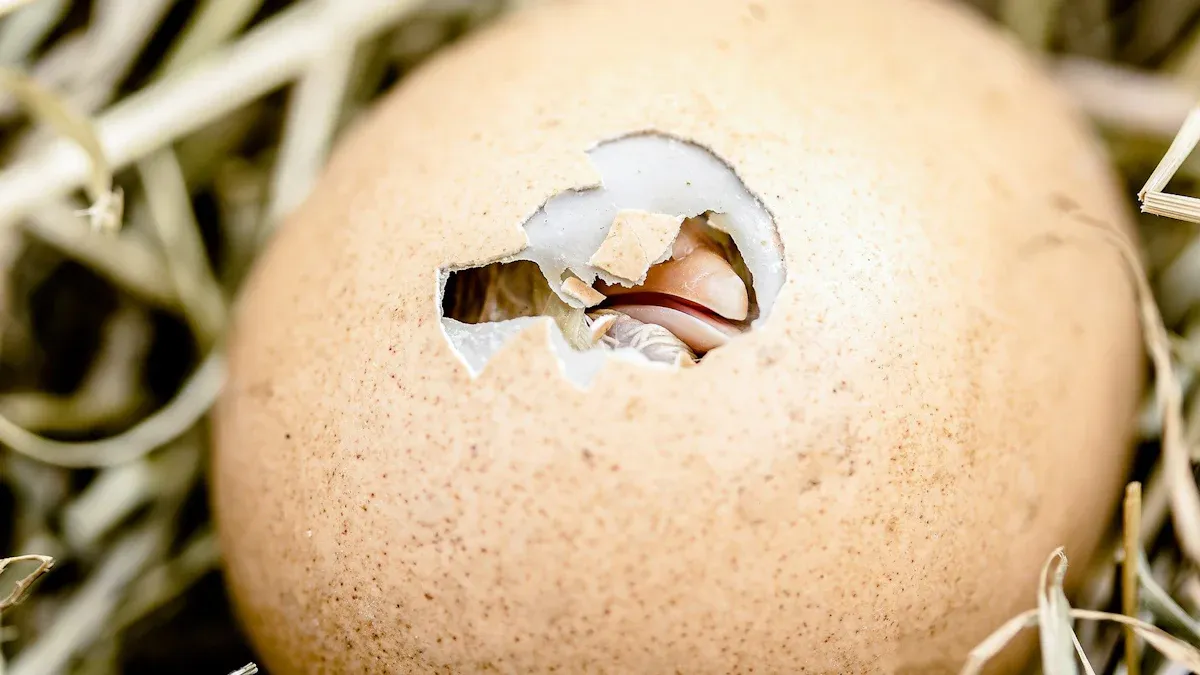
Lockdown Period
You have reached the most exciting part of incubation. The lock-down period starts three days before your eggs hatch. You need to follow a few steps to help your chickens, ducks, or quail hatch safely:
-
Candle your eggs one last time. Remove any that show no signs of life.
-
Stop turning the eggs. This helps the embryos settle into the right position for hatching.
-
Increase humidity in your incubator. Higher humidity keeps the shell membrane soft and helps chicks break free.
-
Chick-proof any water sources inside the incubator.
-
Close the lid and keep it shut!
The lock-down period creates the best conditions for hatching. You mimic what a broody hen does in nature. When you stop turning eggs and raise humidity, you help more chicks hatch strong and healthy.
Tip: Do not open the incubator during lock-down. You want to keep temperature and humidity steady for the best hatch rates.
Final Hatching Steps
When you see the first pip in your eggs, you know hatching has begun. You might feel tempted to help, but let the chicks hatch on their own. This builds muscle strength and helps them survive. Keep the incubator closed to hold the right temperature and humidity. Raise humidity by 8-10% during these last days. This stops the shell membrane from drying out and trapping the chicks.
Wait until all chicks fluff out before you remove them. Chicks need time to dry and rest after hatching. If you rush, you can harm them. Watch your incubator closely, but do not open it unless you see a problem.
Callout: Patience pays off! Healthy chicks from chickens, ducks, or quail need time to finish hatching and fluff out.
Troubleshooting
Sometimes, things go wrong during incubation or hatching. Here are common problems and how you can fix them:
-
Early embryo mortality: This happens if you collect eggs too late, store them too long, or let temperature drop. Collect eggs often and watch your incubator settings.
-
High humidity: Too much humidity can cause pipped eggs and navel strings. Adjust humidity levels to match your poultry species.
-
Temperature fluctuations: If temperature changes too much, you might see fewer chicks hatch or find deformities. Keep your incubator in a stable room and check temperature every day.
|
Problem |
Solution |
|---|---|
|
Early embryo death |
Collect eggs often, monitor temperature |
|
High humidity issues |
Adjust humidity in incubator |
|
Temperature changes |
Keep temperature steady |
If you watch your incubator and make small changes, you can help more eggs hatch. You will see better results with chickens, ducks, and other poultry.
Post-Hatch Care
Moving Chicks
After your eggs finish hatching in the incubator, you might feel excited to meet your new chicks. You should wait until all chicks have hatched and look fluffy before moving them. This helps them stay warm and safe. Here’s what you need to do:
-
Wait for all chicks to hatch and fluff out inside the incubator.
-
Make sure your brooder is ready. Set up heat, food, and water before you move any chicks.
-
If some chicks are fluffy but others are still hatching, you can move the fluffy ones to the brooder. They can survive up to 48 hours without food because they absorb the yolk during incubation.
You want to keep the temperature steady in the brooder. This helps chicks from chickens, ducks, and other poultry adjust after leaving the incubator. Always check that the brooder is warm before you move any chicks.
First 24 Hours
The first day after hatching is important for every chick. You need to prepare the brooder at least a day before the eggs hatch. Use 3-4 inches of clean, absorbent bedding. Keep the temperature at 95-100°F on the brooder floor. This keeps chicks from chickens and ducks comfortable after leaving the incubator.
-
Give fresh water as soon as you move chicks from the incubator.
-
Dip the beaks of a few chicks in the water so they learn where to drink.
-
Wait a couple of hours before giving chick starter feed. This lets them rehydrate after hatching.
-
Check each chick for signs of stress or injury.
-
Handle chicks as little as possible to reduce stress.
You want to keep the humidity in the brooder steady, just like you did in the incubator. This helps chicks adjust after hatching from eggs.
Common Issues
Sometimes, chicks face problems right after hatching. You might see these issues in chicks from chickens or ducks:
|
Issue |
Description |
|---|---|
|
Dehydration |
Chicks can arrive dehydrated even after absorbing the yolk during incubation and hatching. |
|
Pasty Butt |
Droppings stick to the vent area. This can happen from stress, temperature swings, or poor diet. |
If you notice dehydration, make sure chicks have easy access to water. For pasty butt, gently clean the vent area with warm water. Keep the temperature and humidity steady in the brooder to help prevent these problems. Watch your chicks closely after they hatch from eggs in the incubator. Quick action helps keep your chicks healthy and strong.
Quick Reference Table
You want to hatch healthy chicks, ducklings, or keets. You need the right settings for your incubator and eggs. This quick reference table helps you set up your incubator for different poultry species. You can check the table before you start. It saves you time and helps you avoid mistakes.
|
Poultry Species |
Temperature (°C) |
Humidity (%) |
Incubator Turning Method |
Special Notes |
|---|---|---|---|---|
|
Chickens |
37.5–38 |
60–80 |
Every 1–2 hours |
Stop turning 3 days before hatch |
|
Ducks |
37.5–38 |
60–80 |
Every 1–2 hours |
Raise humidity for last 3 days |
|
Quail |
37.5–38 |
40–60 (first), 65–75 (last) |
Every 1–2 hours |
See Complete Guide |
|
Dewlap Toulouse Waterfowl |
37.3 |
20–25 (dry incubation) |
Hourly auto turning after 24 hours, daily hand turn |
Start cooling and misting after 6 days, weigh eggs weekly |
Tip: Always check your incubator’s manual. Some incubators need special settings for different eggs.
You can use this table to set up your incubator for chickens, ducks, quail, or waterfowl. Make sure you set the temperature and humidity before you add your eggs. Turn your eggs often. If you use an automatic incubator, check that it turns the eggs correctly. If you use a manual incubator, set a timer so you remember to turn the eggs.
Here are some steps you can follow:
-
Place your eggs in the incubator with the pointed end down.
-
Set the temperature and humidity for your species.
-
Turn your eggs as often as the table suggests.
-
Watch your incubator every day. Write down any changes.
-
Weigh waterfowl eggs weekly to check moisture loss.
If you want strong chicks, you need to keep your incubator clean. Always wash your hands before handling eggs. If you see any problems, check the table and adjust your incubator settings.
Callout: The right incubator settings help your eggs hatch strong and healthy. Use this table every time you start a new batch.
You can hatch eggs from any kind of poultry if you follow some simple steps. Always wash your hands before you start. Use a good incubator that works well. Try your incubator with local eggs first, not rare ones. Keep the temperature and humidity the same every day. Turn the eggs many times each day. Look at the quick-reference table to set your incubator for each bird. Changing the settings for each type of egg helps more chicks hatch healthy and strong.
Remember: Keeping things clean stops problems. Be gentle with eggs and do not move the incubator while hatching.
If you want more tips, read books like The Book of Geese or Storey’s Guide to Raising Ducks. You can also learn from university websites and 4-H classes. Write down what happens each time you hatch eggs. This helps you get better at hatching every time.
FAQ
How do you choose the best incubator for beginners?
Pick an incubator that keeps temperature and humidity steady. Choose one with automatic turning and easy instructions. If you have only a few eggs, start with a small incubator. Read reviews online and ask other poultry keepers for help.
Can you mix different poultry eggs in one incubator?
You can use one incubator for different eggs. Make sure the temperature and humidity match each species. If the settings are not the same, use separate incubators. Mixing eggs with different hatch times can lower your success.
What should you do if the incubator temperature drops?
If the temperature drops, act quickly. Check the power and settings right away. Cover the incubator to keep heat inside. Write down the time and how much the temperature changed. Most embryos survive short drops, but long drops can hurt hatching.
How often should you clean your incubator?
Clean your incubator before and after every batch of eggs. Use warm water and mild soap to wash all trays and parts. Dry everything well before you add new eggs. Cleaning often stops germs and keeps chicks healthy.
Why do some eggs not hatch in the incubator?
Some eggs do not hatch because of poor fertility, wrong settings, or disease. Check the eggs before you set them in the incubator. Watch temperature and humidity every day. Remove eggs that do not grow when you candle them.
Tip: Always keep a notebook to track your incubator settings and results. This helps you get better hatch rates.


0 Comments