
You might wonder how chicken incubation works and what makes each method unique. The process usually takes about 21 days, but timing can shift based on temperature, egg size, or how long eggs were stored. If you compare natural brooding and artificial incubation, you’ll find clear differences:
| Aspect | Natural Brooding | Artificial Incubation |
|---|---|---|
| Hatch Rate | Fewer chicks | More chicks |
| Control | Hen’s instincts | Precise temperature, humidity |
| Cost | Low | Higher, needs equipment |
Consider what fits your flock and your goals best.
Key Takeaways
- Natural brooding is cost-effective and simple. A healthy hen can hatch about 10 to 14 eggs without special equipment.
- Artificial incubation allows for greater control over temperature and humidity. This method can increase hatch rates and is ideal for larger flocks.
- Monitor your eggs closely, regardless of the method. Regular checks help catch problems early and ensure healthy chicks.
- Consider your goals and flock size when choosing a method. Natural brooding suits small flocks, while artificial incubation is better for larger operations.
- Both methods have their pros and cons. Weigh the benefits of hands-on care against the efficiency of machines to find what works best for you.
Chicken Incubation Methods Overview
Natural Brooding Explained
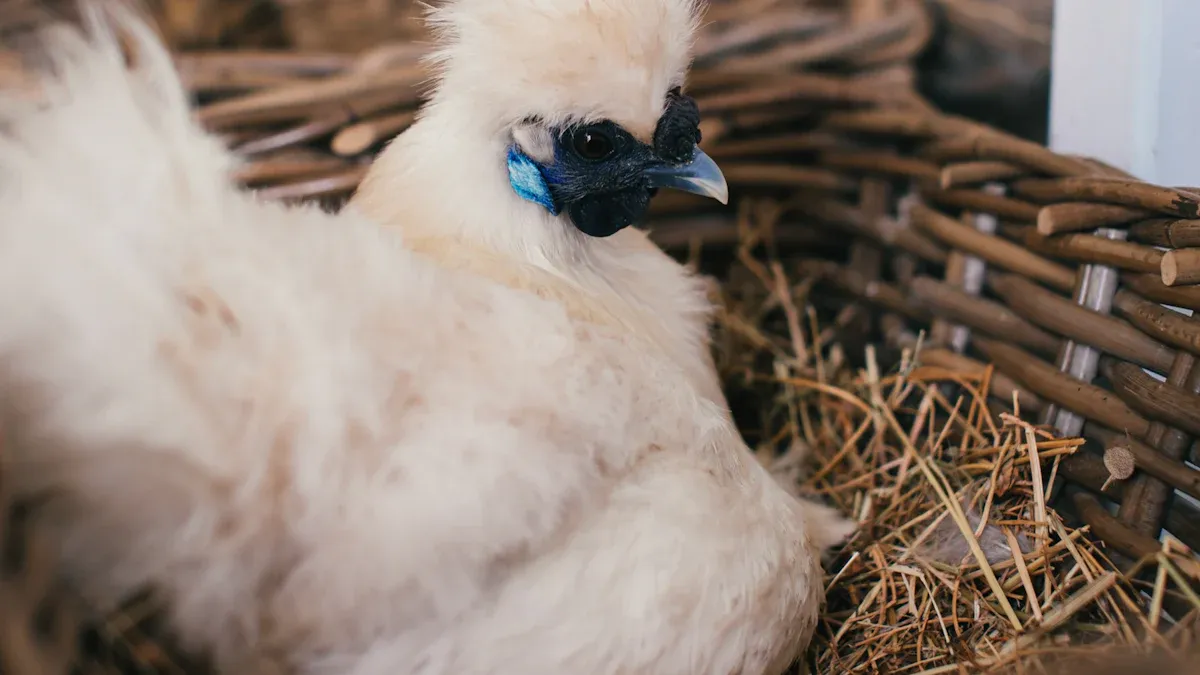
When you think about raising chicks the old-fashioned way, you picture a mother hen sitting on her eggs. This is called natural brooding. The hen does most of the work for you. She keeps the eggs warm, turns them with her beak, and even adds a bit of moisture by splashing water on them. You want to pick a large, healthy hen with a good track record as a mom. Place her in a quiet spot and keep food and water close by so she stays strong.
Here’s what you usually do with natural brooding:
- Choose a broody hen that wants to sit on eggs.
- Give her fertile eggs, sometimes from other hens, within the first few days.
- Make sure she can reach water and food easily.
- Check the eggs after a week with a flashlight (this is called candling) to see if they are growing.
- Wait about 21 days for the chicks to hatch.
Natural brooding feels simple, but you still need to watch the hen and eggs to make sure everything goes smoothly.
Artificial Incubation Explained
If you want more control or need to hatch lots of eggs, you might use artificial incubation. This means you use a machine called an incubator to copy what a hen does. Incubators keep the eggs at the right temperature and humidity. They also turn the eggs for you.
There are two main types of incubators:
| Type of Incubator | Description | Capacity Range |
|---|---|---|
| Still-Air Incubator | An insulated box with one layer of eggs, manually operated vents, temperature difference of about 4°F. | 12 to 200 eggs |
| Forced-Draft Incubator | A machine with a fan for uniform temperature, allowing for lower temperature settings. | 14,000 to 100,000 eggs |
With artificial incubation, you set the temperature (usually around 99.5°F) and adjust the humidity. You also make sure the eggs get enough air and turn them several times a day. This method lets you hatch more eggs at once and works well for both backyard and commercial chicken incubation.
Natural Brooding in Chicken Incubation
How Natural Brooding Works
When you let a broody hen handle chicken incubation, she takes on the job of keeping her eggs warm and safe. She sits on her clutch, turning the eggs with her beak and body. This helps the chicks grow evenly. The hen also adds moisture by moving her feathers and sometimes splashing water. You do not need to worry much about temperature or humidity. The hen knows what to do. She leaves the nest only for short breaks to eat, drink, and stretch her legs.
Researchers have looked at how well hens do this job. Take a look at these results:
| Study Reference | Clutch Size (Average) | Hatchability Rate (%) |
|---|---|---|
| Roy et al., 2004 | 12.6 | 87.9 |
| Sarkar, 2022 | 12.6 | 87.9 |
These numbers show that hens can hatch a lot of eggs with great success.
Pros of Natural Brooding
You get several benefits when you choose natural brooding for chicken incubation:
- Broody hens often reach a hatchability rate of 87.9%, which matches or beats many machines.
- Hens manage the right humidity and temperature without your help.
- You do not need to buy special equipment.
- Chicks learn from their mother right away, picking up natural behaviors.
- The process feels simple and hands-off for you.
Tip: If you want a low-cost, low-effort way to hatch chicks, natural brooding is a great choice.
Cons of Natural Brooding
Natural brooding does have some downsides:
- You cannot control when a hen goes broody. Sometimes, you wait a long time.
- Hens can only cover a small number of eggs, usually around a dozen.
- Some hens may stop sitting before the chicks hatch.
- You might see lower hatch rates if the hen gets disturbed or stressed.
- Disease can spread if the nest is not clean.
Note: Broody hens do a great job, but you need to watch for problems and keep the nest area safe.
Care for Broody Hens
When you have a broody hen, she needs a little extra attention. You want her to stay healthy and happy while she sits on her eggs. Here are some easy steps you can follow:
- Give her a quiet, safe spot away from other chickens. This helps her feel calm and keeps the eggs safe.
- Make sure she always has fresh water and food nearby. Broody hens do not leave the nest often, so easy access is important.
- Check her nest every day. Remove any broken eggs or dirty bedding. Clean nests help prevent sickness.
- Watch her health. Look for signs like weight loss, pale comb, or tiredness. If you see anything odd, you may need to help her take a short break from the nest.
- Offer treats like mealworms or greens. These snacks give her extra energy.
Tip: If your hen leaves the nest for too long, gently place her back. She may need a reminder to keep her eggs warm.
Common Challenges
You might run into a few problems during chicken incubation with a broody hen. Here are some of the most common ones:
| Challenge | What Happens | What You Can Do |
|---|---|---|
| Hen abandons nest | Eggs get cold, may not hatch | Try moving her to a quieter spot or use a different hen |
| Broken eggs | Messy nest, attracts pests | Remove broken eggs quickly |
| Other hens interfere | Eggs get mixed up or broken | Block off the broody hen’s area |
| Parasites | Hen or chicks get itchy or sick | Keep bedding clean, check for mites or lice |
Sometimes, even with your best efforts, things do not go as planned. Stay patient and keep an eye on your hen and her eggs. Most problems have simple fixes if you catch them early.
Artificial Incubation in Chicken Incubation
How Artificial Incubation Works
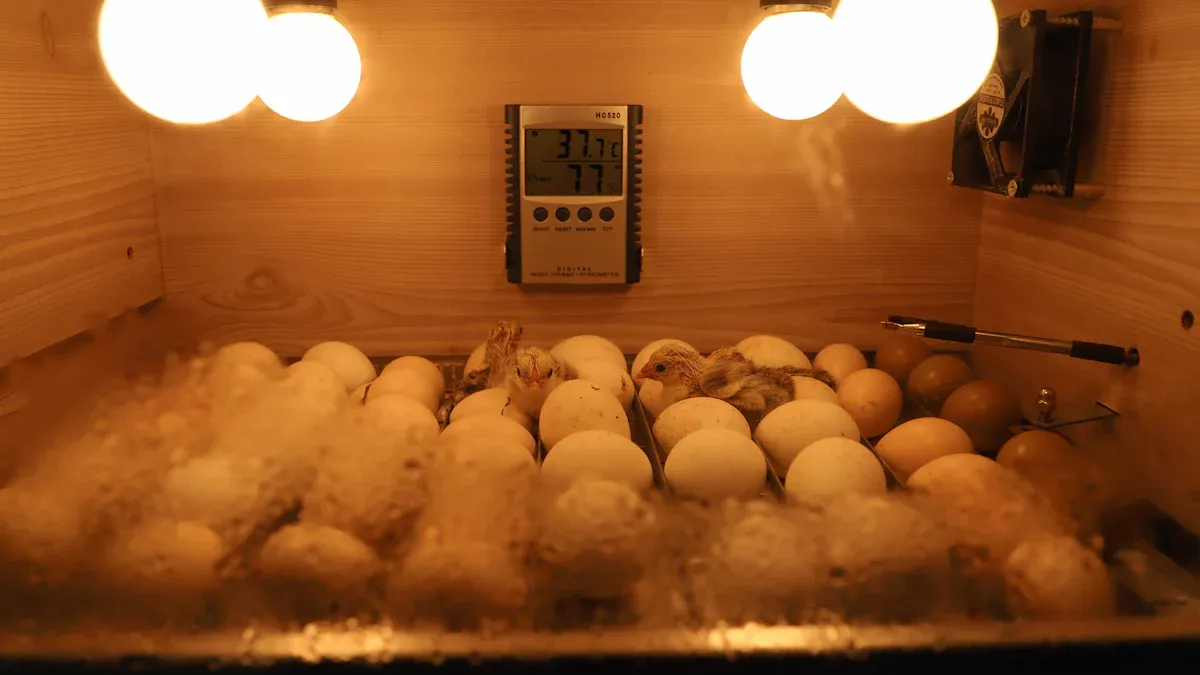
You might wonder how artificial incubation actually works. You use a machine called an incubator to create the perfect environment for your eggs. The incubator keeps the temperature steady, usually around 99.5°F. It also controls humidity, which helps the embryos grow. You need to turn the eggs several times a day. This step is important because it helps the chicks develop properly and keeps them from sticking to the shell. Research shows that frequent egg turning improves hatch rates and helps the embryos absorb nutrients. The incubator also lets fresh air in, so the chicks get enough oxygen. You can watch the eggs and make changes if needed. This method gives you more control over the chicken incubation process.
Pros of Artificial Incubation
Artificial incubation comes with many benefits. You get to manage every part of the process, which means you can hatch more eggs at once. Here are some of the main advantages:
- You can optimize conditions for embryo development by mimicking what a mother hen does.
- Hatchability rates often improve compared to natural methods.
- Chicks usually turn out healthier, which helps your flock grow strong.
- You control temperature and humidity, which are critical for chick growth.
- You can produce high-quality chicks in large numbers, perfect for commercial farms.
- Modern incubators help you avoid problems after the chicks hatch.
- You get a steady supply of chicks, even when hens are not broody.
Tip: If you want to grow your flock quickly or run a business, artificial incubation gives you the consistency you need.
Cons of Artificial Incubation
Artificial incubation is not perfect. You face some challenges that you should know about before you start. Here are a few downsides:
| Challenge | What Can Go Wrong | How It Affects You |
|---|---|---|
| Equipment failure | Temperature or humidity drops | Lower hatch rates, lost eggs |
| Cost | Incubators and supplies are pricey | Higher upfront investment |
| Learning curve | Takes time to master settings | Mistakes can hurt chick quality |
| No mother hen guidance | Chicks miss natural behaviors | You must teach chicks yourself |
| Environmental control | Needs careful monitoring | More work for you |
You need to check your incubator often. If you miss a problem, you might lose eggs or get weak chicks. Artificial incubation also costs more than natural brooding. You have to buy the machine and keep it running. Chicks do not learn from a mother hen, so you must help them adjust after hatching.
Care for Incubators
You want your incubator to work well every time you use it. Good care makes a big difference in chicken incubation. Start by cleaning your incubator before and after each batch of eggs. Dust, old eggshells, and dirt can cause germs to grow. Use warm water and a mild cleaner. Dry all parts before you put eggs inside.
Check the temperature and humidity settings often. Most incubators have a digital display, but you should use a separate thermometer and hygrometer to double-check. If you see a problem, fix it right away. Turn the eggs gently if your incubator does not do it for you. This helps the chicks grow strong.
Keep the incubator in a room with steady temperature. Avoid places with drafts or direct sunlight. Power outages can ruin a hatch, so think about using a backup battery or generator. If your incubator has moving parts, like fans or egg turners, look for dust or wear. Clean and oil them as needed.
Tip: Write down your settings and results in a notebook. You can spot patterns and improve your hatch rates over time.
Common Challenges
You might face some tricky problems when you use artificial incubators. Here are a few you should watch for:
- Power failures can stop the incubator and harm the eggs.
- Temperature swings may happen if the room gets too hot or cold.
- Humidity can drop or rise, making it hard for chicks to hatch.
- Equipment can break, like fans or egg turners.
- Germs and mold can grow if you skip cleaning.
- Sometimes, you find it hard to keep eggs turning on schedule.
If you use a virtual incubator or manage things online, you may run into other issues:
- You might not have the right physical space or tools.
- It can be tough to connect with others face-to-face, which makes building trust harder.
- Time zone differences and cultural gaps can slow down teamwork.
- You may struggle to find local resources or support.
- Staying motivated can be a challenge when you work alone.
- Online incubators need strong cybersecurity to protect your data.
- Building a good reputation without a physical presence takes extra effort.
Note: Stay alert and check your incubator often. Quick fixes and regular care help you avoid most problems in chicken incubation.
Chicken Incubation Methods Side-by-Side Comparison
Availability and Accessibility
When you look at chicken incubation, you want a method that fits your setup. Some people have just a few hens. Others run big farms with hundreds or thousands of birds. Here’s how each method stacks up:
- Natural brooding works best if you have a small flock. You only need a broody hen and some fertile eggs. The hen does most of the work for you. You don’t need fancy tools or machines.
- Artificial incubation helps when you want to hatch lots of chicks or your hens don’t go broody. You need an incubator and a place to keep it safe. This method suits bigger farms or anyone who wants more control.
- If you keep just a few chickens, natural brooding is easy and cheap. You can start with what you have.
- If you want to grow your flock fast or run a business, artificial incubation gives you more options. You can hatch eggs even when hens aren’t broody.
You get to choose what works for your space and your goals.
Egg Care and Monitoring
Egg care matters a lot during chicken incubation. You want healthy chicks, so you need to watch the eggs closely.
- With natural brooding, the hen turns the eggs and keeps them warm. She knows what to do. You check the nest sometimes to make sure everything looks good. You might candle the eggs with a flashlight to see if they’re growing.
- Artificial incubation puts you in charge. You set the temperature and humidity. You turn the eggs by hand or use an automatic turner. You check the incubator every day. If something goes wrong, you fix it fast.
- You get more control with artificial incubation. You can spot problems early and adjust settings.
- Natural brooding feels easier if you trust your hen. You spend less time checking eggs, but you need to watch for trouble.
Tip: No matter which method you pick, clean hands and a clean nest or incubator help keep eggs safe from germs.
Scalability for Larger Flocks
If you want to hatch more chicks, you need a method that grows with your flock. Natural brooding works for small groups. Artificial incubation helps you scale up.
The retrieved results provide insights into the scalability of natural brooding and artificial incubation for larger chicken flocks, particularly through the discussion of technologies like in-ovo sexing and on-farm hatching. These technologies aim to improve efficiency and animal welfare in poultry production, suggesting a shift towards more humane and scalable practices.
Natural brooding limits you to the number of eggs a hen can cover. Most hens handle about a dozen eggs. If you want more chicks, you need more hens. Artificial incubation lets you hatch hundreds or even thousands of eggs at once. You can use bigger machines and new technology to help chicks hatch safely and quickly.
- Small flocks do well with natural brooding.
- Large flocks need artificial incubation for better results.
- New tools and machines make it easier to hatch lots of chicks and care for them.
You decide how big you want your flock to be. Your method should match your goals and resources.
Environmental Control and Consistency
You want your chicks to have the best start. That means you need steady conditions during incubation. With natural brooding, the hen does most of the work. She keeps the eggs warm and adds moisture when needed. Her body adjusts to changes in the weather. You do not have to worry much about temperature swings or dry air. The hen knows what to do.
Artificial incubation gives you more control. You set the temperature and humidity. You use a machine to keep things steady. If you want to hatch eggs in winter or summer, you can. The incubator does not care about the season. You can even use a digital display to check the numbers. Some incubators have alarms if something goes wrong.
Here’s a quick look at how each method handles control and consistency:
| Method | Temperature Control | Humidity Control | Consistency |
|---|---|---|---|
| Natural Brooding | Hen’s body | Hen’s actions | Can vary |
| Artificial Incubation | Machine settings | Machine settings | Very steady |
Tip: If you want the same results every time, artificial incubation gives you more control. If you trust your hens, natural brooding works well for small flocks.
Hatch Rates and Success
You probably want to know how many chicks will hatch. Hatch rate means the number of eggs that turn into healthy chicks. Natural brooding can give you good results. A healthy hen often hatches about 85% to 90% of her eggs. She knows how to turn them and keep them warm.
Artificial incubation can match or even beat these numbers. If you set the right temperature and humidity, you can get high hatch rates. Some people see 90% or more. You can also hatch more eggs at once. This helps if you want a bigger flock.
But both methods can have problems. If the hen gets scared or leaves the nest, eggs may not hatch. If your incubator breaks or the settings are wrong, you can lose many eggs. You need to check on your eggs often, no matter which method you use.
Note: Good care and steady conditions help you get the best hatch rates. Watch your eggs and fix problems quickly.
Risks and Potential Issues
Every chicken incubation method has risks. You need to know what can go wrong. Temperature problems are common. If it gets too hot or too cold, embryos may die. This happens more often in artificial incubation if the machine fails or you set it wrong. In natural brooding, a distracted hen can let eggs get cold.
Humidity matters too. If eggs do not lose enough weight, chicks can drown before hatching. This means they do not get enough air. Poor ventilation is another big risk, especially after day 15. Chicks need more oxygen as they grow. If the air is bad, you may lose chicks late in the process.
Late embryo deaths often come from long-term temperature or humidity problems. Sometimes, you see chicks die right before hatching. This is called hatcher mortality. It usually links back to earlier mistakes with temperature, humidity, or air flow.
Here are some common issues and how often they happen:
- Temperature swings: Very common, especially with faulty incubators or sudden weather changes.
- Humidity problems: Happen often if you do not check water levels or if the room is too dry.
- Poor ventilation: Becomes a big problem late in incubation, leading to late embryo deaths.
- Equipment failure: Can ruin a whole batch in artificial incubation.
- Hen abandonment: Sometimes happens with natural brooding, especially if the nest is disturbed.
Stay alert! Check your eggs and equipment every day. Small problems can turn into big losses if you ignore them.
Costs and Investment
When you think about chicken incubation, you probably wonder how much money you need to spend. The costs can look very different depending on the method you choose. Let’s break it down so you can see what fits your budget.
Natural Brooding Costs
If you go with natural brooding, you save money right away. You don’t need fancy machines or special tools. Here’s what you usually pay for:
- Broody Hen: You need a healthy hen. If you already have one, you spend nothing extra. If you buy a proven broody hen, you might pay a bit more.
- Nest Setup: You need a safe spot for your hen. Old boxes, straw, or wood shavings work well. Most people use things they already have.
- Feed and Water: Your hen needs good food and clean water. You might buy a little extra feed, but the cost stays low.
- Basic Supplies: Sometimes, you buy a flashlight for candling eggs or a few treats for your hen.
Tip: You can start natural brooding with almost no extra money if you already keep chickens.
Artificial Incubation Costs
Artificial incubation asks for more investment. You need equipment and supplies to get started. Here’s a look at what you might spend:
| Item | Typical Cost Range | Notes |
|---|---|---|
| Incubator | $50 - $500+ | Price goes up with size |
| Egg Turner | $30 - $100 | Some incubators include this |
| Thermometer/Hygrometer | $10 - $40 | For checking settings |
| Backup Power | $50 - $200 | Optional, but helpful |
| Cleaning Supplies | $10 - $30 | Needed for every batch |
| Replacement Parts | Varies | Fans, bulbs, trays |
You pay more upfront for artificial incubation. Bigger incubators cost more, but they let you hatch more eggs at once. You also spend money on electricity to run the machine. If you want to avoid losing eggs during a power outage, you might buy a backup battery.
Ongoing and Hidden Costs
Don’t forget about ongoing costs. Both methods need regular care, but artificial incubation usually costs more over time.
- Natural Brooding: You buy feed and bedding. You might spend a little on treats or vitamins.
- Artificial Incubation: You pay for electricity every time you run the incubator. You buy cleaning supplies and sometimes replace broken parts.
Hidden costs can surprise you. If your incubator breaks, you might lose a whole batch of eggs. If your hen gets sick, you might need medicine or a vet visit.
Comparing Value
You want to know which method gives you the best value. Natural brooding costs less, but you can only hatch a few eggs at a time. Artificial incubation costs more, but you can hatch many eggs and grow your flock faster.
Here’s a quick comparison:
| Method | Upfront Cost | Ongoing Cost | Scalability | Risk of Loss |
|---|---|---|---|---|
| Natural Brooding | Low | Low | Small flocks | Hen issues |
| Artificial Incubation | High | Medium | Large flocks | Equipment |
Note: If you want to hatch a few chicks and keep costs low, natural brooding works well. If you plan to grow a big flock or run a business, artificial incubation is worth the investment.
Final Thoughts
Think about your goals and your budget before you decide. You don’t need to spend a lot to start chicken incubation, but bigger plans need bigger investments. Ask yourself how many chicks you want, how much time you have, and how much money you can spend. That way, you pick the method that fits you best.
Choosing the Best Chicken Incubation Method
Factors to Consider
When you decide how to hatch your chicks, you want to look at a few important things. Each method has its own strengths and challenges. Here are some key points to help you choose:
- Natural brooding gives you a process that is hard to copy. The hen keeps the eggs at the right temperature and humidity. This method is usually more reliable if you have a good broody hen.
- Artificial incubation lets you hatch eggs on your own schedule. You can hatch more eggs at once than a hen can handle. This is helpful if you want to plan your hatches or grow your flock quickly.
- You need special equipment for artificial incubation. You must check the temperature, humidity, and turn the eggs often. If you miss something, you might lose eggs.
- Natural brooding gives chicks a mother. The hen teaches them how to eat and stay safe. Chicks often grow up stronger and learn natural behaviors.
- Sometimes, a hen may leave the nest or harm the eggs. This risk is small but real.
- Artificial incubation works well for rare breeds, valuable eggs, or when hens do not want to sit. If you are new to this, talking to an experienced breeder can help you avoid mistakes.
Tip: Think about your goals, your time, and your setup before you pick a method. What works for one person may not work for another.
Matching Method to Flock Size
Your flock size plays a big role in which method fits best. If you have just a few hens, natural brooding often makes sense. The hen can handle a small clutch, and you do not need to buy extra gear. This method also helps keep old breeds and natural behaviors alive.
- Natural brooding works best for small flocks. You get hatch rates between 70% and 90% if your hen has experience.
- If you want to hatch lots of chicks or run a business, artificial incubation is the way to go. You can hatch hundreds or even thousands of eggs at once. This method gives you steady results and helps you grow your flock fast.
- Many commercial farms use artificial incubation because it is easy to scale up. You can set up more machines as your flock grows.
Note: If you want to keep things simple and small, let your hens do the work. If you dream big, invest in an incubator.
Experience Level and Learning Curve
Your own experience matters, too. Some methods are easier to learn than others. If you are just starting out, you might find natural brooding less stressful.
- Broody hens do most of the work for you. You only need to check on them and keep their nest clean. You do not have to worry about settings or machines.
- Artificial incubators give you more control, but you need to learn how to use them. You must watch the temperature, humidity, and turn the eggs on schedule. This can feel tricky at first.
- If you make a mistake with an incubator, you might lose a whole batch of eggs. It takes practice to get it right.
- Many people start with natural brooding and move to artificial incubation as they gain confidence.
Tip: If you want to try artificial incubation, start with a small batch. Write down what you do and what works. You will get better with each hatch.
No matter which method you choose, you can succeed with a little care and patience. Chicken incubation is a rewarding process that helps you grow your flock and learn new skills.
Aligning with Your Goals
You want the best results from your chicken incubation journey. Your goals shape every choice you make. Maybe you dream of a backyard full of happy hens. Maybe you want to start a small business selling chicks. You might even want to preserve a rare breed. Each goal points you toward a different path.
Start by asking yourself a few questions:
- Do you want to hatch just a few chicks for your family?
- Are you hoping to grow your flock quickly?
- Is your main goal to save money, or do you want the highest hatch rate?
- Do you enjoy hands-on projects, or do you prefer to let nature take its course?
- Are you interested in teaching your kids about life cycles and animal care?
Your answers help you pick the right method. If you want a simple, low-cost way, natural brooding fits well. You let the hen do most of the work. You watch and learn as she cares for her eggs. This method feels rewarding if you love seeing nature in action.
If you want more control or need to hatch many eggs, artificial incubation works better. You set the temperature and humidity. You check the eggs and make changes when needed. This method helps you plan your hatches. You can even hatch eggs year-round.
Here’s a quick table to help you match your goals with the right method:
| Your Goal | Best Method | Why It Fits |
|---|---|---|
| Small flock, low cost | Natural Brooding | Simple, uses what you have |
| Large flock, steady supply | Artificial Incubation | Scalable, more control |
| Rare breed preservation | Artificial Incubation | Protects valuable eggs |
| Teaching kids, hands-on learning | Natural Brooding | Shows natural behaviors |
| Business or selling chicks | Artificial Incubation | Higher output, reliable schedule |
Tip: Write down your top goal before you start. This helps you stay focused and pick the method that brings you the most joy.
You can always try both methods. Many chicken keepers use natural brooding for small batches and artificial incubation for bigger projects. Your goals may change over time. Stay flexible and enjoy the process. Chicken incubation is not just about hatching eggs. It is about learning, growing, and reaching your dreams.
You want healthy chicks and a method that fits your life. Remember, keeping eggs at the right temperature and humidity is key for strong hatches. Here’s a quick look at what matters most:
| Factor | Best Practice | Why It Matters |
|---|---|---|
| Temperature | 99.5°F–100.5°F | Supports embryo growth |
| Humidity | 70%–80% | Prevents egg moisture loss |
| Egg Position | Pointed end down | Keeps embryo centered |
- Think about your climate, flock size, and budget.
- Choose a method you feel confident using.
- Trust yourself—both natural brooding and incubators can work well!
No matter what you pick, you can raise happy, healthy chicks with care and attention.
FAQ
How many eggs can a broody hen hatch at once?
Most broody hens can cover about 10 to 14 eggs. Bigger hens might handle a few more. If you give her too many, some eggs may not stay warm enough. Always watch to see if she covers them all.
What happens if the power goes out during artificial incubation?
If the power goes out, the temperature drops fast. Chicks may not survive if it stays cold for too long. Try to keep the eggs warm with towels or a hot water bottle until the power comes back.
Can you mix eggs from different hens in one incubator?
Yes, you can mix eggs from different hens in one incubator. Just make sure all the eggs are about the same age. This helps the chicks hatch around the same time and makes care easier for you.
Do you need to wash eggs before incubating them?
You should not wash eggs before incubation. Washing can remove the natural coating that protects the egg. If an egg is very dirty, gently wipe it with a dry cloth instead.
How do you know if an egg is fertile?
You can check fertility by candling the egg after about a week. Hold a flashlight to the egg in a dark room. If you see veins or a dark spot, the egg is fertile and growing.


0 Comments