
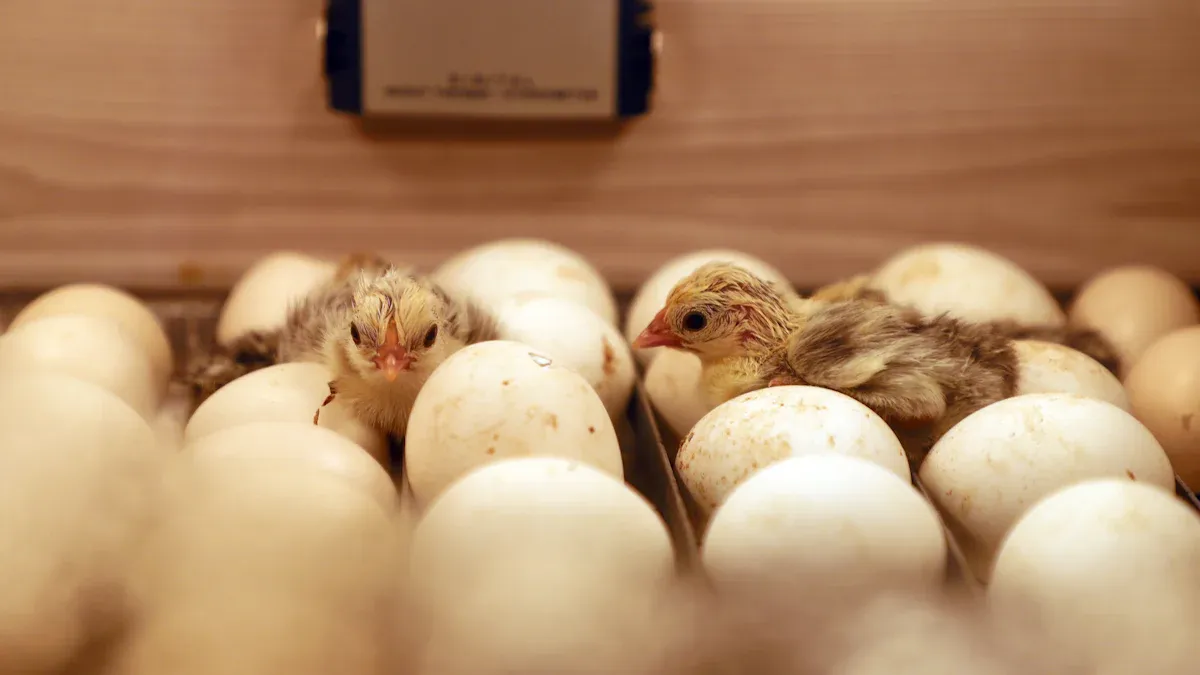
Watching a chick hatch is exciting, but it can also be stressful when things look slow or “stuck.” Most of the time, the safest choice is to wait and let the chick finish on its own. In a few cases, though, gentle assisted hatching can save a life. This guide helps you tell the difference, so you know when to help a chick hatch and when to hold off and keep your touch light.
If your basic incubator settings are not steady, you will face more “should I help?” decisions. A reliable, well-tuned Egg Incubator that holds temperature and humidity evenly can prevent many sticky or shrink-wrapped chicks in the first place.
If you are brand new to hatching, it can also help to read a simple beginner incubator guide for chicken eggs before you start. Once your basic routine is solid, this article will walk you through the edge cases where a chick might need support.
Key Takeaways
-
Most chicks hatch on their own if temperature, humidity, and turning are in a safe range.
-
From the first external pip, a normal hatch often takes 12–24 hours and sometimes up to about 36 hours.
-
Use a simple “24-hour guideline”: if an otherwise active chick has not made progress 24 hours after pipping, review your checklist and consider careful support.
-
Dry, tight, white membranes and a loud but weakening peep can be signs the chick is in trouble.
-
Strong, steady peeping, slow but visible progress, and a soft, damp membrane are usually reasons to wait and keep the incubator closed.
-
Never rush. Assisted hatching should be slow, gentle, and done in stages with plenty of “back in the incubator to rest” time.
-
Some chicks that need heavy assistance will have long-term problems. It is usually best not to breed from those birds.
Understanding the Normal Hatching Timeline
From Internal Pip to Zip
Before you decide to help a chick hatch, it is important to know what a normal hatch looks like. That way you are not “fixing” something that is actually on schedule.
Here are the main stages for a typical chicken egg near hatch day:
|
Stage |
What You See |
Approximate Timing |
|---|---|---|
|
Internal pip |
Chick breaks into the air cell; you may hear faint peeping when you candle. |
Often 12–24 hours before external pip. |
|
External pip |
Small crack or chip in the shell, usually near the air cell. |
Can sit like this 12–24 hours while the chick rests and absorbs yolk. |
|
Zip |
Chick makes a line of little chips around the shell like a zipper. |
Commonly 1–3 hours, but some chicks take longer. |
|
Hatch |
Chick finally pushes free, then rests and dries off. |
Usually within 24 hours of the external pip. |
Tip: A chick that is peeping, breathing, and making tiny chips now and then is usually better left alone, even if you are feeling impatient.
The 24-Hour Guideline
Many keepers use a simple “24-hour guideline” to avoid rushing in too early. It looks like this:
-
Note the time of the first external pip.
-
For the first 12–18 hours, just watch and listen. Do not open the incubator unless you must add water.
-
At around 24 hours with no real progress, start a careful check: look at the air cell, membrane color, and chick behavior.
-
Only move toward active helping if the chick shows several “trouble signs,” not just slow progress.
Some healthy chicks do take closer to 36 hours between external pip and hatch. This is one reason to rely on a full checklist, not only the clock. A stable incubator and calm, consistent conditions matter more than “perfect timing to the minute.”
Signs a Chick Might Need Help
Assisted hatching should be rare. But it can be the right choice when several warning signs line up at the same time.
Common red flags include:
-
It has been more than 24 hours since external pip and the chick has made almost no shell progress.
-
The membrane looks dry, thick, and white instead of soft and see-through.
-
The chick’s peeping has gone from strong to weak or stops completely.
-
You see the beak or a little face through the pip hole, but the chick seems stuck in one position for many hours.
-
Other eggs from the same set are hatching normally, but this one lags far behind.
-
The chick is badly malpositioned on candling, for example the head is away from the air cell.
|
Sign |
What It Can Mean |
What to Consider |
|---|---|---|
|
Dry, white membrane |
Humidity was too low or the hatch has gone on too long. |
Higher humidity and very gentle moistening may be needed. |
|
No progress after 24 hours |
Chick may be exhausted or stuck. |
Review your pre-assist checklist before stepping in. |
|
Weak, fading peep |
Chick is running out of energy or air. |
Time to look closer at the membrane and air cell. |
|
Obvious malposition |
Chick may not be able to zip in a normal way. |
Plan for slow, partial shell removal if needed. |
Note: No single sign means you must assist. Always look at the whole picture: time, membrane, chick movement, and how the rest of the hatch is going.
When You Should Wait and Watch
Waiting is often the hardest part, but it is also one of the kindest choices you can make. Helping too soon can cause bleeding, infection, and long-term health issues. In many cases, patience is safer than action.
Here are situations where you usually should not help:
-
The chick pipped less than 18–24 hours ago and is still peeping or rocking.
-
The membrane looks moist and translucent instead of dry and tight.
-
You see small chips or a short section of zipping that slowly grows over time.
-
Overall humidity and temperature have been steady and other eggs are on a similar schedule.
-
You see blood vessels in the membrane when you gently candle near the pip hole.
Blood vessels are especially important. If you see many active red vessels in the membrane, the chick has not finished absorbing its yolk and is not ready to come out. Opening the shell too far at this stage can cause a serious, sometimes fatal bleed.
Your Pre-Assist Checklist
Before you decide to help, run through a simple checklist. This keeps your decisions calm and consistent instead of driven by worry alone.
-
Time since external pip: Has it been at least 24 hours, and are other eggs from the same batch hatching?
-
Chick behavior: Is it still peeping and pushing now and then, or is it silent and still?
-
Membrane look and feel: Does the membrane look damp and thin, or dry and white?
-
Blood vessels: When you gently lift a little shell at the edge, do you see active red veins?
-
Incubator history: Did you have known problems with low humidity or big temperature swings?
|
If You See… |
Then Usually… |
|---|---|
|
Active chick, clear veins, moist membrane |
Wait and monitor. Do not assist yet. |
|
Very dry membrane and fading peep after 24+ hours |
Consider careful, partial assistance. |
|
No movement, no sound, dark sticky membrane |
Outcome may already be poor. Check gently but be prepared for loss. |
Tip: If you find yourself needing to assist many chicks in the same hatch, step back and review your overall setup. A solid basic routine can fix more than any single rescue.
Step-by-Step Assisted Hatching (When It Is Truly Needed)
If your checklist points toward real trouble and you choose to help, move slowly. The goal is to give the chick a chance, not to “pull it out” quickly. Many keepers plan to help only as far as needed to free the beak and chest, then let the chick finish the rest.
1. Set Up Your Space
-
Wash your hands well with soap and water.
-
Prepare a clean towel, cotton swabs, and warm water in a small cup.
-
Raise incubator humidity to the higher end of your range (often around 65–70% for hatch).
-
Work quickly but gently outside the incubator, then return the egg so it can stay warm between steps.
2. Gently Widen the Pip
-
Take the egg out and sit down at a stable table.
-
Use your fingernail or a dull tool to chip tiny bits of shell around the pip hole, no more than a few millimeters at a time.
-
Stop if you see any fresh blood. Put the egg back in the incubator for at least 20–30 minutes before checking again.
-
If the membrane is dry, you can lightly dab it with a cotton swab dipped in warm water. Do not soak the chick.
3. Free the Beak and Chest Only
In many cases, freeing the beak and upper body is enough. Once the chick can breathe and move a little more, it may be able to finish the zip by itself.
-
Gently open enough shell so the beak is clear and the chick can take full breaths.
-
Check that the membrane around the beak and neck is soft and not stuck over the nostrils.
-
Return the egg to the incubator for at least 30–60 minutes to let the chick rest.
4. Only Continue if the Yolk Is Absorbed
Heavy assistance, where you remove most of the shell, carries more risk. Only go this far if the chick is clearly failing and you understand the risks.
-
If you see exposed yolk sac or a large, moist “bubble” at the chick’s belly, stop. The chick is not ready to come free.
-
If the yolk appears fully drawn in and the navel is closed or nearly closed, you can very carefully peel more shell and membrane away in small sections.
-
Always stop if you see new bleeding or if the chick becomes very limp and unresponsive.
Important: Assisted hatching always carries some risk. Even when you do everything right, not every chick will survive or thrive.
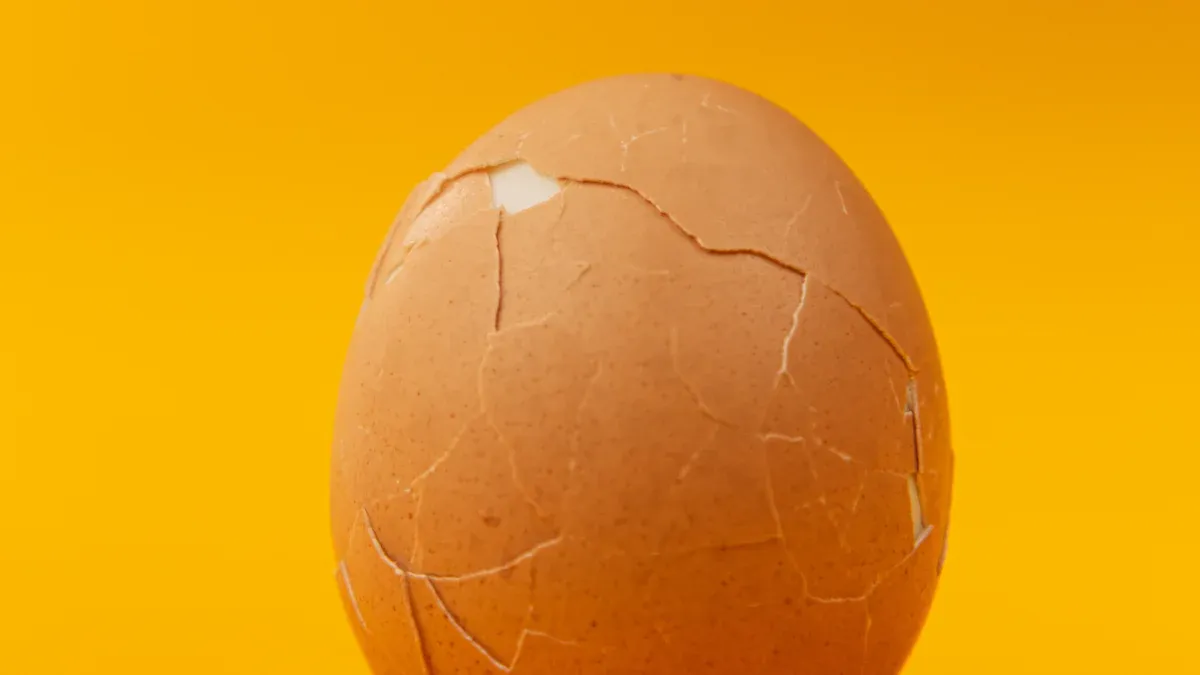
Cracked Shells and High-Risk Eggs
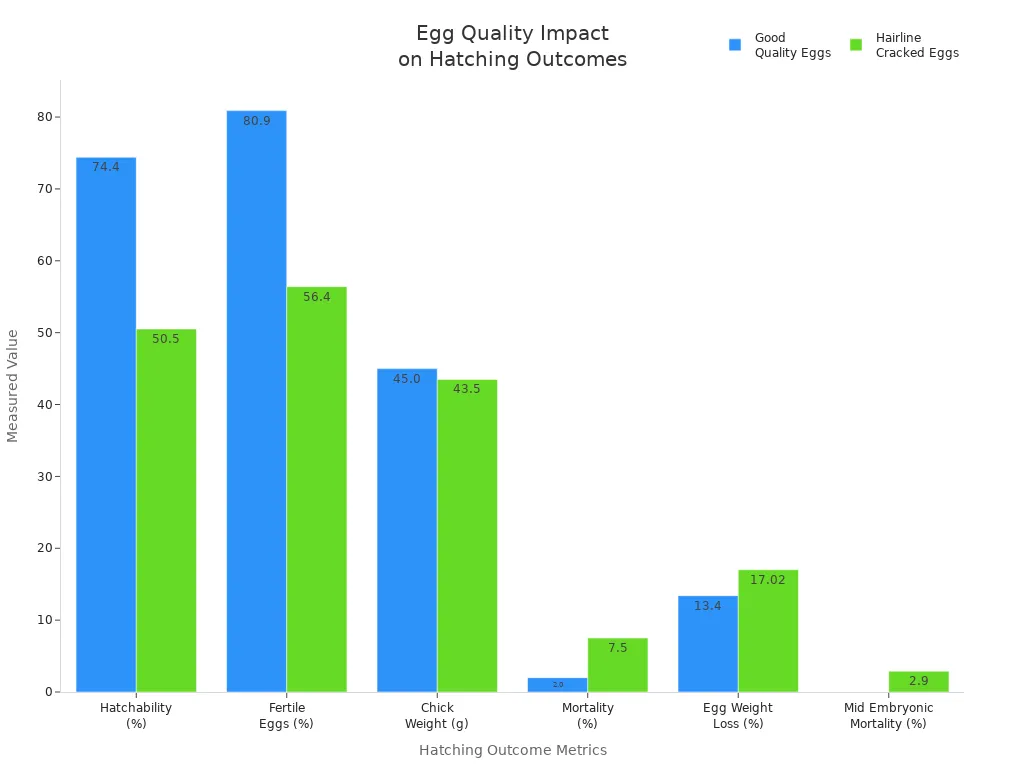
Some eggs start out with tiny cracks or odd shell quality. These eggs are more likely to struggle near hatch and may be more prone to infection. Many keepers choose not to set obviously cracked eggs at all for this reason.
|
Egg Type |
Typical Outcome |
What It Means for You |
|---|---|---|
|
Good, solid shell |
Higher hatch rates and fewer infections. |
Best choice for families, classrooms, and new keepers. |
|
Hairline-cracked shell |
Lower hatch rate and more “stuck” chicks. |
Often not worth setting unless you have lots of experience. |
Even with gentle support, high-risk eggs will not always produce strong, long-lived birds. For most backyard keepers, it is kinder to start with the best quality eggs you can, and to accept that not every chick can or should be saved.
Aftercare for Assisted Chicks
A chick that needed help will usually need extra care in the hours and days after hatch. Your goal is to keep it warm, hydrated, and clean while you watch for signs of infection or long-term problems.
-
Place the chick back in the warm, humid incubator until it is fully free from the shell and the navel area looks dry.
-
Once mostly dry, move it to a clean brooder at about 95°F (around 35°C) for the first week, then lower the temperature by about 5°F each week.
-
Offer fresh water and starter feed once the chick is steady on its feet. You can tap the feed gently to show it where to peck.
-
Watch for swelling, bleeding, bad odor, or trouble breathing. These are red-flag signs that may need a vet’s help.
Make sure children wash their hands after handling chicks and that an adult supervises all chick time. Young birds and children both are more vulnerable to germs. Simple handwashing and keeping brooders clean go a long way toward keeping everyone healthy.
Risks, Ethics, and Long-Term Planning
Helping a chick hatch can feel heroic, but it also has ethical questions. Many chicks that need heavy assistance have underlying genetic or developmental problems. They may grow more slowly, have leg issues, or struggle with health in general.
For a family pet or a special classroom project chick, it may be reasonable to give that bird extra support and a kind home, even if it is not perfect. For a breeding flock, though, most keepers choose not to breed from birds that needed a lot of help to hatch. This helps protect the long-term strength and welfare of the flock.
If you notice repeated problems across hatches, focus first on improving your basic incubator routine. Our troubleshooting guide for hatching problems and a simple egg incubation glossary can help you sort out common terms and mistakes.
Data authenticity note: The timelines, temperature and humidity ranges, and hatch-rate patterns in this article are based on typical incubator manuals, standard small-flock practice, non-branded poultry extension teaching materials, and aggregated records from backyard keepers. Real-world results vary with breed, incubator model, room conditions, and flock health. Always follow your own incubator’s manual and ask local experts or an avian veterinarian for help with serious health issues or repeated hatch failures.
FAQ
How long should I wait before helping a chick hatch?
Most keepers wait at least 24 hours after the first external pip before considering help, as long as the chick is still peeping or making small chips. Some healthy chicks take closer to 36 hours to finish.
How do I know if a chick is shrink-wrapped?
A shrink-wrapped chick is usually stuck to a dry, tight, white membrane. The membrane may look like plastic wrap over the chick’s head and neck. This is more common when humidity was too low near hatch.
Is assisted hatching safe?
Assisted hatching always has risks. It can cause bleeding, infection, or long-term weakness if done too early or too quickly. It should be used only when several clear warning signs are present.
Should I help every chick that is slow to hatch?
No. Many slow chicks finish on their own if you keep humidity and temperature steady and leave the incubator closed. Use the full checklist, not just the clock, before you decide to step in.
What should I do if a chick keeps needing help in every hatch?
If you see the same problems over and over, review your incubator settings, room conditions, and egg quality. You may also want to talk with an experienced breeder or an avian vet about your flock and your setup.


0 Comments