
Quick Reference Table: Ideal Humidity Levels for Quail Incubation
|
Species |
Days 1–14 (Setting) |
Last 3 Days (Hatching/Lockdown) |
Dry Climate Adjustment |
Humid Climate Adjustment |
|---|---|---|---|---|
|
Coturnix |
45–55% RH |
65–75% RH |
Use higher range |
Use lower range |
|
Button |
45–55% RH |
65–75% RH |
Use higher range |
Use lower range |
|
Bobwhite |
45–55% RH (Days 1–20) |
70–75% RH (Days 21–24) |
Use higher range |
Use lower range |
Use these ranges as starting points, then verify by air-cell growth and weight-loss targets. Short egg storage around 60–64°F (16–18°C) at roughly 70–80% RH for up to 7–10 days helps maintain viability. To simplify day-to-day control, explore our quail egg incubators.
Key Takeaways
-
Log humidity daily. Adjust for species and room climate using a simple checklist.
-
Start at 45–55% for Days 1–14. Raise to 65–75% for the final three days.
-
Watch the air-cell trend: too small → lower RH; too large → raise RH.
-
Track temperature/humidity with brief notes so patterns are easy to tune.
-
Dry rooms: use the high end of each range. Humid rooms: use the low end.
Quail Incubation Humidity Guide
Humidity by Species
Match humidity to your quail species for best results, and fine-tune based on what you see in your incubator.
-
Coturnix quail: 45–55% for Days 1–14/15; 65–75% during lockdown.
-
Button quail: Start at 45–55%. In dry rooms lean high; lockdown 65–75% guided by the air cell.
-
Bobwhite quail: 45–55% during the main incubation, then 70–75% for the final 3–4 days.
Tip: Pair humidity with a consistent turning platform—reliable desktop egg incubators make schedules easier to keep.
Humidity by Day
Think in two phases: a steady “setting” phase and a wetter “lockdown” phase for hatching support.
|
Incubation Phase |
Temperature (°F) (Forced-Air/Still-Air) |
Humidity (%) |
|---|---|---|
|
First 14 Days (Setting) |
99.5 / 101 |
45–55 |
|
Final 3 Days (Lockdown) |
99.0–99.5 / 100.5–101 |
65–75 |
Keep humidity steady during the first 14 days, then raise it for hatch support in the last three days. This reduces sticky membranes and helps clean zips.
Note: Adjust RH in ~5% steps and recheck after ~48 hours. Always confirm with the air-cell trend.
Climate Adjustments
Room climate shifts your effective incubator humidity.
-
Dry climate: Use the higher end of the range; add water surface area to slow evaporation.
-
Humid climate: Use the lower end; vent a bit more to purge moisture without starving fresh air.
Tip: Check room RH before setup. Very dry rooms may need a sponge; very humid rooms may need a dehumidifier. Never close vents just to raise RH—expand water surface area instead.


Why Humidity Matters
Embryo Development
Humidity controls water loss and therefore gas exchange and organ development. Too high or too low for long periods can harm embryos.
-
Incubation humidity influences hatchability, egg weight loss, chick weight, and embryo mortality.
-
If eggs don’t lose enough weight, gas exchange suffers and late losses can rise.
-
Sustained high humidity during setting (e.g., 75–80%) can increase early/late losses; lockdown is the controlled exception.
-
Moderate humidity (~45–55%) during setting is common and reduces late-stage risk.
Tip: Watch the air cell: slow growth → lower RH; fast growth → raise RH.
Hatch Rates
Humidity affects hatch rates and chick vigor, and so does pre-incubation storage.
-
Both overly wet and overly dry storage are harmful; short-term, moderate humidity with cool temperature is safer.
-
Storage conditions alter shell/membrane properties and can change chick quality.
-
Once set, use weighing and air-cell tracking to avoid “too little” or “too much” weight loss.
Note: Keep setting at 45–55% and lockdown at 65–75% unless your data (air-cell/weight) points otherwise.
Incubating and Hatching Quail Eggs
Intake Check
Inspect each egg for cracks, odd shapes, or heavy soiling. Pencil an ID for tracking. Store and set pointy side down to protect the air cell.
Tip: For shipped eggs, rest upright 12–24 hours before setting; if the air cell is unstable, extend rest and re-check.
Rest and Set
After intake, rest at room temperature, pointy side down, for at least 12 hours. For setting: 99.5°F (37.5°C) and start humidity at 45–50%. Log your start time.
First 48 Hours
The first 48 hours are stability-critical. Default: keep 45–50% RH and minimize lid openings. Only in very dry rooms or for shipped eggs with unstable air cells, temporarily increase to 50–55% to moderate evaporation and sloshing.
Resume Turning
After 48 hours, begin gentle turning (or bridge with slight tilting for a day). Turn at least 4 times/day, stop three days before hatch, and raise RH to 65–75%. A dependable option for hands-off schedules is a 3-tray automatic egg incubator.
Note: Always calibrate by air-cell and weight-loss curves; make small steps (~5%).
Incubation Humidity by Day
Early Phase
During Days 1–14, prioritize stable temperature and humidity. Recommend 45–50% to support even water loss. Verify your setpoint before loading eggs and use a reliable hygrometer. If the air cell grows slowly, lower RH slightly.
-
Hold 45–50% (setting phase).
-
Daily readings and a simple log.
-
Adjust RH by changing water surface area.
Mid Phase
Mid-incubation (often Days 12–16) continue a moderate humidity (~45% baseline) and watch the trend:
|
Day |
Relative Humidity (%) |
|---|---|
|
12 |
45 |
|
12–16 |
45 |
|
16 |
65–75 (lockdown prep) |
Re-check air-cell size every few days: too small → lower RH; too large → raise RH. Different sources of eggs evaporate differently, so local tuning is normal.
Lockdown Phase
Begin lockdown three days before hatch. Raise humidity to 65–75%, stop turning, and minimize lid openings. Keep temperature stable and ensure fresh air.
-
Lockdown humidity 65–75%.
-
Open only when essential.
-
Stable temp/RH + adequate ventilation.
Tip: Use the air cell and the weight-loss curve as the final check; observe ~48 hours after each adjustment.
Monitoring and Adjusting Humidity
Tools and Methods
Use a digital hygrometer placed at egg-top height and control water surface area with trays/sponges. A wet-bulb thermometer can help gauge evaporation strength. If you prefer set-and-forget control, a digital automatic egg incubator keeps temperature and humidity steady.
Tip: Matching sensor height to egg top yields the most representative reading.
Weight Loss Tracking
Build a target curve: weigh at set, Day 7, Day 14, and before lockdown. Aim for ~11–13% cumulative loss by lockdown. Too fast → raise RH; too slow → lower RH.
-
Record D0, D7, D14, D18 weights.
-
Target ~11–13% total loss by lockdown.
-
Adjust humidity in small steps based on deviation.
-
Track in a sheet or notebook.
Air Cell Growth
Pair candling with the weight curve. A small air cell means insufficient evaporation; a large one means too much. Make gradual RH corrections and verify on the next check.
Note: Regular checks dramatically improve control and repeatability.
Common Problems and Solutions
Early Embryo Death
Early quitters often correlate with humidity errors: too high during setting → small air cell/poor oxygen; too low → dehydration. Re-verify instruments and return to the recommended ranges.
|
Humidity Condition |
Sign/Effect |
|---|---|
|
High humidity at hatch |
Small air cell, sticky membranes; chick struggles to rotate and zip. |
|
Low humidity at hatch |
Shrink-wrap: membranes dry/hard and restrict rotation and escape. |
Action order: verify sensors → adjust water surface area → re-test. Stay within the recommended ranges and fine-tune slowly.
Small Air Cell
Small air cell = evaporation too low (RH too high). Increase ventilation slightly, reduce water surface area, and allow time to stabilize; confirm via candling.
-
Open vents or reduce pans.
-
Use the air-cell chart as a reference.
-
Rely on a trustworthy hygrometer.
Correcting early preserves oxygen supply and hatchability.
Sticky Chick
Lockdown mis-humidity causes “sticky chicks.” Hold 65–75% RH and minimize lid openings; check for sudden RH drops or empty water pans.
-
Stable temp/RH.
-
Reliable instruments.
-
Lockdown RH 65–75% without overshooting wildly.
-
If it occurs, review humidity and opening records.
Tip: Keep a brief “issue → action → result” log to improve next time.
Common signs of humidity problems: Swollen eggs, small air cells, late hatching, sticky chicks, mold or bacteria.
Quick fixes: verify tools, adjust water surface area, and keep good notes. These steps help you reach better hatch rates and steady results over time.
Quick Reference Guide
Humidity & Timeline Chart
Use this quick reference to set up your quail incubator for any species.
|
Species |
Incubation Period |
Temp (°F/°C) |
Humidity (Days 1–Lockdown) |
Humidity (Lockdown) |
Stop Turning |
Max 'Tilt Only' (No Turn) |
|---|---|---|---|---|---|---|
|
Coturnix Quail |
16–18 days |
99.5 / 37.5 |
45–55% |
65–75% |
Day 14–15 |
7 days* |
|
Button Quail |
15–17 days |
99.5 / 37.5 |
45–55% |
65–75% |
Day 13–14 |
7 days* |
|
Bobwhite Quail |
22–24 days |
99.5 / 37.5 |
45–55% |
70–75% |
Day 20–21 |
7 days* |
|
California/Valley Quail |
22–23 days |
99.5 / 37.5 |
45–55% |
65–75% |
Day 20 |
7 days* |
|
Gambels Quail |
22 days |
99.5 / 37.5 |
45–55% |
65–75% |
Day 20 |
7 days* |
|
Mountain/Mearns Quail |
24–25 days |
99.5 / 37.5 |
45–55% |
65–75% |
Day 23 |
7 days* |
Tip: Always stop turning three days before hatch and switch to lockdown humidity. *“Tilt only, no turn” for up to 7 days applies only to shipped eggs with unstable air cells (detached/saddled/tremulous) and is not recommended for normal batches.
Key Steps for Each Hatch:
-
Candle every 3–4 days to check air-cell growth.
-
Weigh at start, midpoint, and before lockdown to track weight loss.
-
Turn 4–6 times daily until lockdown.
-
For hands-off consistency, consider a temperature- and humidity-controlled unit like our quail incubators.
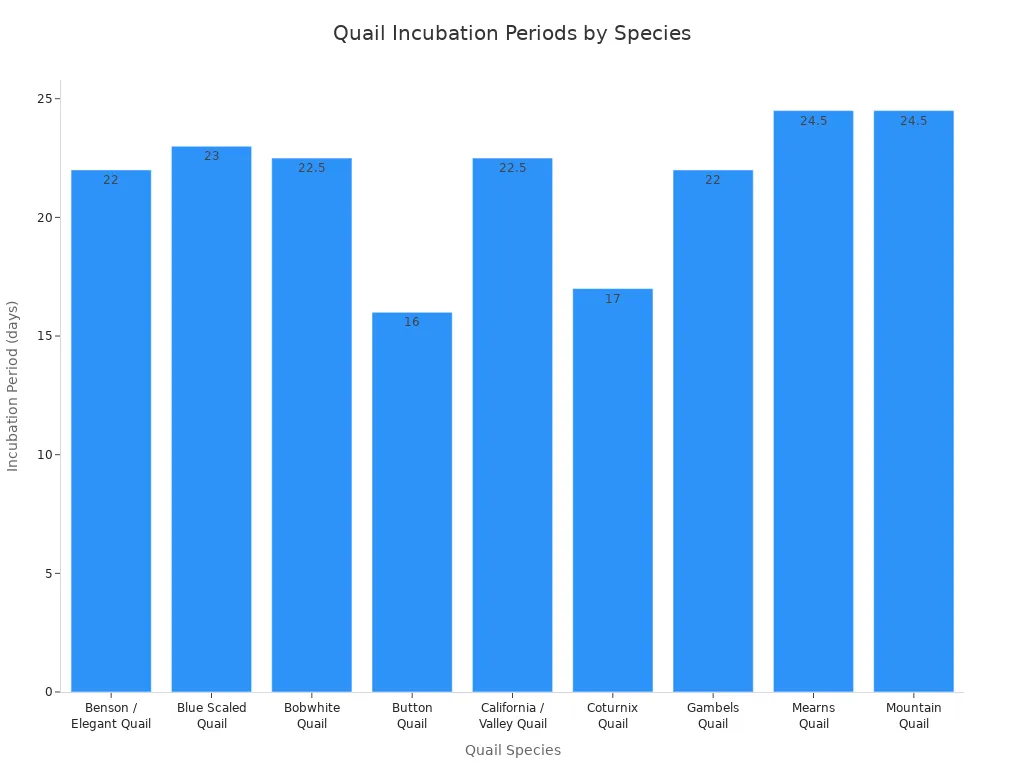
Different quail species have different incubation periods. Always match your settings to the species and your room climate. Simple daily checks plus small, data-driven adjustments deliver the best results.
You drive hatch success by watching humidity closely. Use the tables and tips to set the optimum humidity for your quail eggs by day and by species.
-
Check RH with a hygrometer/sensor often.
-
Adjust to reach the optimum as room weather changes.
-
Keep airflow steady; 45–55% during setting, 65–75% during lockdown.
Stay observant and make small changes when needed. Careful control produces strong chicks and consistent hatches. 🐣
Data authenticity note: Ranges and timelines here reflect widely accepted poultry-hatching practice, equipment manuals, and aggregated keeper logs. To keep this page clean we do not include external links; we can provide a brief source description list without URLs on request.
FAQ
What happens if humidity is too high during incubation?
During the setting phase, sustained high RH leads to too little weight loss and small air cells, which can cause late mortality or hatching difficulties. Lower RH and re-confirm with candling/weights.
How do I check if my incubator humidity is correct?
Place a digital hygrometer at egg-top height and candle to check the air cell. Slow growth → lower RH; fast growth → raise RH.
Can I use tap water in my incubator?
Yes. If mineral content is high, distilled water can reduce scale buildup. Keep pans clean to limit bacteria.
What should I do if my room is very dry or humid?
Dry: increase water surface area or add a wet sponge.
Humid: increase ventilation slightly or dehumidify the room.
Use in-incubator readings and the air-cell trend to guide changes.


0 Comments