
You can start hatching eggs at home if you follow simple steps. Many beginners feel worried about getting ready to hatch eggs, but you are not the only one. Some common worries are:
-
Keeping the right humidity during incubation
-
Knowing when to help if a chick has trouble hatching
-
Picking and using the right equipment
This egg hatching guide will help you feel sure and excited for your hatching eggs journey.
Key Takeaways
-
Begin with good, fertile eggs from trusted hatcheries. This helps you have a better hatch. Keep the temperature and humidity at the right levels during incubation. This helps the embryos grow well. Turn the eggs often so embryos do not stick to the shell. This helps them grow healthy. Stop turning the eggs in the last three days. Raise the humidity to help chicks hatch. Watch your chicks closely after they hatch. Make sure they are dry and comfortable before moving them to the brooder.
Choosing Hatching Eggs
Selecting Fertile Eggs
You want to start with the best hatching eggs for a successful hatch. Always order from reputable hatcheries like Meyer, Cackle, or Stromberg's. These companies focus on healthy, mature breeders. When you select eggs, look for these important qualities:
|
Criteria |
Description |
|---|---|
|
Weight |
Choose eggs that weigh 50-70 grams, depending on the breed. |
|
Shape |
Pick eggs with a round, normal shape. Odd shapes can lower hatch rates. |
|
Embryo Quality |
Good eggs have a strong embryo, usually ring-shaped and 4-5 mm wide. |
|
Eggshell |
The shell should be smooth, clean, and free from cracks. |
|
Yolk Quality |
The yolk should look even in color and have enough nutrients. |
|
Air Cell |
The air cell must be stable and at the blunt end of the egg. |
Tip: Avoid eggs that are too large or too small. Only use clean eggs for hatching.
Inspecting for Damage
When your hatching eggs arrive, check each one for cracks or thin shells. Do not use any eggs with damage, as bacteria can enter and harm the embryo. Gently handle each egg to keep the shell's pores clear. If you see dirt, wipe it off with a soft, warm, damp cloth. Never wash eggs, as this can remove the protective layer.
Note: The USDA requires a permit for importing hatching eggs into the United States. You also need a veterinary health certificate showing the flock is disease-free. Eggs from some countries must travel in sealed vehicles and may need quarantine.
Storing Before Incubation
Proper storage keeps your hatching eggs healthy before incubation. Follow these steps:
-
Store eggs at 53–60°F (11–15°C) with 75–85% humidity.
-
Place eggs on their side or with the big end up.
-
Turn or tilt eggs gently every day.
-
Limit storage to 7 days for the best hatch rate.
-
Warm eggs for 4–8 hours before placing them in the incubator.
Remember: The quality of your hatching eggs affects your success. Handle eggs with care and avoid long storage times.
Hatching Guide: Incubator Setup
Incubator Types
You can pick a forced-air or still-air incubator. Forced-air incubators have a fan that moves air around. This keeps the temperature the same everywhere inside. It helps you get more chicks to hatch. The fan also keeps heat and humidity steady. Still-air incubators do not have a fan. They can have hot and cold spots inside. You might get fewer chicks if you do not watch them closely.
-
Forced-air incubators keep the temperature even and help more chicks hatch.
-
Still-air incubators can have temperature changes and need more checking.
-
Forced-air models control humidity better and hold more eggs.
-
Still-air incubators cost less but need more work.
Put your thermometer and humidity sensor at the same height as the eggs. This way, you know what your eggs really feel.
Calibration Steps
Check that your incubator shows the right numbers before you start. Put your digital sensor and another thermometer at egg height. Use a wet bulb hygrometer to check the humidity. Wait until the incubator is warm enough before you check. For forced-air incubators, set it to 99.5°F. For still-air incubators, measure at the top of the eggs. Keep it between 100–101°F.
-
Use two thermometers and two hygrometers to make sure your numbers are right.
-
Check the egg shell temperature with an infrared thermometer at the middle of the egg. Try to keep it between 100–101°F.
-
Write down where you put water trays and how long it takes for humidity to go back up after you open the incubator.
Tip: If you calibrate well, you can stop problems and help your eggs hatch.
Preheating
Always preheat your incubator before you add eggs. This lets the temperature and humidity stay steady. Most experts say to run the empty incubator for at least 24 hours first. The table below shows how long to preheat:
|
Source |
Preheating Duration |
|---|---|
|
Incubator Instructions (2025) |
12–24 hours |
|
Mastering Egg Incubation |
24 hours |
|
Beginner's Guide to Hatching Eggs |
24 hours |
Put your eggs in a tray or carton during incubation. This keeps them safe and makes turning them easier. Setting up your incubator the right way helps you start well and gives you a better chance for chicks to hatch.
Hatching Chicken Eggs: Daily Care
Temperature and Humidity
You must keep the right temperature and humidity for hatching chicken eggs. The best temperature for a forced-air incubator is 99.5°F, but you can aim for a range between 99.3°F and 99.6°F. If you use a still-air incubator, measure at the top of the eggs and keep it between 100°F and 101°F. The acceptable range for both types is 97°F to 102°F. If the temperature drops too low, the embryos grow slower and may hatch late. If the temperature rises too high, embryos can develop too fast, causing early hatching or malformations. Temperatures above 104°F can cause embryo death.
Humidity also plays a big role in your 21-day guide. For the first 18 days, keep humidity between 45% and 50%. Some guides suggest 58–60% relative humidity for better results. If humidity is too high, eggs can swell and deform. Too much moisture shrinks the air cell, making it hard for chicks to breathe. High humidity can also delay hatching and help mold or bacteria grow. If humidity is too low, chicks may have trouble breaking out of their shells.
|
Stage of Incubation |
Recommended Humidity (%) |
|---|---|
|
First 18 days |
45-50 |
|
Final 3 days |
65 or more |
Tip: Use a hygrometer to check humidity every day. Try to reach 11–13% cumulative egg weight loss by day 18 for the best hatch rate.
Turning Schedule
Turning eggs is a key step in your 21-day guide for hatching chicken eggs. You need to turn the eggs 4–6 times each day at about a 45° angle. This keeps the embryo from sticking to the shell and helps it grow strong. If you miss turns, embryos can end up in the wrong position or even die. The most important days for turning are days 3 to 7. Missing turns during this time lowers hatch rates and slows growth. If you forget to turn eggs between days 12 and 19, chicks may not get enough oxygen and will not grow well.
|
Turning Frequency |
Source |
|---|---|
|
24 times per day |
Freeman and Vince, 1974 |
|
12 times per day |
Almeida et al., 2015; Morita et al., 2016; Zhong et al., 2018 |
|
Every 2 hours |
Leandro et al., 2000 |
Most home incubators turn eggs automatically. You should check the turner every day to make sure it works. If you turn eggs by hand, wash your hands first and work gently. Always turn eggs at regular times to keep the embryos healthy.
Note: Stop turning eggs after day 18. This helps chicks get ready to hatch.
Candling
Candling lets you check the progress of hatching chicken eggs during your 21-day guide. You shine a bright light through each egg to see inside. You should candle eggs on day 7 and day 14. On day 7, you look for signs of life and remove any infertile eggs. On day 14, you check for dead or cracked eggs. Work quickly so you do not change the temperature or humidity too much.
|
Purpose of Candling |
Effective Days for Monitoring Development |
|---|---|
|
Assess fertility and development |
Day 5-6 |
|
Identify infertile eggs |
Day 9-10 |
|
Detect early mortality |
Closer to the day of transfer to hatcher |
Candling helps you spot problems early. You can remove eggs that will not hatch, which keeps the rest healthy. If you see blood rings or no movement, take those eggs out. Always handle eggs gently during candling.
The incubation period for hatching chicken eggs usually lasts 20 to 21 days. Temperature, humidity, and breed can change this timing. If you follow each step in your 21-day guide, you give your chicks the best chance to hatch strong and healthy.
Reminder: Daily care is the heart of hatching eggs. Pay attention to temperature, humidity, turning, and candling for a successful hatch.
Lockdown and Hatching
The final three days before your chicks hatch are called the lockdown period. This stage is critical for a successful hatch. You need to make several changes to your routine to help your chicks break out of their shells safely.
Stop Turning
On day 18, you must stop turning the eggs. Chicks need time to position themselves for hatching. If you keep turning the eggs, the chicks can get confused and may not find the right spot to break the shell. This can cause them to get stuck or even die inside the egg. When you stop turning, you give each chick the best chance to hatch on its own.
Tip: Remove the automatic turner or stop turning by hand after day 18. Let the eggs rest in the same position until the chicks hatch.
Increase Humidity
Humidity plays a big role during lockdown. You should raise the humidity in your incubator to at least 65%, but many experts recommend aiming for 70%. This extra moisture helps soften the eggshell and keeps the inner membrane from drying out. If the air is too dry, chicks can get stuck to the membrane, a problem called "shrink-wrapping." If the air is too wet, chicks might have trouble breathing or even drown.
-
Increase humidity to 65–75% during the last three days.
-
Add warm water to the incubator trays or use a wet sponge to boost moisture.
-
Avoid opening the incubator, as this can cause humidity to drop quickly.
-
If you must open the incubator, do it fast and add a warm, damp cloth to restore humidity.
Note: The right humidity helps chicks break free from their shells. Too little or too much can cause problems.
Ventilation
Chicks need fresh air to breathe, especially as they start to hatch. Even though you want to keep humidity high, you also need to make sure enough oxygen gets inside the incubator. Open or adjust the air vents to let in fresh air, but do not create cold drafts. Good ventilation helps chicks stay healthy and increases your hatch rate.
|
Ventilation Setting |
Hatchability (%) |
Chick Weight at Hatch (g) |
|---|---|---|
|
NV3 |
92.03 |
Highest |
|
NV2 |
90.05 |
Higher than V group |
|
NV1 |
89.15 |
Higher than V group |
|
V |
80.18 |
Lower than NV groups |
Tip: Open vents a little more each day during lockdown. Watch for signs of chicks pipping (cracking the shell) and make sure the air stays fresh.
Lockdown Checklist
-
Stop turning eggs after day 18.
-
Raise humidity to 65–75%.
-
Keep the incubator closed as much as possible.
-
Open vents for fresh air, but avoid cold drafts.
-
Watch for chicks pipping and hatching.
🚫 Do not open the incubator during hatching unless absolutely necessary. Each time you open it, you risk losing humidity and chilling the chicks.
If you follow these steps, you give your chicks the best chance to hatch strong and healthy.
Chicks to Brooder
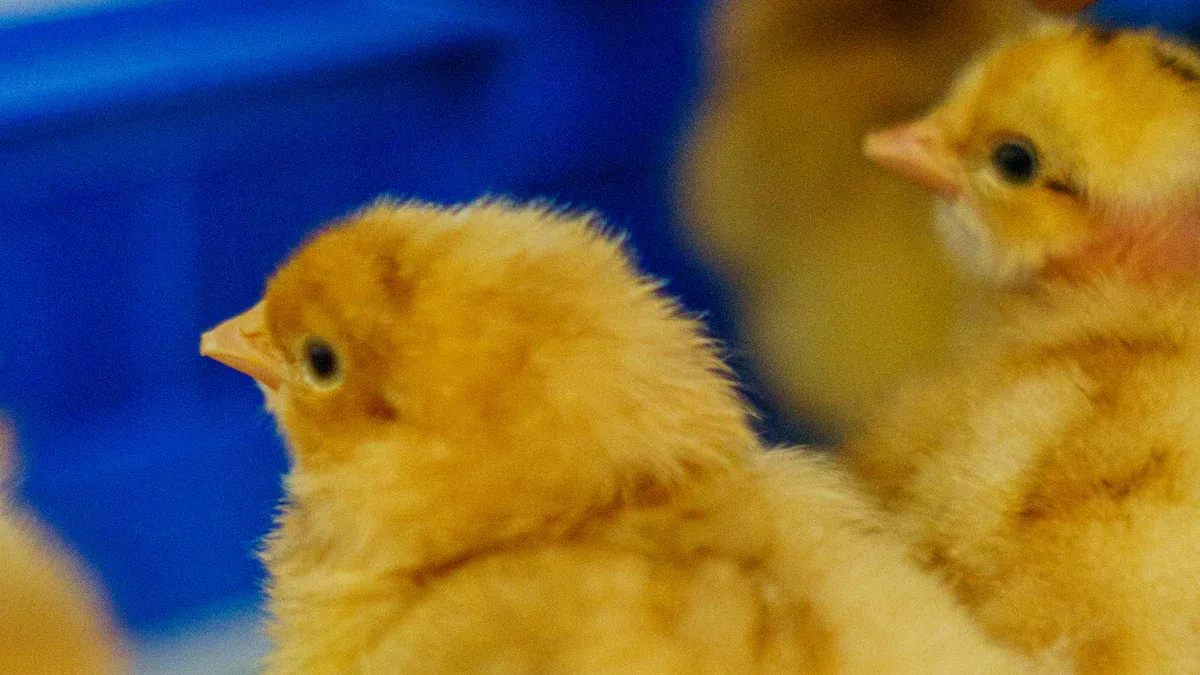
Leaving Chicks in Incubator
After hatching, you should leave your chicks in the incubator for at least 12 to 24 hours. This waiting period lets them dry off and fluff up. Sometimes, you may need to wait up to 48 hours if some chicks hatch late. Always check that each chick looks dry and their feathers feel soft before moving them. Chicks also need time for their navels to close. If you move them too soon, they can get chilled or stressed.
-
Leave chicks in the incubator until they are completely dry and fluffy.
-
Wait at least 12–24 hours, but up to 48 hours is safe if needed.
-
Make sure navels are closed before moving chicks.
Tip: Chicks can survive without food or water for the first 24 hours after hatching because they absorb the yolk before leaving the shell.
Moving to Brooder
When your chicks look ready, prepare the brooder before you move them. Warm up the brooder to the right temperature. Place food and water inside so chicks can eat and drink right away. Use shallow dishes for water and add marbles or clean stones to prevent drowning. Gently pick up each chick and dip its beak into the water to help it learn where to drink. Sprinkle chick starter feed on the brooder floor to encourage pecking. Watch your chicks closely for signs of stress or chilling.
-
Pre-warm the brooder before moving chicks.
-
Place water and food in the brooder.
-
Use marbles in water dishes to keep chicks safe.
-
Dip each chick’s beak in water as you place them in the brooder.
-
Sprinkle feed on the floor to help chicks find food.
-
Monitor chicks for signs of chilling or distress.
Brooder Temperature
Start your brooder at 90–95°F (32–35°C) for the first week. Lower the temperature by 5°F (about 3°C) each week as chicks grow and develop feathers. If chicks huddle under the heat lamp and chirp loudly, they feel cold. If they move far from the heat source and look tired, they feel too hot. Adjust the lamp height or wattage to keep them comfortable.
|
Week |
Ideal Temperature |
Notes |
|---|---|---|
|
Week 1 |
90-95°F (32-35°C) |
Starting temperature for chicks. |
|
Week 2 |
85-90°F (30-32°C) |
Gradual decrease as chicks grow. |
|
Week 3 |
80-85°F (27-30°C) |
Continue to lower temperature. |
|
Week 4 |
75-80°F (24-27°C) |
Further reduction as chicks feather. |
|
Week 5 |
70-75°F (21-24°C) |
Weaning off heat. |
|
Week 6 |
65-70°F (18-21°C) |
Chicks are mostly feathered. |
|
Week 7 |
60-65°F (15-18°C) |
Time to move outside. |
|
Week 8 |
50-60°F (10-15°C) |
Fully transitioned to outdoor conditions. |
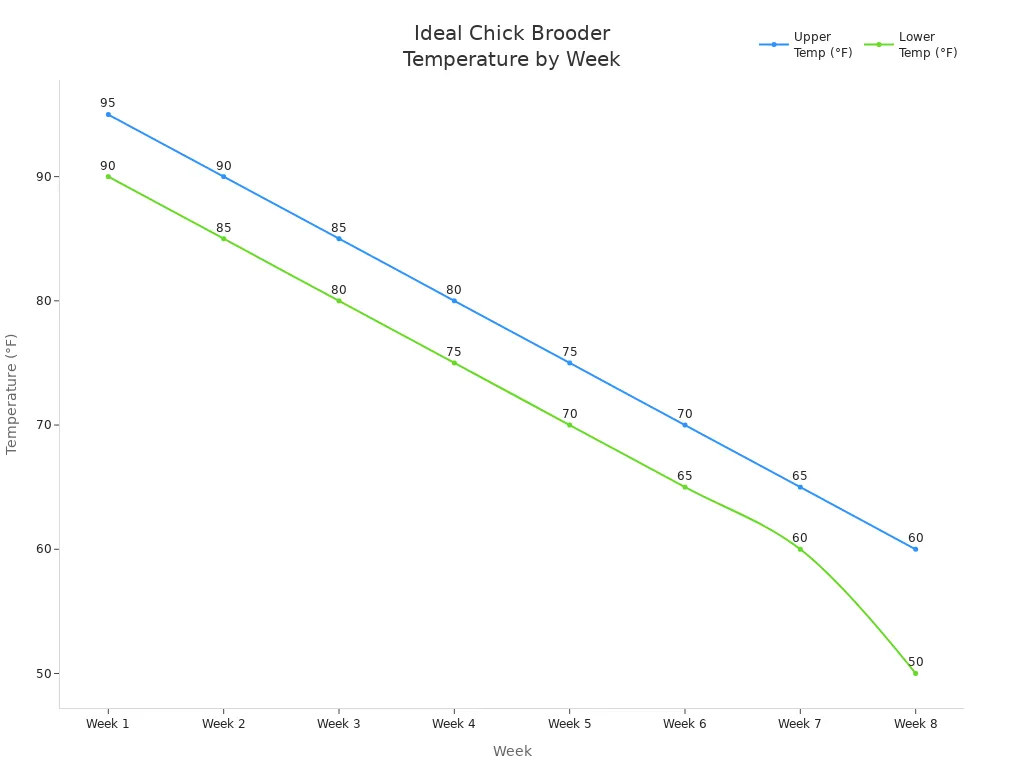
Note: Lower the brooder temperature each week. Watch your chicks’ behavior to keep them healthy and comfortable.
Quick Reference
Cheat Sheet
Here is a handy cheat sheet to help you remember the most important steps and numbers for hatching chicken eggs. Keep this chart nearby during your hatch!
|
Step |
What to Do |
Key Numbers |
|---|---|---|
|
Incubation Length |
Standard incubation period |
21 ± 1 days |
|
Forced-air: set to |
99.5°F |
|
|
Still-air: set to |
100–101°F |
|
|
Humidity |
Days 1–18: maintain |
58–60% |
|
Lockdown (last 3 days): raise to |
65–75% |
|
|
Turning |
Turn eggs daily |
4–6 times at 45° angle |
|
Turning Stop |
Stop turning on |
Day 18 |
|
Candling |
Check eggs on |
Days 7 and 14 |
|
Hatching |
From pip to out: allow |
12–24 hours (up to 48) |
|
Brooder Temp |
Start at |
95°F, lower 5°F each week |
📝 Tip: Avoid opening the incubator lid often. Even small temperature swings (more than ±0.5°F) can harm your hatch.
Common Mistakes
Many beginners make the same mistakes when hatching eggs. You can avoid these problems by following your cheat sheet and watching your eggs closely.
-
Using infertile eggs or eggs that do not show signs of life during candling.
-
Leaving rotten eggs in the incubator.
-
Not stopping egg turning after day 18.
-
Letting humidity drop too low, causing chicks to get stuck in the shell (shrink-wrapping).
-
Opening the incubator lid too often, which causes temperature and humidity swings.
-
Setting the temperature too high or too low.
-
Forgetting to candle eggs on days 7 and 14.
-
Not providing enough ventilation during lockdown.
-
Allowing eggs to hatch too early or too late.
-
Not lowering brooder temperature each week as chicks grow.
🚩 Watch for weak, sticky, or deformed chicks. These signs often mean something went wrong with temperature, humidity, or turning.
By keeping this quick reference close, you give your chicks the best chance for a healthy start!
You can get lots of chicks to hatch if you follow each step. Take your time and pay close attention. This helps you find problems early and keep chicks healthy. Most people new to hatching get about 80% of eggs to hatch. If you watch your eggs closely, you can get up to 90%. Each time you hatch eggs, you learn something new. If things do not go well, read this guide again and try another time.
|
Key Tip |
Why It Matters |
|---|---|
|
Keep temperature steady |
Helps embryos grow well |
|
Turn eggs daily |
Stops chicks from sticking |
|
Candle eggs |
Lets you check chick growth |
|
Raise humidity at end |
Makes it easier for chicks to hatch |
Stay positive and have fun learning!
FAQ
How do you know if an egg is fertile before incubation?
You cannot see fertility from the outside. You can candle eggs after 7 days in the incubator. If you see veins or a dark spot, the egg is fertile. Unfertile eggs look clear.
What should you do if a chick does not hatch on time?
Wait at least 24 hours after the first pip. Chicks often need extra time. Do not help unless you see blood or distress. Most chicks hatch without help.
Can you use eggs from your backyard chickens for hatching?
Yes, you can use eggs from your own flock. Make sure you have a rooster. Collect clean, undamaged eggs. Store them properly before incubation for the best results.
Why do some eggs not hatch even if you follow all steps?
Some eggs may not hatch due to genetics, age, or hidden damage. You can improve your hatch rate by using healthy breeders and following care steps. Not every egg will hatch.


0 Comments