
You want the best incubator for quail eggs because you want a smoother first hatch. For most beginners, a mid-range tabletop model with forced-air (a fan) and auto-turning makes daily care easier and helps keep conditions steadier. Many first-time keepers report lower hatch rates with shipped eggs (often around 50%), while locally sourced eggs can do better (often around 75–80%) when temperature and humidity stay stable. This guide breaks down what to look for and how to set up your incubator for a safer, more consistent hatch.
Key Takeaways
-
Pick a tabletop incubator that is beginner-friendly and steady. Forced-air (with a fan) helps keep heat even, and an auto-turner reduces daily work. Keep temperature at 99.5°F for forced-air models, or about 101°F at egg height in still-air models. Hold humidity around 45–55% for most of incubation, then raise it to about 65–75% for the final 3 days (lockdown). Turn eggs 3–5 times a day until day 15, then stop turning and avoid opening the lid. Use a hygrometer you trust (a simple salt test can check accuracy). Clean and fully air-dry the incubator after each hatch to help protect the next batch.
Why Quail Eggs Need the Right Incubator
Quail Egg Size and Hatch Window
Quail eggs are much smaller than chicken eggs. This means they lose heat and moisture faster. You need to pay close attention to their needs during incubation. Look at the table below to see how Coturnix quail eggs compare to chicken eggs:
|
Type of Egg |
Size Range (grams) |
Incubation Period (days) |
|---|---|---|
|
Coturnix Quail Eggs |
10 - 15 |
18 |
|
Chicken Eggs |
50 - 70 |
21 |
Because Coturnix quail eggs are tiny, they need steady warmth and the right humidity. Even a small change in temperature or moisture can affect your hatch rates. Quail eggs also hatch faster than chicken eggs, so you have less time to fix mistakes. If you want to get the best hatch rates, you must use an incubator that keeps conditions steady from start to finish.
Stability Over Extra Features
You might see incubators with many fancy features. Some have digital screens, alarms, or extra gadgets. These can help, but they do not matter as much as keeping the basics stable. For Coturnix quail eggs, you need:
-
Constant airflow and good ventilation to stop eggs from drying out.
-
Humidity that stays between 45–55% during most of the incubation and rises to 65–75% for the last few days.
-
Temperature that stays at 99.5°F if you use a forced-air incubator, or about 101°F at egg height in a still-air incubator.
Here is a quick look at the key settings for different incubator types:
|
Parameter |
Forced-Air Incubator |
Still-Air Incubator |
|---|---|---|
|
Temperature |
99.5°F |
101°F (top of eggs) |
|
Humidity (Incubation) |
45–55% |
45–55% |
|
Humidity (Hatch) |
65–75% |
65–75% |
If you keep these settings steady, you will see better hatch rates. Many beginners think extra features will boost their results, but stability is what really counts. Budget incubators can work, but you must check them more often. If you want less daily work and more reliable hatch rates, look for a model that holds temperature and humidity steady.
Tip: Always check the temperature at egg height, not just on the display. Small eggs like quail need even heat to hatch well.
Choosing the right incubator gives your quail eggs the best chance. Focus on stability first, and you will see your hatch rates improve.
Temperature Control in Quail Egg Incubators
You need steady temperature control to hatch Coturnix quail eggs successfully. Even a small change in heat can lower your hatch rate. Most experts agree that forced-air incubators work best for beginners. These models use a fan to move warm air around the eggs. This helps keep the temperature even in every part of the incubator.
For Coturnix quail eggs, set your forced-air incubator to 99.5°F. If you use a still-air incubator, aim for 101°F at the top of the eggs. Always check the temperature at egg height, not just on the display. This step gives you precise temperature control and helps you avoid cold or hot spots.
Here are the main points for temperature control:
-
Forced-air incubators: 99.5°F target
-
Still-air incubators: 101°F at egg height
-
Ideal range: 97°F to 102°F, but aim for the target for best results
If you choose a budget quail egg incubator, you may need to check the temperature more often. Some low-cost models can drift up or down, so use a separate thermometer to double-check. Mid-range and premium models usually hold the temperature steady with less effort from you.
Tip: Place your incubator in a room that stays between 65–75°F and away from direct sunlight or drafts. This helps your incubator keep a stable temperature.
Humidity Management Guide
Humidity control is just as important as temperature for a good hatch. Quail eggs lose moisture faster than chicken eggs, so you must watch humidity levels closely. During most of the incubation, keep humidity at 45–55%. In the last few days, called "lockdown," raise it to 65–75%. This helps the chicks hatch without sticking to the shell.
Many incubators have built-in water channels or trays. Fill these as needed to keep the right humidity. Some models let you add water from outside, which makes it easier to adjust without opening the lid. If your incubator does not have this feature, open the lid quickly and only when needed.
You should check your humidity with a hygrometer. To make sure your readings are correct, use the salt test. Place your hygrometer in a sealed bag with salt and water for 12–24 hours. It should read about 75% RH. Adjust your readings if needed.
Here is a quick table of must-have features for your quail egg incubator:
|
Feature |
Description |
|---|---|
|
Capacity and Size |
Match the incubator size to your hatching needs, with options for small (12-30 eggs) and large (100-400+ eggs) batches. |
|
Temperature Control |
Maintain a steady temperature of 99.5°F for forced-air models or 101°F for still-air models. |
|
Humidity Control |
Keep humidity at 45-55% during incubation and increase to 65-75% during the last days of hatching. |
|
Automatic Egg Turning |
Turn eggs 3-5 times daily to prevent sticking; consider an automatic turner for convenience. |
|
Ventilation |
Ensure good airflow so oxygen reaches the eggs and heat stays even. |
|
Viewing Window |
Allows you to check eggs without opening the lid, which helps keep humidity stable. |
Egg Turning: Auto vs Manual
Turning eggs is a key part of hatching Coturnix quail eggs. If your incubator’s tray does not turn, you must turn the eggs by hand. This means you will need to open the lid several times a day. That can cause humidity loss. Auto-turn trays are easier for beginners. They reduce daily work and help keep the incubator stable.
Quail eggs should be turned 3 to 5 times each day until day 15. After that, stop turning and let the eggs rest. Turning helps keep the embryo from sticking to the shell. It also helps the chick develop evenly. If you forget to turn eggs, your hatch rate may drop. Auto-turning models help beginners stay consistent.
Tip: If you use a manual incubator, set reminders to turn the eggs 3–5 times a day. Stop turning at day 15, which is the start of lockdown.
Safety Note: Always wash your hands before touching eggs. Clean hands help prevent bacteria from entering the shell.
Turning errors can lower your hatch rate. Choose the right incubator for your routine. If you want less daily work, consider an automatic model.
-
Common turning mistakes:
-
Forgetting to turn eggs for a whole day
-
Turning eggs at random times
-
Not stopping turning at lockdown
-
Paying attention to these steps helps every egg get the best chance to hatch.
Viewing Eggs Without Losing Humidity
You want to look at your quail eggs while they are in the incubator. Checking for cracks or movement helps you find problems early. But every time you open the incubator, warm and wet air escapes. This quick drop in humidity can hurt your hatch, especially in the last few days.
Modern incubators fix this problem with clear windows or built-in panels. These let you see your eggs without opening the lid. You can watch the eggs, look for water drops, and see if chicks are starting to hatch. You do all this while keeping the air inside steady.
Here are some ways to check your eggs and humidity without losing moisture:
-
Use a digital hygrometer or humidity logger. These tools show the humidity inside the incubator right away.
-
Pick an incubator with a big, clear window. This lets you see the eggs without opening the lid.
-
Set reminders to check humidity a few times each day, especially in the last days before hatching.
-
Keep the incubator in a room with a steady temperature. A steady room helps the incubator keep humidity better.
Tip: Do not open the incubator during "lockdown," which is the last few days before hatching. Chicks need high humidity to hatch safely. Even a quick look can make the air too dry.
Some cheaper incubators have small or cloudy windows. You might need to open the lid to see inside, but try to do this fast and only when you must. Mid-range and fancy models often have bigger, clearer windows. These make it easier to watch your eggs and keep the air moist.
If you want the best results, get an incubator that lets you see your eggs without opening the lid. This simple feature helps you keep the right air for your quail eggs and gives you a better chance for healthy chicks.
Choosing the Right Incubator: Quick Guide
Budget Tabletop Quail Egg Incubator
You might want to start with a budget tabletop quail egg incubator if you have a small batch of eggs and a tight budget. These models usually hold 12–24 eggs, which matches the first hatch learning batch size. Prices often range from $30 to $120. You can see some examples in the table below:
|
Type |
Model |
Price |
|---|---|---|
|
Budget |
Generic 12 |
$29.99 |
|
Budget |
GROPOW HatchXpert |
$59.99 |
Budget incubators often use simple controls. You may need to turn eggs by hand and check temperature and humidity more often. These units work best if you want to learn the basics and do not mind extra effort. You must watch them closely to avoid big swings in temperature or humidity.
Note: Budget incubators can hatch quail eggs, but you need to check them several times a day. Missing a turn or letting the water run out can lower your hatch rate.
Mid-Range Tabletop: Best for Beginners
If you want an easier start, choose a mid-range tabletop incubator. These models often include forced-air fans and automatic egg turning. You can set the temperature to 99.5°F and let the incubator do most of the work. Most mid-range models hold 24–50 eggs, which fits regular small batches. Prices usually range from $120 to $300.
|
Type |
Model |
Price |
|---|---|---|
|
Mid-range |
MATICOOPX 30 |
$119.99 |
|
Mid-range |
IBKINXX 48 |
$129.98 |
Many beginners pick models like the Genesis Hova-Bator 1588 or Farm Innovators 41 Egg Incubator. These get high review scores and offer features like automatic turning and digital controls. You can see how these models compare in the chart below:
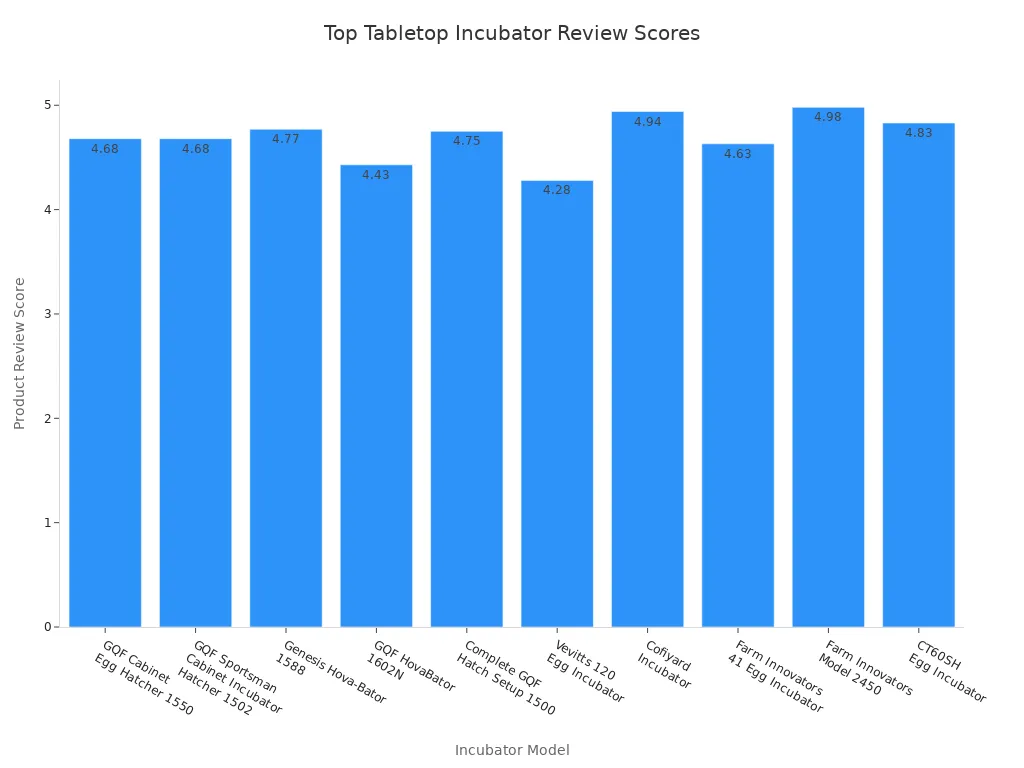
Mid-range incubators reduce the risk of mistakes. You do not need to open the lid as often, so humidity stays steady. If you want to see an example of an automatic model, check out this automatic incubator with auto-turn for stable hatching.
Premium Tabletop: For Frequent Hatchers
If you plan to hatch Coturnix quail eggs often, a premium tabletop incubator gives you more stability and less daily work. These models often cost about $150–$600 and can hold 24–50 eggs per batch. Premium units often include advanced controls, better insulation, and easy cleaning features.
|
Type |
Model |
Price |
|---|---|---|
|
Premium |
Harris Farms |
$157.88 |
You get more reliable results with less checking. Premium incubators suit people who want to hatch eggs every month or run repeat batches. You pay more up front, but you save time and reduce the chance of losing eggs to temperature or humidity swings.
Decision Checklist
-
Are you a first-time hatcher? → Choose a mid-range tabletop incubator.
-
Do you want to hatch eggs every month? → Choose a premium tabletop incubator.
-
Do you want to try a small batch for the lowest cost? → Choose a budget tabletop incubator.
Worked Example
Suppose you want to hatch 24 Coturnix quail eggs. You look for a mid-range tabletop incubator with forced-air and auto-turn. The price is about $120–$300. This size matches your learning batch and gives you steady temperature and humidity. You do not need to turn eggs by hand. This choice lowers your risk of mistakes and helps you focus on learning the basics.
Tip: Choosing the right incubator means matching your goals, budget, and how much time you can spend checking the eggs.
By following this guide, you can pick the best quail egg incubator for your needs and set yourself up for a successful first hatch.
Cabinet Incubators: For Scaling Up
If you want to hatch lots of Coturnix quail eggs, cabinet incubators give you more space and better control. These incubators are good for people who want to hatch more than just a few eggs. You can use a cabinet incubator if you want to hatch eggs often or sell chicks to others. Cabinet incubators are special because they hold many eggs at one time. You can hatch hundreds of eggs in one batch. This is helpful if you want to grow your quail flock or start selling eggs.
Most cabinet incubators use forced-air systems. This means a fan moves warm air around all the trays. The temperature and humidity stay steady for every egg. You get better results, even with big batches. Look at this table to see how cabinet incubators compare to smaller ones:
|
Incubator Type |
Egg Capacity |
Suitability for Scaling Up |
|---|---|---|
|
Compact Models |
10–30 eggs |
Ideal for hobbyists and beginners |
|
Mid-range Units |
50–100 eggs |
Balances space and manageability |
|
Large Cabinet Incubators |
200+ eggs |
Suitable for commercial operations |
Cabinet incubators can hold 200 eggs or even more. This is a lot more than small tabletop models. If you want to hatch eggs every week or run a small business, a cabinet incubator is a good choice.
Some well-known cabinet incubators in the U.S. are the GQF Sportsman series. These models have automatic turning, digital controls, and trays that are easy to clean. You can use more than one tray at a time. This lets you start new eggs while others are still hatching. You always have chicks ready to go.
When you use a cabinet incubator, you need to think about space. These incubators are bigger and heavier than tabletop ones. Put your incubator in a room that stays the same temperature. Keep it away from sunlight and cold air. Make sure you have room to open the doors and clean the trays after each hatch.
Cabinet incubators cost more than small incubators. In 2025, a new one costs $800 to $1,200 or more. This is a lot of money, but it is worth it if you want to hatch many eggs at once. You also do not have to check each egg as much. The incubator turns the eggs and keeps the air moving for you.
Tip: Always check the temperature and humidity at egg height, even in a big cabinet incubator. This helps you find problems before they hurt your hatch.
Cabinet incubators are best for people who want to hatch lots of eggs. If you are new to hatching, a tabletop incubator is easier to use. If you want to grow your flock or start selling chicks, a cabinet incubator gives you what you need.
Best Quail Egg Incubator Comparison Table
Incubator Type
There are different types of quail egg incubators. Each type is good for a certain need and budget. The table below shows the main types, how many eggs they hold, and what they usually cost in 2025.
|
Incubator Type |
Capacity (Eggs) |
Price Range (USD) |
Example Models |
|---|---|---|---|
|
Budget Tabletop |
12–24 |
$30–$120 |
Generic 12, GROPOW HatchXpert |
|
Mid-Range Tabletop |
24–50 |
$120–$300 |
MATICOOPX 30, IBKINXX 48 |
|
Premium Tabletop |
24–50 |
$150–$600 |
Harris Farms |
|
Cabinet Incubator |
200+ |
$800–$1,200+ |
GQF Sportsman |
The egg incubator buying guide for you depends on how many eggs you want to hatch and how often you plan to run batches.
Setup Guide: First Hatch Success
Setting up your incubator the right way gives your quail eggs the best chance at a healthy hatching. You need to follow a few key steps before you start.
Sensor Placement Tips
You want to measure temperature and humidity where your eggs will sit. Place your digital sensor or thermometer at the same height as your eggs. You can put a Bluetooth sensor in an empty egg slot or between two eggs. This gives you the most accurate reading. Always check that your sensors match each other. Calibrate your incubator while it is empty, before you add eggs. Regularly check the heating system to make sure it works well. If you use more than one sensor, keep them close together for the best results. Good sensor placement helps you spot problems early and keeps your hatching on track.
Tip: Run your incubator for at least 24 hours before adding eggs. This lets you check temperature and humidity and fix any problems.
Turning Schedule and Lockdown
Turning your eggs is important for healthy hatching. You need to turn each egg about 3–5 times a day. This keeps the embryo from sticking to the shell. If you use an automatic turner, set it to turn the eggs on schedule. If you turn eggs by hand, wash your hands and be gentle. Stop turning on day 15. This is called "lockdown." During lockdown, raise humidity to 65–75% and do not open the incubator unless you must. Chicks need steady air and moisture to hatch safely.
Place your incubator in a room that stays between 65–75°F. Keep it away from sunlight, heaters, and drafts. A steady room helps your incubator hold the right temperature and humidity. If you use a budget incubator, check your settings more often. These units can change quickly, so you need to watch them closely.
Note: Always check temperature at egg height, not just on the display. This small step can make a big difference in your hatching results.
By following these steps, you give your eggs the best start. Careful setup and monitoring help you enjoy the hatching process and learn from each batch.
Common Mistakes with Quail Egg Incubators
Wrong Temperature Spot
You might think your incubator’s display tells you everything, but the real temperature at egg height matters most. Many first-time hatchers place the thermometer too high or too low. This mistake can cause the eggs to get too hot or too cold. If you set the sensor above the eggs, you risk cooler air at the actual egg level. If you put it below, you might miss a hot spot.
Quail eggs need steady warmth. Even a small spike or drop can affect your hatch rate. Some hatchers have seen a brief spike near 103°F and still had eggs pip, but you should not rely on that. Aim for a steady target and check temperature at egg height so you can catch problems early.
Tip: Always check the temperature at egg height, not just on the incubator’s display.
Opening Lid Too Often
You may want to check your eggs often, but opening the lid too much can hurt your hatch. Every time you lift the lid, warm and moist air escapes. This drop in humidity can cause chicks to get stuck in the shell. Some hatchers call this “shrink-wrapping.” Chicks can fail to hatch after pipping if the air inside gets too dry.
Try to use the incubator’s window to watch your eggs. Only open the lid when you must add water or fix a problem. During the last few days, called lockdown, keep the lid closed as much as possible. High humidity helps chicks break free from the shell. If you open the incubator during this time, you risk losing moisture that every egg needs.
Note: Avoid opening the incubator during lockdown unless it is an emergency.
Turning Errors
Turning eggs is a key part of hatching. If you forget to turn the eggs, the embryo can stick to the shell. If you turn them too little or too much, you can also cause problems. Manual turning works if you follow a strict schedule, but busy days make it easy to forget.
Many beginners find automatic turning helpful. A automatic incubator with auto-turn for stable hatching can save you time and lower the risk of mistakes. This feature turns each egg gently and evenly. You do not have to remember to turn the eggs by hand. If you want to see what a dual-motor auto-turn setup looks like, here is a dual-motor auto-turn incubator.
Dirty Incubator Issues
A dirty incubator can ruin your hatch before it even starts. You might think a little dust or leftover shell does not matter, but bacteria and mold can grow fast in warm, moist conditions. These germs can attack each egg and lower your hatch rate. Chicks can get sick or fail to hatch if you do not keep your incubator clean.
You should clean your incubator after every batch. Old eggshells, spilled water, and dust can hide bacteria. If you skip cleaning, you risk spreading disease to your next group of eggs. Even budget incubators need regular cleaning, though some models have more parts that are hard to reach. Premium units often have smooth surfaces and removable trays, which make cleaning easier.
Here is a simple cleaning routine you can follow:
|
Step |
Action |
Precaution |
|---|---|---|
|
1 |
Clean the incubator with warm, soapy water |
Avoid submerging delicate equipment |
|
2 |
Disinfect with a mild bleach solution |
Do not mix bleach with soap |
|
3 |
Allow to air-dry |
Rinse well first, then allow all parts to fully air-dry |
A clean incubator protects each egg from bacteria and mold. You give your chicks a better chance to hatch strong and healthy. If you notice a bad smell or see mold, clean the incubator right away. Do not wait until the next batch. Good cleaning habits help you avoid problems and keep your hatching safe.
Safety Note: Never use harsh chemicals or scented cleaners. These can leave residues that harm eggs or chicks.
You can make cleaning part of your regular hatching routine. Write down your steps and check them off after each batch. Clean equipment helps you learn from each hatch and improve your results over time.
You can get the best hatch rates if you focus on a few important things. Clean your incubator often so germs do not spread. Keep the temperature and humidity steady for strong chicks. Pick an incubator that has a thermostat, humidity control, fan, and automatic egg turner for small quail eggs. Get your eggs ready before you start hatching. Change your steps after each hatch if you need to. Write down what works well and what does not. Every batch teaches you something new and helps you get better.
FAQ
How many Coturnix quail eggs fit in a tabletop incubator?
Most tabletop incubators can hold 12 to 50 Coturnix quail eggs. You can pick a small incubator if you want to learn. Bigger models are good for hatching more eggs at once. Always look at the egg tray design before you buy.
What temperature should I set for quail eggs?
Set forced-air incubators to 99.5°F. For still-air incubators, check the temperature at egg height and set it to about 101°F. The right temperature helps your chicks grow well.
Do I need an automatic egg turner?
You do not have to use an automatic egg turner, but it makes hatching easier. It helps you turn eggs on time and keeps embryos healthy. You can see quail egg incubators to compare options.
How often should I check humidity?
Check the humidity at least two times each day. Keep it between 45% and 55% while the eggs are growing. Raise it to 65% to 75% during lockdown. Use a calibrated hygrometer for the best results.
Can I open the incubator to check eggs?
Try not to open the incubator too much. Use the window to look at your eggs instead. Opening the lid lets out warm, wet air and can hurt your hatch, especially during lockdown.
What is the best room for my incubator?
Pick a room that stays between 65°F and 75°F. Do not put the incubator in sunlight, near heaters, or in a drafty spot. A steady room temperature helps your incubator work better.
How do I clean my incubator after hatching?
Take out the trays and wash them with warm, soapy water. Use a mild bleach solution to disinfect. Let everything dry in the air before you use it again. Clean equipment keeps your chicks safe.
What should I do if hatch rates are low?
Check your temperature, humidity, and how often you turn the eggs. Make sure your sensors are correct and keep the incubator clean. Write down what happens after each hatch to help you do better next time.
Data authenticity note: The temperature targets, humidity ranges, hatch timelines, and cost ranges in this article reflect typical incubator manuals, standard small-flock practice, and aggregated keeper logs. Real-world results vary by breed, egg handling, incubator model, and room conditions. Always follow your own incubator’s manual and consult local experts or an avian veterinarian for health concerns.


0 Comments