
A cabinet egg incubator helps you hatch eggs well, especially in breeding season. You can use regular cabinet egg incubators for more eggs and good airflow. Many people pick a cabinet incubator because it is easier than making your own or starting from nothing. You get the most help if you are one of these groups:
-
Small-scale farmers who want easy controls
-
Hobbyists who follow step-by-step guides
-
Classrooms that need hands-on and real-time learning
Key Takeaways
-
Cabinet egg incubators make hatching easier by controlling temperature and humidity automatically. This means you do not have to do as much work by hand.
-
Using a cabinet incubator can help more chicks hatch. Hatch rates can go up by 15-20% because the environment stays steady and eggs turn by themselves.
-
Pick the right incubator size for what you need. Some can hold 50 eggs, and some can hold up to 22,000 eggs. This makes them good for both small farms and big businesses.
-
You must check and take care of your incubator often. Watch the temperature and humidity every day to help the eggs hatch well.
-
Use a 'record → review → adjust' plan to get better at hatching. Write down your settings and results, look at them, and make changes to improve over time.
What Are Cabinet Egg Incubators
Core Design
People use cabinet egg incubators to hatch many eggs at once. The main part looks like a strong box with two walls. The outside is made of stainless steel. The inside is made of aluminum. Insulation keeps the heat inside and saves power. There is a thermostat that keeps the temperature steady at 99.5°F (37.5°C) for chicken eggs. Humidity control helps make the right place for embryos to grow. You can see the main parts in the table below:
|
Component/Part |
Description |
|---|---|
|
Cabinet |
Double-walled box, 20–800L (5–200 gal), insulated to prevent heat loss |
|
Thermostat |
Keeps temperature steady for best hatching |
|
Insulation |
Saves energy and keeps heat inside |
|
Humidity Control |
Lets you set the right moisture level for eggs |
Tip: Put sensors at the same height as the eggs for good readings. Use two thermometers and check them often.
User Scenarios
A cabinet incubator helps if you want less work and better results. You see these incubators in classrooms, small farms, and breeding places. Teachers use them for science class. Farmers use them to hatch many eggs with less checking. Hobbyists use them to grow more birds. You get steady airflow and do not need to open the door much. You can handle hundreds of eggs at one time.
-
Classrooms: Let students watch chicks grow in real time.
-
Small farms: Hatch lots of eggs with less work.
-
Breeders: Control temperature and humidity for better hatching.
Differences from Tabletop and Homemade Egg Incubator
Cabinet egg incubators are different from smaller models. Tabletop incubators hold fewer eggs and fit on a desk. Cabinet incubators can hold many more eggs. You get better control of temperature, humidity, and airflow. Homemade egg incubators need more care and may not keep things steady. The table below shows the main differences:
|
Feature |
Tabletop Incubators |
Cabinet Incubators |
|---|---|---|
|
Size |
Small, portable |
Medium, large, sturdy |
|
Capacity |
Dozens of eggs |
Hundreds of eggs |
|
Ideal Use |
Home, school |
Small farms, breeders |
|
Controls |
Basic settings |
Advanced controls |
Safety Note: Keep your cabinet egg incubator flat and away from sunlight or air vents. Use safe power and make sure all cables are tight.
Types of Cabinet Egg Incubators
Single-Stage
Single-stage cabinet incubators let you put in eggs that are the same age. You set the temperature and humidity for just that group. This helps you care for every egg the right way. You can change the settings as the embryos grow. This often means more chicks hatch and they are healthier.
🐣 Tip: Warm up your incubator for 24–48 hours at 99.5°F (37.5°C) with water in the tray before adding eggs. Put sensors at the same level as the eggs and use two thermometers to check.
Single-stage incubators make daily checks simple. You only watch one group at a time. This makes it easy to keep notes and change things if needed. Studies show single-stage incubation can help more chicks hatch by about 1.3%. It can also lower chick deaths by 0.4%. You use less feed for each pound of live bird.
Some well-known single-stage cabinet incubators are:
-
IncuView XL All-In-One Cabinet Incubator (full-view window, 6 egg turner trays)
-
GQF 1502 Digital Sportsman Cabinet (digital thermostat, automatic turning)
-
GQF 1202E Classic Sportsman Cabinet Incubator (cost-effective, less automation)
-
GQF 1500 Digital Cabinet Egg Incubator (standard model for various eggs)
Multi-Stage
Multi-stage cabinet incubators hold eggs at many different growing stages. You add new eggs while older eggs are still inside. You must set the temperature and humidity for all eggs together. This makes it harder to give each batch what it needs.
📋 Note: Multi-stage incubation can make it tough to control temperature and humidity. You might see more germs and fewer chicks hatching.
You might pick a multi-stage incubator if you want chicks all the time. But you need to check trays often and change airflow to keep tray temperatures close. Do not let trays get too full and keep them away from fans. Keep the door closed if the power goes out and bring back humidity slowly when power is back.
"The results reported in this article quantify the performance of one flock over its entire production lifespan, showing that single-stage incubation outperformed multi-stage in key metrics such as hatchability and post-hatch mortality.
Key Features
Capacity, Trays, and Visibility
Pick a cabinet egg incubator that matches what you need. Capacity is very important to check first. Cabinet incubators can hold lots of eggs at one time. The table below shows how many eggs fit for each type:
|
Egg Type |
Capacity Range |
|---|---|
|
Quail Eggs |
130 - 1500 |
|
Chicken/Duck Eggs |
50 - 500 |
|
Goose/Turkey Eggs |
13 - 60 |
|
Ratite Eggs |
4 - 16 |
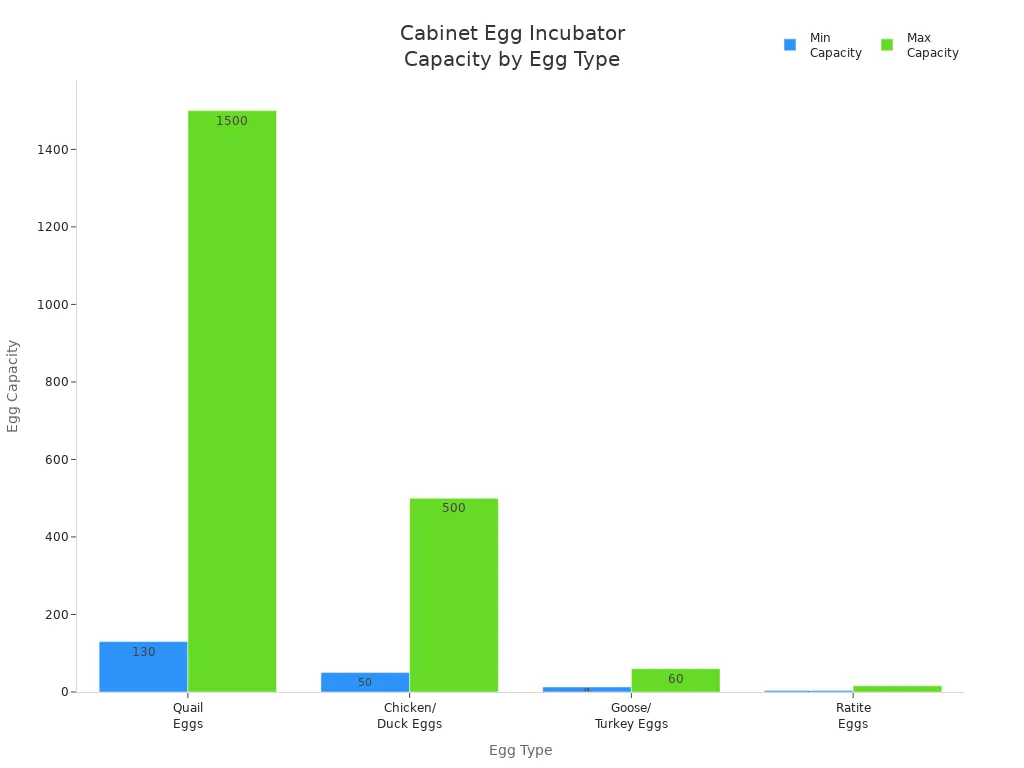
Trays help you sort eggs by batch or type. Clear windows and lights let you see the eggs inside. You do not have to open the door to check. This helps keep the temperature control and humidity steady.
Tip: Do not put too many eggs in one tray. Leave space on both sides for air to move. Put eggs with the pointy end down and the big end up.
Automation and Controls
Modern cabinet incubators have smart features to help you. Some models have digital screens, alarms, and automatic egg turners. These features help you keep temperature control and humidity steady. The table below lists some popular models and their features:
|
Incubator Model |
Features Supporting Hatching Reliability |
|---|---|
|
IncuView XL |
Full-view window, automatic humidity management, 6 egg turner trays |
|
No. 1502 SPORTSMAN |
Accurate digital thermostat, real-time environmental monitoring, electronic egg turning control |
|
1202E |
Mechanically timed automatic egg turning, rugged thermometer/hygrometer |
|
No. 1500 |
On-board computer for environment monitoring, electronic egg turning control |
You can set alarms for temperature control, humidity, or if the door opens. These controls help you act fast if something changes.
Safety Note: Always use two thermometers and check them often. Put sensors at the same height as the eggs.
Humidity and Airflow Management
Good humidity and airflow help chicks grow strong. Many cabinet incubators use water pans or automatic humidifiers. Some models, like the Ova-Easy 380 Advance Series II, use digital systems for temperature control and humidity. They also use fans to move air evenly. This keeps the temperature difference between trays under 1.0°F (0.6°C).
|
Feature |
Description |
|---|---|
|
Control System |
Digital control for temperature and humidity |
|
Humidity Management |
Continuous display, external pump for automatic control |
|
Airflow Management |
Laminar airflow for even temperature |
|
Additional Features |
Room temperature alarms, automatic shelf leveling |
|
Hatch Rate |
High hatch rates due to stable conditions |
-
Use a programmable humidifier to keep humidity steady.
-
Let in more air as embryos get bigger.
-
Keep doors closed during hatching to keep temperature control steady.
Tip: Change humidity by adding or removing water or sponges. Watch the air cell size and write down weight loss.
Cleanability, Calibration, and Backup Power
Clean your incubator after every hatch. Pick a model with smooth parts and trays you can take out. This makes cleaning and disinfecting simple. Check and adjust sensors often to keep temperature control right.
Backup power is very important. Losing power can ruin your hatch. You can use these backup options:
-
Battery backups keep the incubator working during outages.
-
Medical-grade battery backups are quiet and work well.
-
A car battery with an inverter works for short outages.
-
Use strong power cords for safe, steady power.
- See power outage protection
Tip: Put your incubator on a flat surface, away from sun or vents. Make sure all cables are tight and use a safe power supply.
Room and Setup
Room Conditions
You need the right room for your cabinet egg incubator. The room should stay between 75 and 80°F (24–27°C). Keep the humidity at 50–60% for best results. Fresh air helps your incubator work well. A room with a little more air pressure than outside keeps dust and germs out.
-
Pick a dry, draft-free space away from direct sunlight and air conditioners.
-
Leave space around the incubator for heat to escape and air to move.
-
Keep the room clean to lower the risk of germs.
📝 Tip: Good airflow in the room helps your incubator keep a steady temperature and humidity.
Positioning and Leveling
Set your incubator on a flat, sturdy surface. A level incubator keeps trays from sliding and helps eggs turn evenly. Place the incubator where you can reach it easily, but not where people walk by all the time.
-
Check the level with a bubble level tool before you start.
-
Keep the incubator away from windows, heaters, and vents.
-
Make sure power cords are safe and not loose.
⚠️ Safety Tip: Secure all cables and use a stable power supply. This keeps your incubator running safely.
Preheating and Calibration
Before you load eggs, you must preheat and calibrate your incubator. Run the empty incubator with the water tray filled for 24–48 hours at 99.5°F (37.5°C). This step helps you find any problems before you add eggs.
-
Place your digital sensor at the same height as your eggs for the best reading.
-
Use two thermometers and check both often.
-
Calibrate the temperature with the incubator empty. Adjust until both thermometers match.
-
Set humidity to about 51% using a hygrometer. A wet bulb hygrometer works well.
-
Wait until the incubator holds steady temperature and humidity before loading eggs.
💡 Tip: Write down your readings during preheating. Review and adjust as needed. This habit helps you spot trends and fix issues early.
Loading and Placement
Egg Arrangement
Arranging your eggs correctly inside the cabinet incubator helps you get better hatch rates. Start by sorting eggs by type and age. Place eggs with the pointed end down and the larger end up. This position lets the embryo develop in the right spot and helps the chick breathe before hatching.
-
Keep eggs from the same batch together on one tray.
-
Leave small gaps between eggs for air to move freely.
-
Do not overcrowd trays. Too many eggs block airflow and cause uneven temperatures.
-
Keep trays away from direct airflow from fans. This prevents eggs from drying out too quickly.
You should always use a level surface for your incubator. This keeps trays stable and helps the automatic turning system work smoothly. Place sensors at the same height as your eggs for accurate readings. Use two thermometers and check them often. Calibrate your sensors before each batch.
🛡️ Safety Tip: Avoid direct sunlight and air conditioning vents. Secure all cables and use a stable power supply.
Batch Loading
Loading eggs in batches makes your work easier and helps you track each group. For best results, load eggs of the same age and type together. This practice lets you set the right temperature and humidity for each batch. You can also monitor weight loss by sampling 6–12 eggs per batch. Aim for about 12% weight loss by day 18. Adjust humidity if needed.
-
Preheat your incubator for 24–48 hours at 99.5°F (37.5°C) with water in the tray before loading eggs.
-
Set humidity to 45–55% RH for days 1–18. Raise it to 65–70% RH for the last 3 days.
-
Turn eggs automatically every 1–2 hours at a 45° tilt. Stop turning 3 days before hatch.
-
Increase ventilation as embryos grow. Keep the door closed during hatching to maintain stable conditions.
Using a separate hatcher for each batch improves your hatch rates. You can control the environment for each group and clean thoroughly after each hatch. Continuous hatching makes humidity control harder and can lower your success rate. Always record your settings and results. Review them after each hatch and adjust your process for next time.
💡 Tip: Follow a "record → review → adjust" routine. This habit helps you improve your hatching results over time.
Daily Operation
Routine Checks
You should check your cabinet egg incubator every day. This helps you keep it working well. Use this table to help you remember what to do each day:
|
Routine Check |
Description |
|---|---|
|
Temperature Monitoring |
Use a digital thermometer to see if the temperature is 99.5°F (37.5°C). |
|
Humidity Management |
Check the hygrometer to keep humidity right for each stage. |
|
Mechanical Component Check |
Look at moving parts like the egg turner and thermostat for problems. |
|
Cleaning |
Wipe surfaces and remove dust or dirt. |
|
Trial Run |
Run the incubator empty before a new batch to find problems early. |
-
Check the incubator temperature with a calibrated thermometer once a week.
-
Watch humidity levels every day to keep things steady.
🛡️ Safety Tip: Put your incubator on a flat surface. Keep it away from sunlight and air conditioning. Use safe power and make sure cables are tight.
Water and Humidity
Keeping the right humidity helps chicks grow well. For chicken eggs, use 45–55% relative humidity (RH) for days 1–18. Raise it to 65–70% RH for the last 3 days. This helps chicks hatch. Use a digital hygrometer to get good readings.
-
Fill the water tray or use an automatic humidifier to control humidity.
-
Weigh 6–12 eggs in each batch. Try for about 12% weight loss by day 18. Change humidity if needed.
-
Egg size, shell thickness, and weather can change how much humidity you need.
💡 Tip: Change humidity by adding or removing water or sponges. Watch the air cell size during candling to see if moisture loss is right.
Turning and Ventilation
Turning eggs keeps embryos from sticking to the shell. It helps them grow strong. Most cabinet incubators turn eggs every 1–2 hours at a 45° tilt. Stop turning eggs 3 days before they hatch.
-
Turn eggs every 30–60 minutes for the first 7 days. Keep the tilt between 43° and 45°.
-
In the last 2 days, turn eggs less and let them rest flat.
-
Check that the turning system works well and does not shake eggs.
-
Let in more air as embryos grow. Good airflow keeps tray temperatures close together.
⚠️ Notice: If you lose power, keep the door closed. Bring back humidity slowly when power is back.
Record Keeping
Good records help you get better hatching results. Use a notebook or chart to track each batch.
-
Write the date, tray number, egg type, and any changes you make.
-
Record candling results and egg weights on days 7, 14, and 18.
-
Look for patterns in hatch rates and change your process next time.
📓 Tip: Use a "record → review → adjust" routine. This helps you learn what works best and spot problems early.
Monitoring and Candling
Candling Schedule
Candling lets you see if eggs are growing inside the incubator. You use a bright light to look through each egg. This helps you find eggs that are not growing or have cracks. You can take out bad eggs early so the rest stay healthy.
-
[Candle on Day 5](https://www.eggbloom.com/Candling-Fertile-Eggs-Timeline-and-Key-Signs-to-Watch-F) to check if eggs start growing.
-
Candle on Day 10 to see if embryos are alive.
-
Candle on Day 14 to check air cell size and growth.
-
Candle on Day 18 before lockdown to remove bad eggs.
Always use a dark room and a strong light for candling. Hold each egg gently and look for veins, movement, and a clear air cell. Write down what you see in your hatching notebook. This helps you spot patterns and get better at hatching.
💡 Tip: Candle eggs at the same time for each batch. Use a notebook to write down what you see. Take out eggs with cracks or no growth to keep the rest safe.
Weight Loss Tracking
Tracking egg weight loss helps you control humidity and get more chicks. Weigh some eggs at the start and again on days 7, 14, and 18. Try for about 12–15% weight loss by day 18. Change humidity if eggs lose too much or too little water.
Good hatching needs eggs to lose about 15% of their weight during incubation. This is true for most bird eggs. Egg weight loss is linked to how many chicks hatch and live. If eggs keep too much water, chicks can get swollen muscles and skin. If eggs lose over 20%, chicks can dry out and not hatch. The air cell inside the egg grows as water leaves the egg.
Cracks in eggshells make eggs lose more water and can let germs in. This can cause problems and more chick deaths. When using an incubator, breeders change humidity and temperature to help eggs hatch.
Always write down your egg weights and check them after each hatch. Change your humidity settings for the next batch if needed. This "record → review → adjust" habit helps you get better results each time.
📝 Tip: Use a digital scale to get the best results. Weigh 6–12 eggs from each batch. Write down each weight and figure out the percent lost. Change humidity by adding or removing water or sponges if you need to.
Hatching and Transfer
Lockdown Steps
When you reach the last three days before hatching, you enter the "lockdown" phase. This step is very important for your chicks. You need to make sure the environment stays steady and safe. Follow these steps for a smooth lockdown:
-
Candle your eggs one last time. Remove any eggs that are not developing.
-
Stop turning the eggs. Let them rest in place so chicks can get ready to hatch.
-
Raise the humidity to 65–70% RH. This helps chicks break out of their shells without drying out.
-
Make sure any water trays or humidifiers are safe for chicks. Cover open water so chicks cannot fall in after hatching.
-
Close the incubator lid and keep it closed. Do not open the door unless you must. This keeps the temperature at 99.5°F (37.5°C) and humidity steady.
Tip: Write down your settings and any changes you make during lockdown. Review your notes after each hatch and adjust your process for next time.
-
Keep the incubator level and away from sunlight or air vents.
-
Use a stable power supply and secure all cables.
-
Place sensors at egg height and check with two thermometers.
Hatching Layer Setup
Setting up the hatching layer helps your chicks hatch safely and easily. You want to give them the best chance to come out strong.
-
Make sure air can move freely around the eggs. Good airflow keeps heat and humidity even.
-
Use a water pan to keep humidity high during hatching.
-
If you plan to hatch eggs in batches, use a separate hatcher for each group. This helps you control the environment for each batch.
-
Do not open the incubator during lockdown. Opening the door can cause chicks to get stuck in their shells.
🛡️ Safety Tip: Avoid overcrowding trays. Do not place trays right in front of fans. Keep the door closed during power outages and restore humidity slowly when power returns.
Keep watching your records. After each hatch, review your notes and make small changes to improve your results next time. This "record → review → adjust" habit helps you get better at hatching with every batch.
Cleaning and Maintenance
Post-Hatch Cleaning
After chicks hatch, you must clean your cabinet egg incubator. This keeps it safe for the next group of eggs. First, take out all trays and any loose pieces. Wipe every inside part with alcohol wipes. Use a can of air to blow dust from the fan area. For small spaces, use a cotton swab to get dirt out. When you finish, put the top back on the bottom. Leave the incubator a little open so air can dry the inside.
Tip: Always unplug the incubator before you clean it. Make sure it sits flat and is not in sunlight or near air conditioning.
Disinfection and Storage
Disinfecting your incubator and eggs stops germs and helps more chicks hatch. Clean eggs right after you collect them and again at the hatchery. Spray or mist the inside often to stop bacteria. Wash hatching eggs with alkaline cleaners at 108–113°F (42–45°C) for a short time. Clean trays, crates, and baskets with the same cleaners. Make sure they do not foam in the machine. Clean floors, walls, and setters with a universal cleaner. Use an acid foamer once a month. Finish by spraying, foaming, or fogging for final disinfection. Keep all rooms very clean. Clean foot dips and handwashing spots often.
Safety Tip: Wear gloves and a mask when using cleaners. Make sure all parts are dry before you store the incubator with the lid closed.
Regular Checks
Regular care keeps your cabinet egg incubator working for a long time. Clean it with a gentle cleaner after each use. Check and fill water in humidity pans to keep moisture steady. Calibrate sensors and thermostats so temperature readings are right. Make sure vents are clear for good airflow. Look at wires for damage, like frayed spots. Check the door seal for wear. Listen to the fan to be sure it runs quietly. Test backup systems, like battery backups, to see if they work.
-
Put sensors at egg height for the best readings.
-
Use two thermometers and check them often.
-
Secure all cables and use a safe power supply.
-
Keep trays away from direct fan airflow.
📝 Note: Write down your cleaning and care steps. Review your notes and change your routine to get better results each time.
Benefits of Cabinet Incubators
Less Manual Labor
Using a cabinet egg incubator saves you lots of work. With old ways, you must turn eggs by hand and check temperature and humidity many times each day. You also have to make small changes often. This takes a long time and can be hard, especially if you want to hatch rare chicks or have many eggs.
A cabinet incubator does most of the work for you. It turns eggs every 1–2 hours at a 45° tilt. It keeps the temperature steady at 99.5°F (37.5°C). It also controls humidity with water trays or automatic humidifiers. You only need to check it quickly each day and add water when needed. This makes hatching much easier, even if you are new to using an incubator.
Here is a table that compares the work you must do:
|
Method |
Manual Labor Required |
|---|---|
|
Traditional Methods |
You must watch eggs, change settings, and turn eggs by hand. This takes hours every day. |
|
Cabinet Incubators |
Turns eggs and controls climate for you, so you do not have to do as much work. |
Tip: Put your cabinet egg incubator on a flat surface. Keep it away from sunlight and air conditioning. Make sure all cables are tight and use safe power.
Higher Hatch Rates
Cabinet egg incubators help you get more chicks from each batch. They keep temperature and humidity steady, so chicks grow better. Automatic egg turning helps embryos stay healthy and strong. You do not have to worry about forgetting to turn eggs or making mistakes with the settings.
-
Cabinet incubators give you good results every time.
-
You can use them for many batches during the year.
-
Temperature control keeps all trays within 1.0°F (0.6°C) of each other.
-
Automatic egg turning can make hatch rates 15–20% better and use less energy.
You can hatch rare chicks or common breeds with a cabinet egg incubator. The steady environment helps stop problems like sticky chicks or uneven hatching. You can also check weight loss by weighing 6–12 eggs in each batch and changing humidity if needed. If you "record → review → adjust," you can get better results over time.
Notice: Always use two thermometers and check them often. Put sensors at egg height for the best readings.
Scalability
Cabinet egg incubators can grow with your needs. You can start with a small one for home or pick a bigger one for a farm or business. The design lets you hatch lots of eggs, so you can get a bigger incubator as your flock grows.
Here is a table that shows how many eggs fit in different sizes:
|
Scale |
Egg Capacity |
|---|---|
|
Small-scale |
80–1,800 chicken eggs |
|
Medium-scale |
2,000–8,000 chicken eggs |
|
Large-scale |
9,900–22,000 chicken eggs |
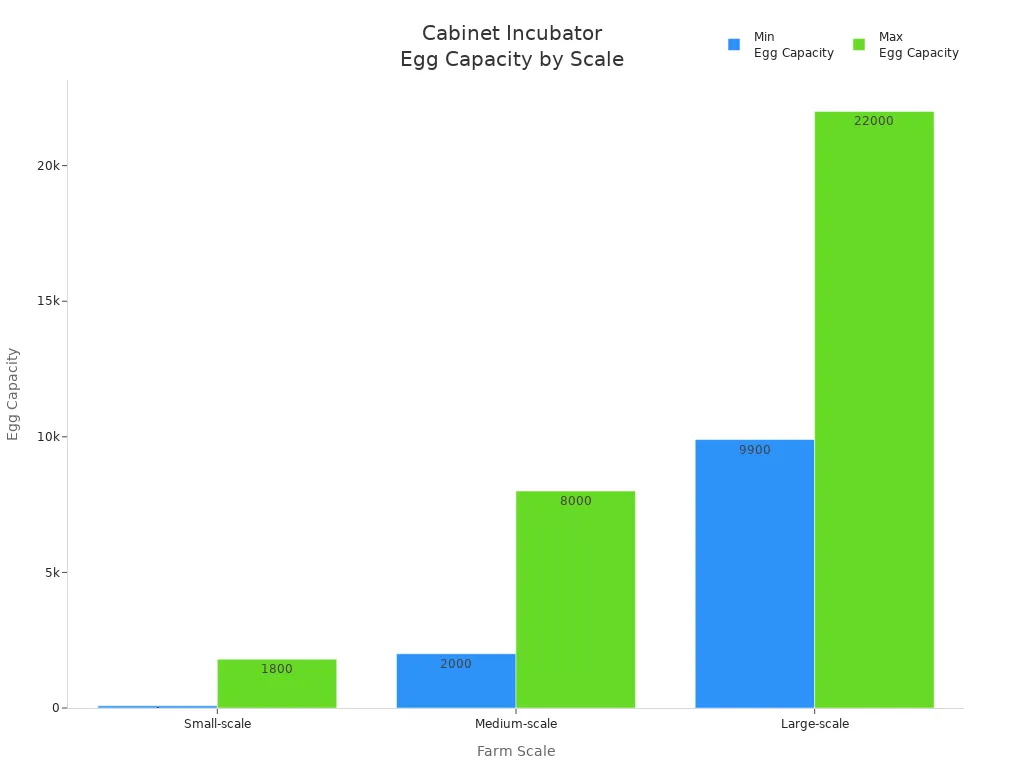
-
Cabinet egg incubators let you hatch lots of eggs at once.
-
You can get a bigger incubator if you need to hatch more eggs.
If you have a small family farm, you might start with a cabinet egg incubator that holds 88 to 1,000 eggs. This size fits in most homes and does not take up too much space. When you need to hatch more eggs, you can get a bigger model and keep using the same steps.
Tip: Do not put too many eggs in one tray. Keep trays away from fans. Keep doors closed if the power goes out and add humidity slowly when power comes back.
Cabinet incubators let you hatch more eggs as your needs grow. You can handle many batches, keep notes, and change your steps to get better results each time.
Cabinet Egg Incubators vs Homemade Egg Incubator
Tabletop and DIY Comparison
You might wonder how a cabinet egg incubator compares to a tabletop or homemade egg incubator. Tabletop models work for small batches, usually holding 12–48 eggs. You need to check temperature and humidity often. A homemade egg incubator can use a plastic box, a light bulb, and a water tray. You must turn eggs by hand and watch the readings closely. Cabinet egg incubators let you hatch hundreds of eggs at once. You get automatic egg turning every 1–2 hours at a 45° tilt. You can keep temperature at 99.5°F (37.5°C) and humidity steady. You only need to sample 6–12 eggs per batch for weight loss and adjust humidity as needed.
|
Feature |
Cabinet Egg Incubator |
Homemade Egg Incubator |
|---|---|---|
|
Capacity |
50–500 eggs |
12–48 eggs |
|
Egg Turning |
Automatic, 6–8 times/day |
Manual, by hand |
|
Temperature Control |
Digital, stable |
Manual, less stable |
|
Humidity Control |
Automatic or water tray |
Water tray, manual |
Tip: Place sensors at egg height, use two thermometers, and calibrate often for best results.
Natural Hatching
Some people use hens for natural hatching. You let the mother hen sit on eggs and turn them herself. She keeps the eggs warm and humid. You do not need a homemade egg incubator or a cabinet model. Natural hatching works for small numbers of eggs. You cannot control temperature or humidity as closely. You may see lower hatch rates if the weather changes or if the hen leaves the nest.
-
Natural hatching needs less equipment.
-
You must watch for predators and keep the nest safe.
-
Results can change with weather and hen health.
🛡️ Notice: Always keep nests dry and safe from direct sun or cold drafts.
Cost and Value
You might build a homemade egg incubator for less money. You use simple parts like a box, bulb, and water tray. You spend less at first, but you need to check eggs often and fix problems yourself. Cabinet egg incubators cost more, but you save time and get better control. You can hatch more eggs and use less manual labor. You also get alarms, backup power options, and easier cleaning.
-
Cabinet egg incubators offer better value for classrooms, small farms, and breeders.
-
Homemade egg incubators work for learning and small projects.
-
Always record your results, review what worked, and adjust your process for next time.
💡 Tip: Avoid overcrowding trays, keep doors closed during power outages, and restore humidity slowly after power returns.
Troubleshooting Cabinet Incubator
Temperature and Humidity Issues
Sometimes your incubator does not keep the right temperature or humidity. This can make it harder for chicks to hatch. For chicken eggs, try to keep the temperature at 99.5°F (37.5°C). Keep the humidity at 45–55% for days 1–18. Raise the humidity to 65–70% for the last 3 days.
-
Check both thermometers every day. Put sensors at the same height as the eggs for the best reading.
-
Calibrate your sensors before each batch. Use two thermometers to see if they match.
-
Change humidity by adding or taking away water or sponges.
-
Keep the incubator flat and away from sunlight or air conditioning.
-
Make sure all cables are tight and use a safe power supply.
📝 Tip: If you see the temperature difference between trays is more than 1.0°F (0.6°C), move the trays or change the airflow. Always write down your settings, check them after each hatch, and make changes for next time.
Uneven Hatching
Sometimes chicks do not hatch at the same time. This can happen if trays are too full or if air cannot move well.
-
Do not put too many eggs in one tray. Leave space so air can move around each egg.
-
Keep trays away from fans blowing right on them. This stops eggs from drying out too fast.
-
Let in more air as the embryos grow. Good airflow helps keep the temperature even.
-
Try not to open the door during hatching. This keeps heat and humidity steady.
⚠️ Notice: If chicks hatch too early or too late, check your notes. Look for changes in temperature or humidity. Use the "record → review → adjust" steps to get better results.
Power Outages
Losing power can cause problems for your hatch. If the incubator stops, temperature and humidity can drop fast.
-
Keep the incubator door closed if the power goes out. This helps keep heat and moisture inside.
-
Use a battery backup or UPS if you can.
-
When power comes back, add water slowly to bring humidity up. Watch the readings as you do this.
-
Check all settings and sensors before you start again.
💡 Tip: Always make sure cables are tight and use a safe power source. Write down any power problems in your notes. Review and change your steps for future batches.
Cabinet egg incubators let you hatch eggs with less effort. You can set the temperature to 99.5°F (37.5°C). You also control humidity for each part of hatching. Automatic turning and steady airflow help a lot. This makes hatching simple for classrooms, hobbyists, and small farms. Use checklists before loading eggs, for daily checks, during lockdown, and for cleaning. Always write down what you do, look at your notes, and make changes if needed.
Tip:
-
Keep the incubator flat and away from sunlight or AC.
-
Make sure cables are tight and use safe power.
-
Put sensors at the same height as the eggs and use two thermometers.
-
Change humidity by adding or removing water or sponges.
Read more guides about egg incubators, cabinet incubators, and poultry incubation to get the best results.
FAQ
How do you choose between single-batch and staggered-batch incubation, and how does this affect cleaning and hatch rates?
Single-batch incubation lets you set ideal conditions for one group. You get easier cleaning and higher hatch rates. Staggered-batch incubation means more work. You must balance settings for different ages. Clean between batches for best results. Always record, review, and adjust your process.
Tip:
-
Use single-batch for [better control and easier cleaning](https://www.eggbloom.com/5-Common-Mistakes-to-Avoid-Before-You-Start-Hatching-Chicks).
-
Staggered-batch needs more monitoring and careful record keeping.
Why is there a large temperature difference between upper and lower trays, and how do you keep it within ≤1°F?
Uneven airflow or overcrowded trays cause temperature gaps. Keep trays spaced and away from direct fan airflow. Adjust fan speed or tray position. Place sensors at egg height on each level. Use two thermometers and calibrate often. Aim for less than 1°F (0.6°C) difference.
Notice:
-
Level your incubator and avoid direct sunlight or AC.
-
Secure all cables and use a stable power supply.
What should you do if humidity readings are normal but chicks are 'sticky'? How do you use weight loss and air cell size to adjust?
Sticky chicks mean too much moisture stayed in the eggs. Weigh 6–12 eggs per batch. Target about 12% weight loss by day 18. Candle eggs to check air cell size. If air cells are small, lower humidity next time. Always record, review, and adjust.
Tip:
-
Change humidity by adjusting water surface area or adding/removing sponges.
-
Watch air cell growth during candling.
When should you transfer eggs to the hatching tray or a separate hatcher, and what settings should you change after transfer?
Move eggs to the hatching tray three days before hatch. Stop turning eggs. Raise humidity to 65–70% RH. Keep temperature at 99.5°F (37.5°C). Increase airflow but keep the door closed. Use a non-slip mat in the hatching tray.
Notice:
-
Do not overcrowd trays or place them right in front of fans.
-
Restore humidity slowly after power returns.
How do you schedule routine maintenance and sensor calibration?
Clean your incubator after every hatch. Wipe trays and check for dust or debris. Calibrate sensors and thermometers before each batch. Test backup power monthly. Keep a log of all maintenance. Always record, review, and adjust your routine for better results.
Tip:
-
Place sensors at egg height and use two thermometers.
-
Check cables and seals for wear.


0 Comments