
You might wonder whether using a portable egg incubator in your apartment can really be safe and manageable. Many people worry about fire risks, electric shocks, or unreliable cheap machines. Heat, water, and electricity in a small space can be risky for families with kids. With the right equipment, clear rules, and good hygiene, you can run a short-term hatching project more safely. Always follow building rules and local laws, think about health first, and set up the incubator carefully to protect your home and family.
Key Takeaways
-
Check your lease and local rules before using an egg incubator. Many apartments do not allow poultry, even for short-term projects.
-
Choose a compact incubator that fits your space. Most portable models hold about 7 to 24 eggs.
-
Place the incubator in a quiet, separate room. Keep the room temperature between 70°F and 75°F for best results.
-
Move chicks out within 24 hours after they hatch. This helps keep your apartment cleaner and supports rule compliance.
-
Wash your hands after touching eggs or chicks. This helps reduce health risks such as Salmonella.
-
Talk with neighbors about your hatching project in advance. Clear communication can ease worries about noise, smell, or disease.
-
Use incubators with automatic controls and easy-to-clean parts. This makes hatching simpler, safer, and more consistent.
-
Consider partnering with farms or friends for the later stages of hatching. This can keep your apartment tidy while still letting you learn from the process.
Egg Incubator Feasibility in Apartments
Why Try Hatching in Small Spaces
You may want to hatch eggs in your apartment for many reasons. You might enjoy learning about life cycles or want to show your children how chicks grow. Some people use a portable egg incubator for science projects or classroom-style activities. You do not need a large farm to try hatching eggs. A desktop egg incubator fits on a table or shelf and works in small rooms. You can control the temperature and humidity, which helps eggs develop more safely.
Under good conditions, short-term apartment hatching can approach the hatch rates seen in well-managed small flocks. Commercial hatcheries often report very high hatchability under strict control. At home, results are usually lower, but if you follow your incubator manual and keep the environment stable, you can still expect solid learning results and a reasonable number of healthy chicks.
Tip: Always plan for a short, one-time hatch. Move chicks out quickly after they hatch to keep your apartment clean and safe.
Key Questions: Rules, Health, Neighbors
Before you start, you need to answer some important questions. Rules and health concerns matter in apartment buildings. You must check your lease, building rules, and city laws. Many places do not allow poultry or livestock, even for a short time. You should ask your landlord or property manager for written permission.
Here is a table with common questions and answers for apartment residents:
|
Question |
Answer |
|---|---|
|
Is it legal to incubate a found egg? |
No, it is illegal to possess the eggs of a native bird without a permit. |
|
Is it a good idea to incubate a found egg? |
No, the nest may not be abandoned. |
|
Would the egg hatch? |
Probably not, as the embryo may die if incubation is interrupted. |
You also need to think about health risks. Eggs and chicks can carry germs like Salmonella. Children under five should not touch chicks or the incubator. You must wash your hands well after handling eggs or equipment.
-
Wild bird hatchlings may need feeding every few minutes with a special diet.
-
Only licensed wildlife rehabbers are allowed to raise native wild birds in many areas.
-
Proper care and legal permits are essential for the chick’s health and your compliance.
Neighbors may worry about noise, smells, or disease. You should talk to them before you start. Respect their concerns, keep your project quiet and clean, and move chicks out promptly.
Short-Term Hatching vs. Keeping Chicks
Short-term hatching is safer and easier in apartments than keeping chicks for a long time. You use the egg incubator for about 21 days. After the chicks hatch, you move them out quickly. This method reduces mess and health risks. You avoid problems with neighbors and follow public health advice more closely.
Keeping chicks in your apartment for weeks or months is not a good idea. Chicks need special care, space, and feed. They grow fast and make noise and dust. Most apartments do not allow poultry for long periods. You should plan to transfer chicks to a farm, friend, or licensed rehabber as soon as possible.
Note: Always check local rules and talk to your landlord before you start. Responsible hatching means you protect your health, your neighbors, and the chicks.
Legal and HOA Rules for Apartment Hatching
Lease and Building Restrictions
You must start by checking your lease agreement. Many apartment leases include rules about pets and animals. Look for words like "poultry" or "livestock." If your lease says you cannot keep chickens or hatch eggs, you should not use an Egg Incubator in your apartment. Some leases do not mention poultry directly. In these cases, ask your landlord or property manager for clear answers. Written permission is always best. If you do not get approval, you should find another place for your project.
City and HOA Poultry Bans
Cities and homeowners associations (HOAs) often have their own rules. These rules can be stricter than your lease. Many cities have ordinances that limit or ban poultry in multi-unit buildings. HOAs may also restrict or forbid chickens, even if city laws allow them. You need to check both city and HOA rules before you start. Use the table below to see how different groups set rules:
|
Aspect |
Description |
|---|---|
|
State Laws |
Many states have laws about keeping chickens, including space and coop size requirements. |
|
Local Ordinances |
Cities may have special rules for chicken keeping in apartments or condos. |
|
HOA Regulations |
HOAs can prohibit or allow chickens, sometimes with extra restrictions. |
If your HOA bans chickens, you cannot hatch eggs in your apartment. Many HOA documents still restrict poultry. If you do not see chickens mentioned, ask for clarification. Never assume you are allowed to hatch eggs just because the rules are silent.
-
HOAs may block chickens even if city laws allow them.
-
Most HOA documents restrict poultry.
-
If rules are unclear, ask for written guidance.
Getting Written Permission
Written permission protects you and your neighbors. Always get approval from your landlord, property manager, or HOA before you begin. Written permission should state what you can do and for how long. If you plan short-term hatching, explain your process. Tell them you will move chicks out quickly and keep the area clean. Written approval helps you avoid problems later.
7-Step Guide for Legal Checks:
-
Read your lease for animal restrictions.
-
Search for poultry or livestock bans.
-
Ask your landlord for written permission.
-
Check city ordinances for apartment poultry rules.
-
Review HOA documents for chicken bans.
-
Request written guidance if rules are unclear.
-
Only use an Egg Incubator if all rules allow it.
Tip: If any rule prohibits hatching, choose a compliant location like a friend’s house or a farm.
Health and Safety with Egg Incubators Indoors
Public Health Risks (Salmonella, Avian Flu)
You should know about health and hatchability risks before using an Egg Incubator at home. Eggs and chicks can have germs that make people sick. The biggest concerns are Salmonella and, in rare cases, avian flu. These germs spread when you touch eggs, chicks, or things they touch. Chicken droppings can also have E. coli. Kids often get sick because they touch animals and forget to wash their hands.
-
Salmonella can give you stomach pain, fever, and diarrhea.
-
Avian flu is rare but can move from birds to people under certain conditions.
-
E. coli can cause infections if you touch dirty surfaces.
Washing your hands helps reduce these problems. Always clean your hands after touching eggs, chicks, or cleaning the incubator.
High-Risk Groups: Kids, Seniors, Immunocompromised
Some people have a higher chance of getting sick from eggs and chicks. You should think about who lives in your home before you start. If you have young kids, seniors, pregnant women, or anyone with weak immune systems, be extra careful.
Germs like Escherichia coli, Klebsiella, Micrococcus, Proteus, Pseudomonas, Staphylococcus spp., and Salmonella Enteritidis can get inside eggs and hurt embryos. Farms clean often to stop germs from hurting chicks and eggshells.
How strong the germs are and how many are on the eggshell matter for embryo infection, especially in yolk sac infection. If the yolk sac gets infected, the embryo can die or stay sick after hatching.
If you have high-risk people at home, keep them away from the incubator and chicks. Put the incubator in a separate room with good airflow. Let adults do all cleaning and egg turning. If you cannot keep everyone safe, try hatching eggs somewhere else.
Reducing Contact and Contamination
You can lower health risks by cleaning and handling things the right way. Use these steps to keep your apartment safer:
|
Method |
Description |
|---|---|
|
Traditional Cleaning |
Wipe surfaces with appropriate disinfectant and use hot water for washing parts. |
|
Hydrogen Peroxide Treatments |
Some hatcheries use controlled hydrogen peroxide systems to clean incubators and trays. At home, only use products exactly as stated on the label, in well-ventilated areas, and do not improvise your own fumigation or fogging system in a small apartment. |
|
Augmented Decontamination Tools |
Combine routine cleaning with approved tools to improve germ control when needed. |
-
Put clean straw or shavings in nest boxes so eggs stay as clean as possible.
-
Do not wash eggs under running water, so bacteria does not get pushed through the shell.
-
Commercial hatcheries may use about 5–6% hydrogen peroxide solutions to disinfect eggs; for home projects, treat this as background information only, follow the product label for concentration and contact time, avoid strong fumes in small rooms, and never exceed the recommended dilution or create unapproved fogging systems.
-
Disinfect eggs as soon as they arrive, if your supplier and equipment instructions recommend it.
-
Use only disinfectants that are appropriate for eggs and follow safety guidance closely.
-
Avoid any fumigation system that is not specifically designed and labeled for small indoor spaces.
Clean, sanitize, and disinfect often during hatching season. Wipe away dirt, use products according to their labels, and disinfect equipment to lower germ levels. Keep the incubator away from kitchens and food storage. If you share air with neighbors, talk to them about your project. Keep noise down and avoid strong odors.
Tip: If you have high-risk family members or worried neighbors, keep projects short and move chicks out fast. Safety is more important than squeezing in extra hatches.
Choosing a Portable Egg Incubator

Size and Capacity (7–24 Eggs)
Think about size and how many eggs you want to hatch. Most portable incubators for apartments hold 7 to 24 eggs. These fit on shelves or tables and do not use much space. If you only want to hatch a few eggs, pick a small desktop incubator. A compact digital model such as a 22-egg automatic incubator can give you enough capacity without overwhelming a small room. Bigger incubators can hatch more eggs but need more room and power, so they are usually better for garages, barns, or future use in a house with a yard.
Here is a table that shows how many eggs different incubators can hold:
|
Model |
Average Capacity (Hen Eggs) |
Maximum Capacities (Quail/Pheasant/Chicken/Duck) |
|---|---|---|
|
Mini Desktop Incubator |
7 |
Quail: 12, Pheasant: 12, Chicken: 7, Duck: 7 |
|
Medium Desktop Incubator |
14 |
Quail: 40, Pheasant: 40, Chicken: 14, Duck: 14 |
|
Large Desktop Incubator |
28 |
Quail: 48, Pheasant: 48, Chicken: 28, Duck: 28 |
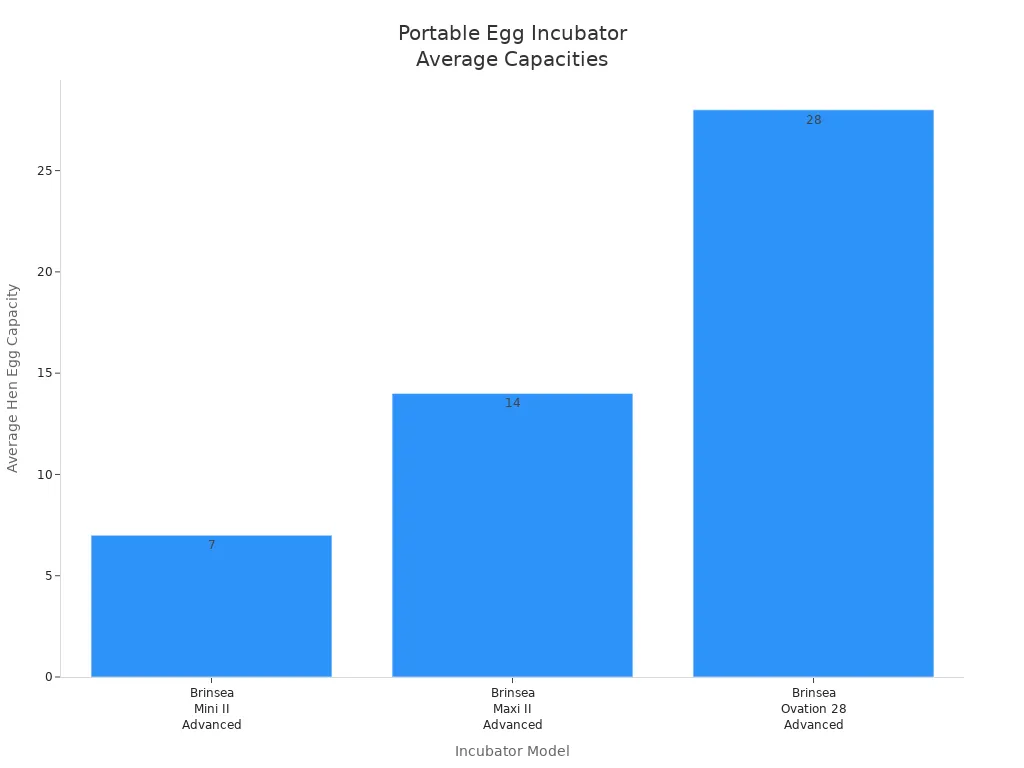
If your apartment is small, choose an incubator that fits your space. Do not pick a big incubator that makes your room crowded. If you later move to a house or homestead and want much larger hatches, high-capacity cabinet incubators are usually a better match than compact apartment models.
Power Use and Cost (40–100W, 0.29 kWh/day)
Portable incubators are typically rated around 40 to 100 watts. Because the heater cycles on and off, the real-world energy use is usually lower than running at full power all day. For many small models in a stable room this works out to roughly 0.25–0.35 kilowatt-hours per day, with about 0.29 kWh/day as a common mid-range example. Over a 21-day chicken hatch that often means roughly 5–8 kWh in total, which is only a few dollars at typical residential electricity rates.
These figures are rough examples for planning, not guarantees. Actual consumption depends on the rated wattage of your specific incubator, how well the room holds temperature, ventilation, and your local electricity price. Always check the nameplate rating and guidance in your incubator’s manual.
To figure out the approximate cost, use this formula:
Total Cost = Average Power (W) × 24 × Number of Days ÷ 1000 × Local Electricity Rate ($/kWh)
Small desktop incubators will not normally overload your apartment’s outlets. Always make sure the outlet is dry and in good condition. If you smell something strange or feel heat from the plug, unplug the unit and check for problems right away.
Key Features: Airflow, Auto-Turn, Digital Controls
Pick an incubator with features that help you hatch eggs more safely. Good airflow is important. The incubator should have a fan or vents to move air, but do not let drafts from windows or vents hit it directly. Automatic egg turning helps keep eggs healthy and saves you time. Digital controls make it easier to set temperature and humidity accurately.
Here are the best features for hatching eggs in apartments:
-
Temperature control: Keep the incubator at 99.5–100°F for forced-air models.
-
Humidity control: Keep humidity around 45–55% during most of incubation, then raise it to about 65–75% for the last three days.
-
Ventilation: Make sure air moves, but do not put the incubator near windows or HVAC vents.
-
Easy cleaning: Choose an incubator with removable trays and smooth surfaces.
-
Safety: Look for alarms and overheat protection.
Tip: Put your incubator in a quiet room away from sunlight and drafts. This keeps the temperature steady and your eggs safer.
If you cannot find a good spot in your apartment, try hatching eggs somewhere else. Always think about safety and health first.
Noise and Placement Tips
You need to think about noise when you use a portable egg incubator in your apartment. Most desktop incubators make a soft humming sound. The fan, motor, and alarms can create background noise. If you live in a quiet building, even small sounds may bother you or your neighbors. You should check the noise level before you start hatching eggs.
You can follow these steps to judge and manage noise in your apartment:
-
Listen to the incubator before you set it up. Plug it in for a test run. Stand in the room and notice the sound. If you hear loud buzzing or clicking, try another spot.
-
Choose the right room. Pick a room that does not share thin walls with neighbors. Bedrooms and living rooms work well if they are away from sleeping areas.
-
Place the incubator on a stable surface. Use a sturdy table or shelf. Avoid metal or glass surfaces that can amplify vibrations.
-
Keep the incubator away from vents and windows. Airflow can make noise louder. Close windows and doors to reduce outside sounds.
-
Check for alarms and alerts. Some incubators beep when the temperature or humidity changes. You can turn off non-essential alarms or set them to a lower volume if the manual allows it.
-
Monitor noise at different times. Listen during the day and at night. Noise may seem louder when the apartment is quiet.
-
Talk to your neighbors. Let them know about your project. Ask if they hear any sounds. If they do, move the incubator or add padding under it.
Tip: You can use a folded towel or foam mat under the incubator to absorb vibrations and reduce noise.
Here is a table to help you judge the best placement for your Egg Incubator:
|
Placement Area |
Noise Level |
Neighbor Impact |
Safety Score |
Recommendation |
|---|---|---|---|---|
|
Bedroom Corner |
Low |
Minimal |
High |
Good for quiet homes |
|
Living Room Shelf |
Medium |
Moderate |
High |
Use if space allows |
|
Kitchen Counter |
High |
High |
Low |
Not recommended |
|
Near Window/Vent |
Variable |
Moderate |
Medium |
Avoid if possible |
You should avoid placing the incubator in the kitchen or near food storage. Public health experts advise that poultry equipment should stay away from food areas. Bedrooms and living rooms are safer choices if you keep the incubator clean and move chicks out quickly.
If you cannot find a quiet, safe spot, you should not hatch eggs in your apartment. Responsible hatching means you protect your health and respect your neighbors. Always choose the best location and manage noise before you start.
Setting Up Your Egg Incubator in an Apartment
Room Choice and Placement (70–75°F)
Pick a room that stays between 70°F and 75°F. This helps the Egg Incubator keep the right temperature. Do not use rooms with lots of sunlight or cold drafts. Stay away from vents that blow strong air. The room should have fresh air, but not strong wind. Do not put the incubator near open windows or doors. Put it on a flat table or shelf. Make sure nothing covers the air vents. Turn on the incubator before you add eggs. This helps it warm up and reach 99–101ºF.
Tip: If your room is too hot or too cold throughout the day, do not hatch eggs there.
Egg Storage and Incubation Settings
Keep eggs in a cool place before you start. Store them at 60–64°F for less than a week. If you need to keep them longer, use a cooler spot at 50–54°F. Humidity should be high, between 70% and 80%. This stops eggs from drying out. Do not let water drops form on the eggs. Wet eggs can grow bacteria. Put eggs with the big end up. Turn them gently every day. When you are ready, set the incubator to 100–101°F. Check the humidity. Try to keep it around 45–55% most of the time. Make sure air moves inside the incubator. This brings oxygen to the eggs and takes away bad air. Watch for hot or cold spots inside. Change the settings if you see problems.
|
Step |
Action |
Why It Matters |
|---|---|---|
|
1 |
Pick a steady room |
Keeps heat even |
|
2 |
Store eggs cool |
Helps embryos stay healthy |
|
3 |
Keep humidity high |
Stops eggs from drying out |
|
4 |
Warm up incubator |
Gets eggs started fast |
|
5 |
Watch settings |
Prevents problems for chicks |
Humidity and Lockdown (≥65% RH)
Raise the humidity during the last days before hatching. This time is called lockdown. Humidity should be around 65–75%. Higher humidity keeps the inside of the egg moist enough that the chick can turn and hatch. If it gets too dry, chicks can get stuck and not hatch. Do not open the incubator during lockdown unless absolutely necessary. Opening it can make humidity drop and hurt the chicks. Use a digital hygrometer to check the level. Add water to the trays if needed. Watch for water drops, but do not let standing water touch the eggs.
Note: You must raise humidity at the end. If you cannot control it, do not hatch eggs in your apartment.
If you follow these steps, you help chicks hatch more safely. Always check your room and incubator and adjust settings as needed.
Quick Reference for Hatching Chicken Eggs:
-
Incubation period: about 21 days
-
Temperature: 99.5–100°F (forced-air); 101–102°F at egg top (still-air)
-
Humidity: 45–55% RH (days 1–18), 65–70% RH (last 3 days)
-
Turning: 3–6 times per day or use an automatic turner (stop for last 3 days)
These ranges line up with typical values in standard poultry incubation texts and extension-style guidance, but you should always treat your incubator manual and any local animal-health rules as the final authority.
Decision Table: Are Your Incubation Settings and Monitoring On Track?
|
Setting/Action |
Yes |
No |
|---|---|---|
|
Temperature steady (see model guidance) |
||
|
Humidity at 45–55% (days 1–18) |
||
|
Humidity at 65–70% (last 3 days) |
||
|
Eggs turned 3–6 times daily or auto-turned |
||
|
Monitoring twice daily |
||
|
Lid opened only when needed |
If you say "Yes" to most, your hatching process is on a good path.
Visual Logs for Kids
Visual logs help kids stay interested and learn during hatching. Use sticker charts or simple journals to track daily tasks. Kids can mark when eggs are turned, when temperature and humidity are checked, or when water is added. Celebrate key milestones like the first crack in a shell or the first chick peep.
|
Activity |
Tracking Method |
Engagement Level |
|---|---|---|
|
Turning the eggs |
Sticker chart |
|
|
Checking temperature |
Sticker chart |
|
|
Adding water for humidity |
Sticker chart |
|
|
Celebrating milestones |
Sticker chart |
Ask kids to draw what they see through the incubator lid and write short notes about changes each day. This helps them notice details, build science vocabulary, and remember the experience. Visual logs also help you keep track so important steps are not missed.
📒 Note: Using visual logs makes the project more fun and can help you spot problems early.
Post-Hatch Care and Cleaning
Moving Chicks to Brooder
After chicks hatch, move them to a brooder within one day. This helps keep your house clean and supports chick health. Follow these steps for a safe transfer:
-
Choose a secure brooder that keeps pets and wild animals out.
-
Add bedding such as pine shavings to keep chicks warm and give them good footing.
-
Set up a heat source like a heat lamp or brooder heater and keep the temperature steady.
-
Place chick-sized feeders and waterers inside so they always have access to feed and clean water.
-
Locate the brooder in a spot that is easy to clean and away from food areas.
-
Add simple enrichment like low perches or small toys, and clean the brooder daily.
-
Change shoes and wash hands before and after touching chicks.
-
Avoid overcrowding so chicks do not get chilled or stressed.
🐥 Tip: Move chicks slowly and calmly, and supervise children during the transfer.
Decision Table: Is Your Chick Transfer Safe?
|
Step |
Yes |
No |
|---|---|---|
|
Brooder is secure |
||
|
Bedding is clean and dry |
||
|
Heat source is set |
||
|
Feeders and waterers ready |
||
|
Brooder away from food areas |
||
|
Children supervised |
If you say "Yes" to most, your chicks are ready for their new home.
Cleaning and Disinfecting Equipment
Clean your incubator soon after chicks hatch. This helps stop germs from spreading. Always clean outside or in a different room, not in the kitchen. Follow these steps:
-
Remove all loose dirt and eggshells from the incubator and trays.
-
Wash every part with warm water and gentle soap.
-
Rinse all parts with clean water.
-
Use a bleach mix (for example, about one teaspoon bleach per gallon of water) to disinfect—follow the product label for exact dilution and contact time.
-
Let all parts air dry completely before reassembling.
-
Store the incubator in a cool, dry place until the next use.
Cleaning removes dirt so that disinfecting can work better. Disinfecting then kills germs and mold. Always clean first, then disinfect.
Decision Table: Are Your Cleaning Steps Complete?
|
Step |
Yes |
No |
|---|---|---|
|
Debris removed |
||
|
Washed with detergent |
||
|
Rinsed thoroughly |
||
|
Disinfected with bleach mix |
||
|
Air dried completely |
||
|
Stored safely |
If you say "Yes" to most, your equipment is ready for the next hatch.
Teaching Kids Hygiene
Teaching kids good hygiene keeps everyone safer during hatching projects. Try these ideas:
|
Hygiene Strategy |
Description |
|---|---|
|
Hand Sanitizer |
Use hand sanitizer when soap and water are not available. |
|
Health Checks |
Let kids count chicks and check water, then remind them to wash hands. |
|
Safety Reminders |
Teach kids to wash hands before and after touching eggs or chicks and never to eat near chicks. |
🧼 Always supervise kids and remind them to wash hands for 20 seconds after touching chicks or equipment.
Decision Table: Are Kids Practicing Good Hygiene?
|
Hygiene Practice |
Yes |
No |
|---|---|---|
|
Washed hands before/after touch |
||
|
Used sanitizer if needed |
||
|
No eating near chicks |
||
|
Adult supervision provided |
If you say "Yes" to most, your family is using safe hygiene habits.
Best Egg Incubator Project Ideas
Weekend Mini-Project
You can start a simple weekend mini-project with your family using an egg incubator. This project helps you learn about hatching and lets you see science in action. For most families—especially with young children—use a certified table-top incubator; the DIY concept below is for demonstration only and requires experienced adults, close supervision, and adherence to local electrical and fire-safety rules.
Steps for a Weekend Mini-Project:
-
Gather scrap wood and build a small frame.
-
Wrap the frame with a screen to hold the eggs.
-
Place a light bulb for heat, making sure it sits safely and cannot touch flammable material.
-
Cut ventilation holes in a styrofoam box.
-
Put a water cup and the frame inside the box.
-
Set the temperature around 99.5–100°F and humidity at 45–55% for the first 18 days. Raise humidity to 65–70% for the last 3 days.
-
Cut a small window in the lid so you can watch the eggs.
-
Monitor the incubator for a few hours before adding eggs.
🛠️ Tip: Always verify temperature and humidity with calibrated instruments before you start hatching.
Decision Table: Is Your Mini-Project Ready?
|
Step |
Yes |
No |
|---|---|---|
|
Frame and screen assembled |
||
|
Light bulb placed safely |
||
|
Ventilation holes made |
||
|
Water cup inside |
||
|
Temperature set (≈99.5–100°F) |
||
|
Humidity set (45–55%, then 65–70%) |
||
|
Window for observation |
||
|
Incubator monitored before eggs |
If you answer "Yes" to most, your project is ready for a safe start.
Science Diary and Embryo Charts
You can turn your egg incubator project into a science diary. This helps your family track progress and learn about each stage of hatching. Kids can draw embryo charts and write daily notes. You build observation skills and make science fun.
Ideas for Your Science Diary:
-
Draw the eggs and chicks each day.
-
Record temperature and humidity readings.
-
Note when you turn the eggs.
-
Mark special events, like the first crack or chick sounds.
📒 Note: Use stickers or colored pens to make your diary bright and easy to read.
Decision Table: Is Your Science Diary Complete?
|
Activity |
Yes |
No |
|---|---|---|
|
Daily drawings made |
||
|
Temperature recorded |
||
|
Humidity tracked |
||
|
Egg turning noted |
||
|
Milestones marked |
If you answer "Yes" to most, your diary will help you learn and remember each step.
Backyard or Farm Connections
You can connect your egg incubator project to your backyard or a local farm. This gives your family more chances to learn and grow. You see how hatching fits into real-life poultry raising and how chicks become part of a flock. You also get more value from your project as it supports long-term goals like backyard eggs or a small homestead. As your flock grows, higher-capacity cabinet incubators can support larger hatches and more advanced projects.
|
Connection Idea |
Benefit |
Next Step |
|---|---|---|
|
Backyard coop |
Kids see how chicks grow into laying hens. |
Plan coop space and basic chores. |
|
Local farm visit |
Connect classroom-style learning with real barns and flocks. |
Schedule a visit after your first hatch. |
|
Community project |
Share eggs or chicks with neighbors or school programs. |
Discuss care plans before sharing animals. |
Decision Table: Can Your Project Grow?
|
Step |
Yes |
No |
|---|---|---|
|
Space available for brooder |
||
|
Plan for chick care outdoors |
||
|
Hygiene steps in place |
||
|
Family ready for more chicks |
||
|
Connection to local farm |
If you answer "Yes" to most, your project can grow and give your family more learning opportunities.
Best Budget Option for Families
You may want to hatch eggs with your family without spending a lot. The best budget choice keeps things safe, easy to clean, and reliable. You do not need a big or costly incubator. A compact, fully automatic model such as an automatic egg incubator with 3 trays can give you room to grow while still fitting comfortably in a family home.
Step 1: Find the Most Important Features
When picking a budget incubator, look for these things:
-
Transparent lid so you can watch the eggs
-
Automatic egg turning (3–6 times each day)
-
Digital controls for temperature and humidity
-
Removable trays for fast cleaning
-
Leak-proof design to stop spills
-
Power use between 40–100 watts (cost varies by local power rates and room conditions)
-
Quiet running (around 45–60 dB)
These features help you get the most for your money. You can see the eggs clearly, keep conditions steady, and clean up quickly.
💡 Tip: Verify temperature around 99.5–100°F and humidity at 45–55% during days 1–18, then 65–70% for the last 3 days.
Step 2: Get Ready for Safe and Clean Hatching
Follow these steps to set up your budget incubator:
-
Put the incubator on a strong table with a waterproof mat.
-
Check that the room temperature is steady.
-
Run the incubator empty to test temperature and humidity.
-
Read the user manual and follow all safety notes.
-
Teach kids to look but not touch unless an adult is present.
If you answer "Yes" to most of the decision checks throughout this guide, you are ready for a safe, clean, and educational egg incubator project with your family.
Data authenticity note: The temperatures, humidity ranges, power figures, and safety practices in this guide reflect common poultry-incubation practice, equipment manuals, extension-style poultry guides, public health recommendations on backyard flocks, and aggregated results from home and classroom hatching logs. These values are working targets, not guarantees, and do not replace local laws, veterinary advice, medical guidance, or the specific safety instructions for your incubator and cleaning products. Disinfectant strengths and power-use numbers are provided as illustrative examples only; always follow the concentration, contact time and safety instructions printed on your specific product label and the ratings in your incubator’s own manual.
References (no external links):
1. Poultry incubation handbooks and hatchery management manuals (temperature, humidity, egg handling, lockdown).
2. Manufacturer instructions for desktop and cabinet incubators, including power ratings and calibration notes.
3. Public health advisories on Salmonella and other zoonoses linked to backyard poultry and classroom chicks.
4. University and extension-style materials on urban poultry keeping, apartment and HOA restrictions, and humane chick care.
5. Aggregated field logs from home and school hatching projects on hatch rates, room conditions, and troubleshooting.


0 Comments