
Placing your incubator in the wrong spot can quietly ruin a hatch. The settings on the control panel may look perfect, but if the room itself swings from hot to cold or gets hit by drafts, embryos will struggle and hatch rates drop. The good news is that you do not need a perfect farmhouse or a dedicated hatch room. With some smart egg incubator placement, most backyard homes and small farms can create a steady, safe space for chicks to develop.
This guide is written for backyard chicken keepers, small-scale farmers, and teachers running school hatching projects. You will learn which rooms usually work best, which spots to avoid, and how to test your own home or classroom so you can choose the most stable location available. These suggestions are based on common poultry extension advice and real-world home hatching experience. They will not guarantee a 100% hatch, but they will remove many of the biggest risks that cause healthy eggs to fail.
Key Takeaways
-
Choose an indoor room that stays fairly steady in temperature from day to night, away from direct sunlight, drafts, and busy doorways.
-
Place the incubator on a solid, level surface at a comfortable working height where you can check it quickly without bumping or moving it.
-
Before setting eggs, monitor the room with a simple thermometer and hygrometer for at least 24 hours so you know how much the conditions change.
-
Avoid problem areas such as garages, porches, kitchens, and damp basements unless you have no other option and are ready to monitor conditions more often.
Quick Guide to Egg Incubator Placement
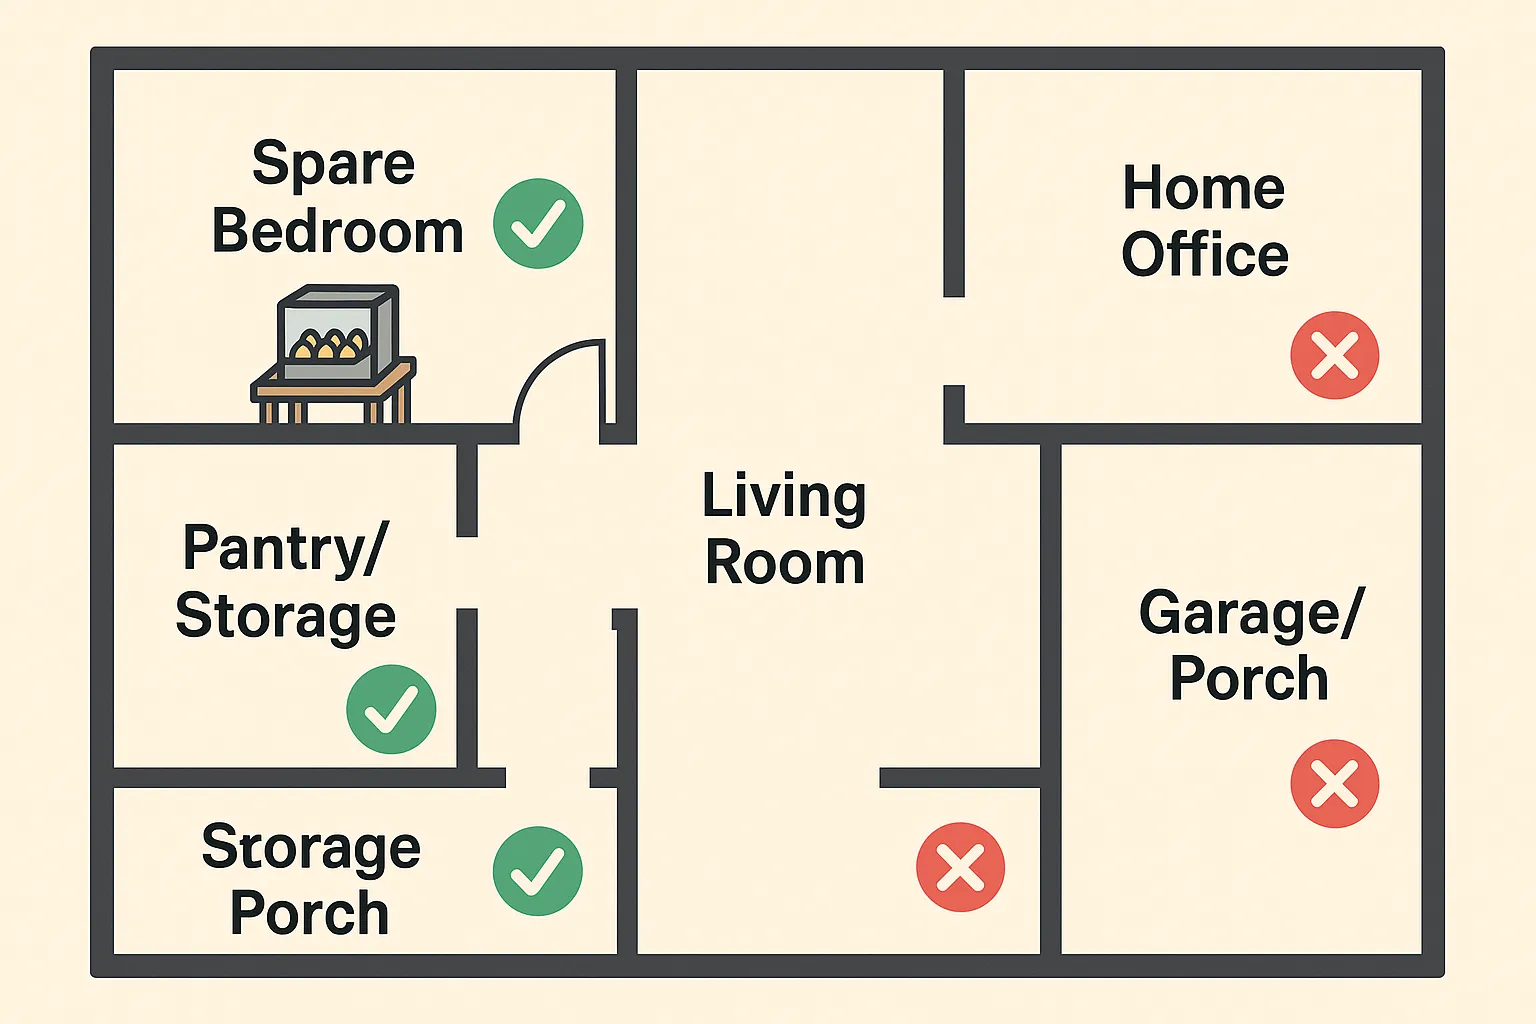
Best Rooms for Egg Incubator
When you first bring home an incubator, it helps to narrow down your options quickly. In most homes and small farms, the best egg incubator placement is a quiet, low-traffic room that stays in a moderate temperature range and does not have lots of doors and windows opening all day. Here are some rooms that often work well.
-
Spare bedroom or guest room. This is one of the most reliable choices. The door can stay closed, foot traffic is light, and the temperature usually changes slowly. You can set up a small table or shelf in a corner away from the window.
-
Home office. If you work from home, a home office lets you keep an eye on the incubator throughout the day. Just avoid placing it right under an air conditioner or heater vent, and close blinds during strong afternoon sun.
-
Pantry, storage room, or walk-in closet. These small, enclosed rooms are often surprisingly stable. As long as they are dry, clean, and not sharing a wall with a hot garage or outside door, they can be great incubator rooms.
-
Finished, dry basement corner. A finished basement that does not smell damp and does not flood can also work, especially if the temperature stays near typical room temperature and away from exterior doors or open windows.
If you are still choosing equipment, our chicken egg incubators are designed to stay stable even in older homes and mixed-use rooms, with good insulation and easy-to-read controls.
Spots to Avoid for Placement
Some locations cause more trouble than they are worth. You may technically be able to hatch in them, but they add risk and require constant checking.
-
Busy kitchens. Ovens, stovetops, dishwashers, and boiling pots all change room temperature and humidity quickly. Grease and steam are also not ideal around electronics and chicks.
-
Living rooms and main hallways. These spaces get constant traffic, doors opening and closing, and kids and pets passing by. All of that means bumps, noise, and drafts.
-
Sunrooms and windowsills. Direct sun can overheat an incubator in minutes, even on cool days. Shadows from clouds and trees then cause rapid swings the other way.
-
Garages, porches, and sheds. Most of these spaces are not insulated like the house. Temperatures can swing widely between day and night, especially in spring and fall.
If one of these is your only option, you will need extra monitoring and backup plans. In the sections below, we will walk through how to test and improve them.
Step-by-Step Room Selection
List Possible Rooms
Start by listing every realistic spot where your incubator could live for three to four weeks. Do not worry yet about details — just write down anything that could physically hold the machine on a stable surface with access to power. For many backyard chicken keepers, the list looks like this: spare bedroom, home office, dining room corner, pantry, hallway table, finished basement corner.
Next, cross off any area that clearly fails basic safety rules: right beside a wood stove, directly above a washing machine that shakes, or anywhere a toddler or large dog can easily slam into it. You should end up with two or three possible rooms to test in more detail.
Monitor Temperature and Humidity
Once you have a short list, place a simple room thermometer and hygrometer in each candidate room. Many inexpensive digital units show both readings and record daily highs and lows. Leave them in place for at least 24 hours, and ideally across both a daytime and nighttime period when your heating or cooling systems would usually run.
For chicken eggs, most people get the best results when the room stays somewhere in the mid-60s to mid-70s °F (roughly 18–24 °C) with only small changes during the day. A brief swing of a few degrees is fine; what you want to avoid are rooms that jump 10 °F or more whenever the sun comes out or the wind picks up. Humidity can vary more, but steady, moderate room humidity makes it easier to keep the incubator in its target range.
Many incubation guides recommend watching a room for at least one full day before you set eggs. This shows you how the space behaves at night, when doors are closed, and during busy times, like when everyone gets home from school or work. If one room clearly has gentler highs and lows, it should go to the top of your list.
Check for Drafts and Traffic
Next, pay attention to airflow and movement. Stand in each room during a windy period or when the furnace or air conditioner is running. Can you feel air blowing near the place you would put the incubator? Is there a vent, fan, or drafty window nearby? Drafts can strip heat from the incubator and lead to uneven development inside.
Also think about traffic. How often does someone walk past this table? Does the door open and close all day? Are there children playing rough games nearby, or pets that like to jump up on furniture? Your ideal spot is boring: a place where people rarely brush past and the door stays mostly closed.
Finally, check for practical details. You need a grounded outlet within safe cord distance. You also need room to reach the incubator comfortably to add water, candle eggs, and remove chicks. If you want a deeper refresher on how the heater, fan, and vents inside the machine work together, you can read our guide on how chicken egg incubators work.
For a full walk-through of cleaning, testing, and preparing your unit before the first hatch, you can also follow our incubator setup guide.
Placement Tips for Different Home Scenarios
Small Apartments and Rentals
If you live in a small apartment or rental, you may not have a spare room. That does not mean you cannot hatch; it simply means you must be extra thoughtful about egg incubator placement. In compact homes, a corner of the bedroom or a walk-in closet often makes the most sense.
In a bedroom, choose a sturdy dresser or side table away from the window and not directly under a vent. Use blackout curtains if morning or afternoon sun hits that wall. The fan in a typical forced-air incubator is not very loud, but if you are a light sleeper, you might place the incubator at the foot of the bed or behind a small screen so the sound is less noticeable.
In a closet, make sure there is still some air exchange. Leaving the door slightly open or opening it several times a day is usually enough. Watch carefully for heat buildup in very small spaces, especially if the closet shares a wall with a hot hallway or attic.
Cold or Hot Climates
In very cold climates, the biggest risk is a room that dips too low overnight. Avoid unheated porches and rooms with large, single-pane windows. Instead, place the incubator in a room that already stays comfortable for people, such as a bedroom or main living area, but choose a quiet corner away from doors. If your home cools down a lot at night, monitor room temperature during your coldest hours to be sure it stays within a reasonable range.
In very hot climates, you are more likely to fight overheating. Air-conditioned rooms are helpful, but only if the vent does not blow directly onto the incubator. Close blinds and curtains in the hottest part of the day to reduce sun through the glass. Many people find that an interior hallway or room away from west-facing windows works better than a bright, sunny space.
When the climate is extreme in either direction, a well-insulated incubator with reliable temperature control gives you more margin for error. Even then, no machine can fully cancel out a wildly swinging room, so placement still matters.
Busy Homes with Kids and Pets
In busy family homes, bumps, noise, and curiosity are normal. Your goal is not to make children and pets disappear, but to place the incubator where they are less likely to accidentally harm it. A small table in a low-traffic corner of a bedroom or office usually works better than the kitchen counter or coffee table.
If you have young children, explain that the incubator is “hands-off science equipment” and set clear rules. A baby gate, folding screen, or simple tape line on the floor can remind kids to give it space. For pets, avoid placing the incubator on low shelves or wobbly stands that a dog could bump or a cat could jump onto.
If your home is always noisy and drafty, it may be worth choosing a more advanced incubator that holds temperature and humidity steady with less help from the room. An automatic model with accurate controls and alarms can reduce the number of times you need to open the lid or make big adjustments.
Egg Incubator Placement in Classrooms
Best Classroom Locations
Teachers and school staff face a special challenge: you need students to see the incubator, but you also have to protect it from constant traffic, noise, and accidental bumps. In most classrooms, the best placement is on a solid counter or table against an interior wall, away from the main doorway and away from windows that bring in strong sun.
Try to place the incubator where the teacher can see it from the desk and from most spots in the room. Many classes use a side counter near the whiteboard or a back counter that students can approach in small, supervised groups. Avoid placing the incubator on a table that is constantly moved, or on a surface shared with art supplies, water tubs, or heavy stacks of books.
Balancing Access and Safety
Students are naturally curious, which is great for learning but risky for delicate equipment. Set clear rules about when students may approach the incubator and whether they may ever touch it. Some teachers mark a viewing line on the floor so children can look closely without leaning on the table.
Keep cords tidy and taped or tucked away so no one trips. Make sure the outlet is not overloaded with other high-draw devices. As hatch day approaches and chicks begin to pip and move, excitement will grow. Plan in advance how many students can come up at once so the incubator is not surrounded and bumped from all sides.
If your school has specific health or animal-handling policies, follow them closely. Many teachers also choose to move chicks to a brooder in a different area once they are dry, so students can interact with them in a more controlled space.
Problem Areas for Egg Incubator Placement
Garages, Basements, Kitchens
Some of the most tempting spaces for an incubator are also the least stable. Garages, unfinished basements, and kitchens show up over and over again in stories about failed hatches. Understanding why they are risky will help you decide whether you can safely use them.
Garages and mudrooms tend to follow outdoor weather much more closely than the rest of the house. Temperatures may surge on sunny days and plunge on cold nights. Doors opening for cars or people add sudden bursts of hot or cold air. Unfinished basements can be chilly and damp, with pockets of colder air near the floor and walls. Kitchens, meanwhile, swing with cooking and dishwashing, and grease and steam are not ideal near delicate electronics.
Solutions for Limited Options
If one of these spaces is truly your only option, treat it as a “higher maintenance” incubator room. Place the incubator on a sturdy table away from exterior doors and windows, and as far as possible from ovens, heaters, or washing machines. Consider using cardboard or foam board to block direct drafts without covering vents on the incubator itself.
Check the room thermometer several times a day, especially during weather changes. In cold areas, a small, safe space heater with a built-in thermostat can sometimes help smooth out big swings, but it must be used with care and never left near flammable items. In very damp basements, a dehumidifier or moving the incubator higher off the floor may help.
If you often see big internal temperature swings even after you improve placement, our guide on how to troubleshoot incubator temperature fluctuations walks through common causes and fixes step by step.
Placement Checklist and Next Steps
Final Checklist for Egg Incubator Placement
Before you set eggs, walk through this simple checklist. If you can answer “yes” to most of these questions, you have probably found a good home for your incubator:
-
Does the room stay in a comfortable range for people, without large temperature swings between day and night?
-
Is the incubator on a solid, level surface where it will not be bumped, shaken, or moved once eggs are inside?
-
Is the incubator away from direct sunlight, drafty windows, doorways, vents, and fans?
-
Is there a safe electrical outlet within reach, with the cord secured so no one trips?
-
Can you reach the incubator easily to add water, candle eggs, and remove chicks without stretching or lifting it?
-
Have you monitored the room with a thermometer and hygrometer for at least 24 hours and found only gentle changes?
Good egg incubator placement cannot promise perfect results, but it does remove many avoidable risks. Combined with correct incubator settings and good egg handling, it sets your flock or classroom project up for success.
When to Upgrade Your Egg Incubator
If you have done your best with placement and still fight big swings, constant alarms, or poor hatch rates, the incubator itself may be the limiting factor. Older or very basic units can struggle in homes with drafty windows, strong temperature swings, or crowded family schedules.
In those cases, it may be time to consider a better-insulated, automatic model with more precise controls and alarms. You can explore options like our automatic egg incubator with three trays for birds and quail, which is designed to hold temperature and humidity steady while reducing the number of times you need to open the lid.
If you are not ready to upgrade yet, keep notes on room conditions and hatch outcomes. That record will help you spot patterns and make your next hatch smoother, whether you use the same machine or a new one.
FAQ
How often should you check the temperature and humidity?
For most home and classroom projects, checking the incubator at least twice a day is a good baseline — once in the morning and once in the evening. During the first few days of a new hatch, or when your weather is changing quickly, you may want to glance at the display more often to be sure the room and machine are both settling.
If your incubator has alarms, use them, but do not rely on them alone. A quick visual check takes only a few seconds and helps you catch small issues before they become big problems.
Can you put the incubator near a window if you block the sunlight?
It is usually better to avoid putting an incubator right next to a window, even with blinds or curtains. Sunlight can heat the air and the machine faster than you expect, and drafts can still sneak in around frames and seals. If a window area is your only option, keep the incubator several feet away and monitor the room carefully on sunny and windy days.
What if your only option is a busy room?
If you must use a busy room like a living room or shared family space, place the incubator in the quietest corner you can find. Use a sturdy table, keep pets and small children away, and explain to everyone in the house why the incubator should not be bumped or moved. You may also need to check conditions more often than someone using a spare bedroom or office.
In the long run, if you plan to hatch regularly, it is worth rearranging furniture or carving out a more protected spot. Even a small table in a bedroom or home office can dramatically improve stability compared to the center of household activity.


0 Comments