
You want a hatch that feels calm, not stressful. You also want a simple way to choose between egg incubator types. We will walk through the main types on this page, and we will help you match a type to your flock and your daily schedule. You can start with our Egg Incubator resource library when you want to compare options in one place.
Key Takeaways.
- You can think about how many birds you have and your hatching plans. You can pick the incubator type that matches your needs. Small incubators are good for people starting out. Bigger ones are better for small farms or people who hatch a lot of eggs.
- You can look for automatic features like egg turning and humidity control. These features help you save time and make hatching easier. They also help more chicks hatch, which is good for busy people.
- You should watch the temperature and humidity closely. Good control helps chicks stay healthy and hatch better.
- You should check how many eggs the incubator can hold. You can pick a small one for just a few eggs. Medium and large ones are best for bigger hatching jobs.
- You should put your incubator in a place where the room stays the same temperature. This helps keep the inside conditions steady for hatching.
Egg incubator types overview.
Three main categories explained.
We built this page as a simple doorway. You can learn what the main incubator types are. You can also see which type fits your flock, your time, and your space.
| Type of Egg Incubator. | Notes |
|---|---|
|
Small (lab/backyard) |
Not a public number |
|
Forced-air |
Not a public number |
|
Poultry |
Not a public number |
Small incubators work well for backyard chicken keepers, classroom projects, and hobby breeders. These types of incubators are easy to manage and do not take up much space. Forced-air incubators use fans to move air and keep the temperature even. This design helps you hatch more eggs at once and improves hatch rates. Poultry incubators are larger and suit small farms or anyone who wants to hatch many eggs at a time.
You can compare the design and capacity of common egg incubator types in the table below:.
|
Type |
Hatching Capacity |
Size |
|---|---|---|
|
36 egg incubator |
About 36 chicken eggs (egg size changes capacity) | Varies by model |
|
64 egg incubator |
About 64 chicken eggs (egg size changes capacity) | Varies by model |
|
150 egg incubator |
About 150 chicken eggs (egg size changes capacity) | Varies by model |
Tip: If you want to hatch a small batch, choose a compact incubator. If you plan to hatch eggs for a whole season or a larger flock, look for a bigger model.
How to match type to your flock.
You need to think about your flock size and hatching goals before picking an incubator. If you have a few hens or want to hatch eggs for a classroom, a small incubator is a good choice. You can manage it easily and watch the process closely. If you want to hatch eggs for a small farm or increase your flock quickly, a medium or large incubator will help you reach your goals.
Flock size and hatching goals decide how many eggs you can hatch and what features you need. You should count the eggs you want to hatch and check if the incubator fits your needs. Some types of incubators offer automatic turning and humidity control, which save you time and improve hatch rates. If you want less daily work, look for these features.
You can use this page as a guide to learn more about each egg incubator type. Explore detailed guides for small, forced-air, and poultry incubators. You can find out which model matches your flock and hatching plans. This way, you can avoid common mistakes and choose the best incubator for your eggs.
Airflow: still-air vs forc ed-air incubators.
Still-air incubator basics.
You can think of airflow like the difference between a still room and a room with a ceiling fan. A still-air incubator can hold warm air near the top and cooler air lower down. A forced-air incubator uses a fan to move air, so the heat stays more even.
Here is a table of suggested temperature settings for still-air incubators:.
|
Type of Egg |
Temperature (°F) |
|---|---|
|
Quail Eggs |
100.5 |
| Bantam and Pheasant Size Eggs. |
100 |
| Chicken and Other Large Eggs. |
100.5 |
|
Duck Eggs (Summer) |
95 |
|
Duck Eggs (Winter) |
94 |
| Eggs in Automatic Turner (Summer). |
97 (Chicken) |
| Eggs in Automatic Turner (Winter). |
96 (Chicken) |
| Eggs in Automatic Turner (Summer). |
99 (Quail) |
| Eggs in Automatic Turner (Winter). |
98 (Quail) |
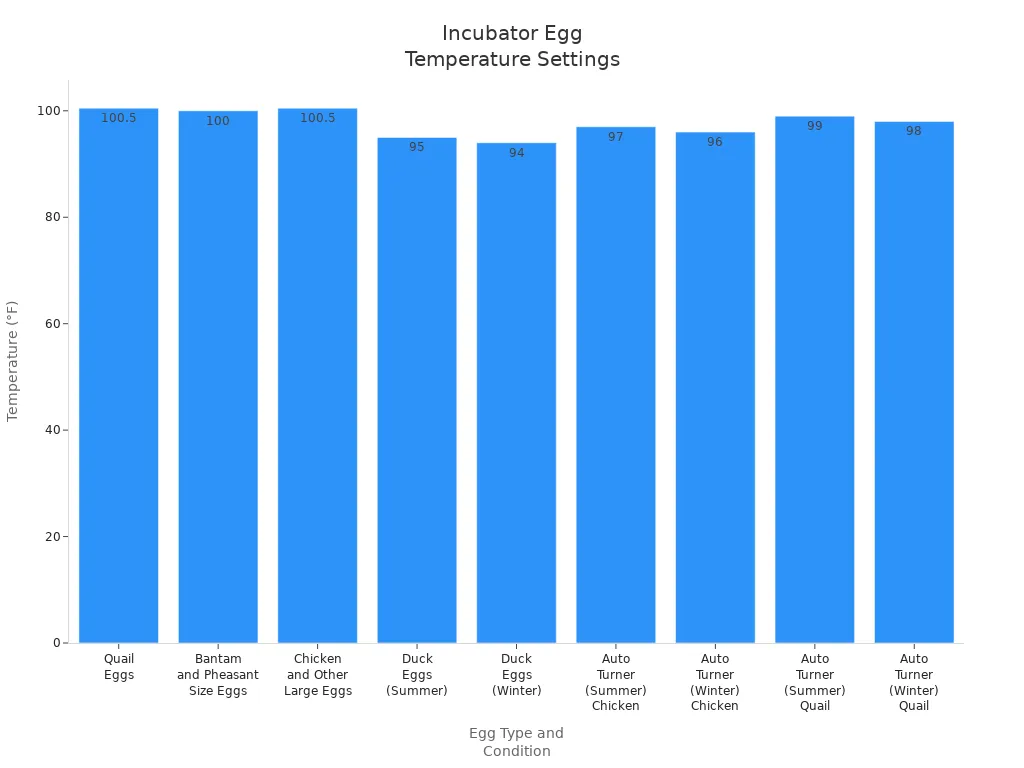
Tip: Always check the temperature at the same height as the eggs, not at the very top or bottom of the incubator.
Forced-air incubator benefits.
Forced-air incubators have a fan that moves the air around. This keeps the temperature the same everywhere inside. You do not have to worry about hot or cold spots. Forced-air incubators help you hatch more eggs at one time. They also make it easier to get better hatch rates. Many small farms and serious hobbyists pick forced-air incubators because they work well.
|
Benefit |
Description |
|---|---|
|
Temperature Uniformity |
A fan moves the air, so the temperature stays the same everywhere in the incubator. |
|
Measurement Accuracy |
It is easier to check and control temperature and humidity because you do not have to worry about different temperatures in different spots. |
|
Hatch Rate Predictability |
Forced-air incubators give you steady conditions, which can help more eggs hatch. |
Note: Forced-air incubators are a smart choice if you want to hatch a lot of eggs at once or do not want to check on them all the time.
Temperature and probe placement tips.
You need to put your temperature probe in the right place to get a good reading. Here are some tips:.
- You should keep the probe out of direct sunlight.
-
Do not put it near vents, doors, or windows.
-
Do not place it against hot or cold surfaces.
-
Make sure nothing is covering the probe.
-
Do not put it under bright lights.
-
Always check that the fan is working in forced-air incubators.
- You can use a second thermometer at egg height in the middle.
Many people make mistakes by putting the probe in the wrong spot. This can make the temperature go up and down and cause fewer eggs to hatch. If you use still-air incubators, always measure at the top of the egg. For forced-air incubators, you can measure almost anywhere inside, but the middle is best.
You should remember: Keeping the temperature steady and putting the probe in the right place helps you get the best hatch results.
Chicken egg incubator automation.
Manual vs automatic turning.
Turning eggs is the job that wears people out. You can do it by hand, and many keepers enjoy the routine. But you can also pick an automatic turning setup when your schedule is tight.
Automatic egg turners do the work for you. The machine turns the eggs at set times. This stops embryos from sticking to the shell. You get steady results and do not miss any turns. Some people think hand turning works better, but results are different for everyone.
Here is a quick comparison:.
|
Method |
Pros |
Cons |
|---|---|---|
|
Automatic turning |
Steady, correct, saves time. | Not much hands-on work. |
|
Manual turning |
Feels good, you watch eggs closely. | Takes time, easy to forget turns. |
Tip: Pick an automatic egg turner if you want less daily work.
Humidity control options.
Keeping the right temperature and humidity is important. Manual incubators need you to add water and check often. You must look at the numbers and change things when needed. You have more control, but it is more work.
Automatic incubators use sensors and built-in parts. They keep the temperature and humidity right for you. You do not need to check as much. This helps you avoid mistakes and keeps things steady for the eggs.
Note: Good control of temperature and humidity helps more eggs hatch.
Who should choose automatic features.
You can think about your daily life and how many eggs you want to hatch. Automatic incubators are best for busy people or big groups of eggs. They help stop mistakes and keep things steady. This means more eggs hatch and you worry less.
Here is a guide to help you decide:.
|
Benefit |
Description |
|---|---|
|
Fewer mistakes |
Automatic incubators help you make fewer errors. |
|
Steady conditions |
They keep temperature and humidity at the right levels. |
|
More eggs hatch |
You get better results with less work. |
If you want to hatch eggs for a class, farm, or hobby, automatic features save time. If you like doing things yourself and have only a few eggs, manual options may be better. Always pick the incubator that fits your needs and daily life.
If you want a full, practical walkthrough for automatic models, use this automatic egg incubator guide (2025).
Chicken egg incubators: capacity options.
Capacity is not only a number on a box. You should think about how many chicks you really want at one time, and how many chicks you can brooder and feed. A smaller unit can feel easier to manage, and a larger unit can fit steady batches.
Small batch incubators (12 eggs).
A small incubator that holds 12 eggs is good for beginners. If you also want to keep costs low, you can follow this under-$100 picks + setup guide to avoid the common budget-incubator mistakes.
It is also great for classroom projects and hobby breeders. You can watch each egg closely and manage the incubator easily. Small batch incubators are best if you have a few hens or want to try new breeds.
|
Advantages |
Disadvantages |
|---|---|
|
Simple design |
Temperature can be uneven. |
|
Low cost |
Large eggs may not hatch as well. |
|
Quiet operation |
Needs careful checking |
| Best for small batches (6–12 eggs). |
Tip: Check the temperature and humidity often. Small incubators need more care to keep eggs healthy.
Medium batch incubators (30 eggs).
Medium incubators are good for a growing flock or small farm. They give you a balance between space and how many eggs you can hatch. These models are good for teachers, backyard keepers, and small farmers. You can hatch eggs for several hens at one time.
-
You can hatch enough eggs to grow your flock.
-
Medium incubators have more automatic features than small ones.
-
You do not need to check them as much every day.
|
Incubator Capacity |
Suitable Farm Size |
Key Advantages |
Key Disadvantages |
|---|---|---|---|
|
88-200 eggs |
Small farms |
Not too expensive, easy to use, saves space. | Can’t hatch lots of eggs at once. |
Note: Medium incubators help you hatch more eggs without spending a lot.
Cabinet and large capacity incubators.
Cabinet incubators are best for small businesses and pro breeders. They are also good if you want to hatch lots of eggs. You can hatch eggs all the time and manage hundreds at once. These models have smart controls, save energy, and keep things steady.
|
Feature |
Cabinet/Large Capacity Incubators |
Smaller Models |
|---|---|---|
|
Capacity |
Made for lots of eggs. |
Holds fewer eggs |
|
Automation |
Has smart automatic features. |
Basic manual controls |
|
Energy Efficiency |
Power use depends on the model and your room temperature. |
Not as energy-saving |
|
Humidity Management |
Built-in water system |
You add water by hand. |
|
Temperature Control |
Smart temperature control |
Basic temperature control |
-
Cabinet incubators are good for pro use.
- Capacity depends on the tray and egg size.
-
LCD screens help you check and change settings.
Tip: If you want to hatch eggs for a business or big flock, cabinet incubators work best and save time.
You can pick your incubator size based on your hatching goals. You can start with a small one if you want to learn or hatch eggs for a few birds. You can choose medium or cabinet incubators when you need to hatch more eggs or want more automatic features.
If you are new to cabinet machines, start with this beginner’s cabinet incubator setup guide.
Key features: humidity, turner, ventilation.
You can buy a big incubator and still have a rough hatch if the basics slip. Humidity, turning, and fresh air are the daily pillars. We will keep these features practical, so you know what to watch and what to ignore.
Humidity control essentials.
Humidity control is very important for hatching eggs. It helps the egg lose the right amount of water. This makes it easier for chicks to break out at the right time. If humidity is too high, eggs do not lose enough weight. This can make it hard for chicks to hatch. If humidity is too low, chicks can get stuck inside the shell. You want eggs to lose about 13-15% of their weight by hatch day. Raise the humidity in the last few days to help chicks hatch.If humidity swings keep stressing you out, follow this 3-step humidity guide to set a steady baseline and raise humidity correctly for lockdown.
Good humidity control means more healthy chicks and better hatch rates.
Tip: Use an egg candler to see the air sac and change humidity if needed.
Reliable egg turning systems.
Eggs need to be turned every day so embryos do not stick. You can turn eggs by hand or use an automatic turner. Automatic turners save time and turn eggs the right way. Turning eggs by hand lets you check each one, but it takes more work. If you are busy or have many eggs, automatic turners help a lot. Turning eggs often helps them grow well and hatch better.
Importance of ventilation.
Ventilation gives fresh air and helps embryos grow strong. Every incubator needs vents so air can move in and out. Good airflow keeps temperature, humidity, and gases balanced. This stops bad gases from building up and helps chicks grow. If air cannot move, hatch rates go down and chicks may be weak.
|
Feature |
Why It Matters |
|---|---|
|
Ventilation |
Keeps temperature, humidity, and gases balanced for healthy embryos. |
|
Air Exchange |
Stops bad gases and helps chicks grow strong. |
Note: Always make sure vents are open and air can move inside your incubator.
When you choose an incubator, focus on these three features. They help you get more chicks and make your daily work easier.
Choosing the right egg incubator for your home.
Handling room temperature changes.
Your house is part of the incubator system. Room swings, drafts, and short outages can push your numbers around. You can pick a type that forgives your real life, not a perfect lab.
Tip: Keeping the room temperature steady helps your chicks grow strong.
Power outage solutions.
Sometimes the power can go out. You need a plan to keep your eggs safe if this happens. Some incubators can use both coal and electricity for heat. This gives you a backup if you lose power. You can also use a battery backup that charges while it works. This is good for short power cuts. For long outages, use a dual fuel generator or a solar battery bank. You can pick an incubator that works with your backup plan. If you live where power goes out a lot, get a model with backup power options.
- Coal-electricity dual-purpose incubator.
- Battery backup for short outages.
- Dual fuel generator or solar battery bank for long outages.
Note: Always test your backup system before you start hatching eggs.
Limited time management tips.
You may not have much time to check your incubator every day. Automatic features can help you hatch eggs with less work. You can look for incubators with automatic egg turning, humidity control, and alarms. These features save time and help you make fewer mistakes. If you want to watch the eggs, pick a model with a clear window. This lets you see inside without opening the lid. Use these important things to pick the best incubator for your routine:.
|
Criteria |
Why It Matters |
|---|---|
|
Capacity |
Fits your flock size and goals. |
|
Temperature Control |
Keeps eggs at the right temperature. |
|
Humidity Control |
Prevents chicks from getting stuck. |
|
Egg Turning Method |
Saves time and improves hatch rates. |
|
Visualization/Alarms |
Alerts you to problems quickly. |
Tip: Choose an incubator with features that fit your daily schedule for the best results.
FAQ for chicken egg incubators.
Incubation timeline basics.
You might feel nervous when you wait for hatch day. You are not alone. We will answer the common questions in plain language, so you can make calm choices.
-
Chicken eggs hatch in about 21 days.
-
Some eggs hatch between 500 and 526 hours.
-
Forced-air incubators help keep the timeline steady.
If you want a complete do-this-now workflow (setup → temp/humidity → turning → candling → lockdown → hatch day), follow our incubator instructions step-by-step manual.
Egg turning schedule.
Turning eggs helps the embryos grow well. If you use a manual incubator, turn eggs every 30 minutes for the first week. Try to do a full turn every 55 minutes with a short break. In the last two days, turn eggs every 50 minutes and pause longer. Automatic incubators do this for you. They make hatching easier and more steady. Turning eggs often stops embryos from sticking to the shell. This helps chicks hatch healthy.
- You can turn eggs every 30 minutes at first.
-
Do a full turn every 55 minutes with a 5-minute break.
-
In the last two days, turn every 50 minutes with a 10-minute break.
Egg storage and ventilation.
Storing eggs the right way helps them hatch better. You should keep eggs at 53 to 60 degrees Fahrenheit and 75-85% humidity. You should put eggs on their side or with the big end up. Handle eggs gently and do not wash unless needed. Only use clean eggs for hatching. Try to set eggs within 7 days for best results. Storing eggs longer can lower hatch rates.
"If you store eggs too long, they lose CO2 through the shell. This can change the egg and hurt the embryo. Good airflow during incubation controls CO2 and helps chicks grow strong. ".
If you follow these steps, you will get better hatching results. Focus on steady temperature, regular turning, and good storage for every part of hatching.
If you know about egg incubator types, you can pick the best one for your flock and how you live. This helps you get stronger chicks and more eggs to hatch. Here is what the right incubator can do:.
|
Benefit |
Result |
|---|---|
|
Chick Quality |
Healthier chicks and improved performance. |
|
Stress Control |
Less stress for young birds. |
Think about these tips before you buy:.
-
Decide how much money you want to spend and how many eggs you want to hatch.
- You can pick if you want to do things by hand or use automatic features.
- You can find one that is easy to clean and has a window you can see through.
Reading what other people say and getting advice from experts can help you not make mistakes and have better hatching. You can take time to think about what you need and read more guides to find the best incubator for your flock.
FAQ.
How long does it take for chicken eggs to hatch?
Some keepers want quick answers in one place. We keep these notes short and clear. You can use them as a checklist when you stand next to the incubator.
How often should you turn eggs in an incubator?
You need to turn eggs at least three times each day. Turning helps the embryo grow and stops it from sticking to the shell. If you use an automatic turner, check that it works every day.
Can you hatch dirty eggs in an incubator?
You should not hatch dirty eggs. Dirt can carry germs that harm the embryo. Always use clean eggs for the best hatch rate. If you must clean eggs, use a dry cloth and handle them gently.
What is the best way to store eggs before incubation?
You should store hatching eggs in a clean place that stays cool and steady. You should set the eggs with the large end up. You should try to set the eggs within about a week for better results. You should avoid washing eggs unless a trusted hatchery guide tells you to.
Why is ventilation important in an incubator?
Ventilation gives fresh air to growing embryos. Good airflow keeps temperature and humidity balanced. You can open vents help remove carbon dioxide and bring in oxygen. This helps chicks grow strong and healthy.


0 Comments