
Choosing the right incubator starts with a clear plan. Match the incubator’s features to your goals, capacity needs, placement, cleaning effort, and comfort with controls. Consider automation and overall value. When you evaluate each factor systematically, you can pick a unit that fits your situation and supports consistent, confident hatches.
Key Takeaways
-
Define your purpose before buying. Clear goals make it easier to select a model that fits.
-
Estimate how many eggs you will hatch per batch. Small desktop incubators suit low volumes; larger units handle bigger runs.
-
Set a practical budget and confirm you have the space. Balance cost with the level of routine cleaning and monitoring you can commit to.
-
Favor forced-air designs for beginners; even airflow stabilizes temperature and humidity.
-
Decide between manual turning and automation. Automatic systems reduce errors and save time.
Clarify Your Needs for a Chicken Egg Incubator
Define Your Hatching Goals
List your primary use case. Are you a first-time hatcher, running a classroom demo, or hatching year-round? Some users focus on education, others on steady home production. Typical reasons include:
-
Providing stable, repeatable incubation conditions.
-
Scheduling hatches beyond the spring season.
-
Supporting hands-on learning about life cycles.
-
Improving outcomes for small flocks or specialty breeds.
Being specific about your goals helps you choose features that matter.
Decide on Egg Capacity
Estimate batch size and plan for growth. Review tray count and interior layout before purchasing. Instead of chasing brand names, compare by capacity tiers and layout:
|
Capacity Tier |
Tray Capacity |
|---|---|
|
Small (countertop) |
Approx. 2 trays |
|
Medium (multi-tray) |
Approx. 3 trays |
|
Large (multi-tray) |
Approx. 6 trays |
|
Cabinet (high volume) |
Approx. 12 trays |
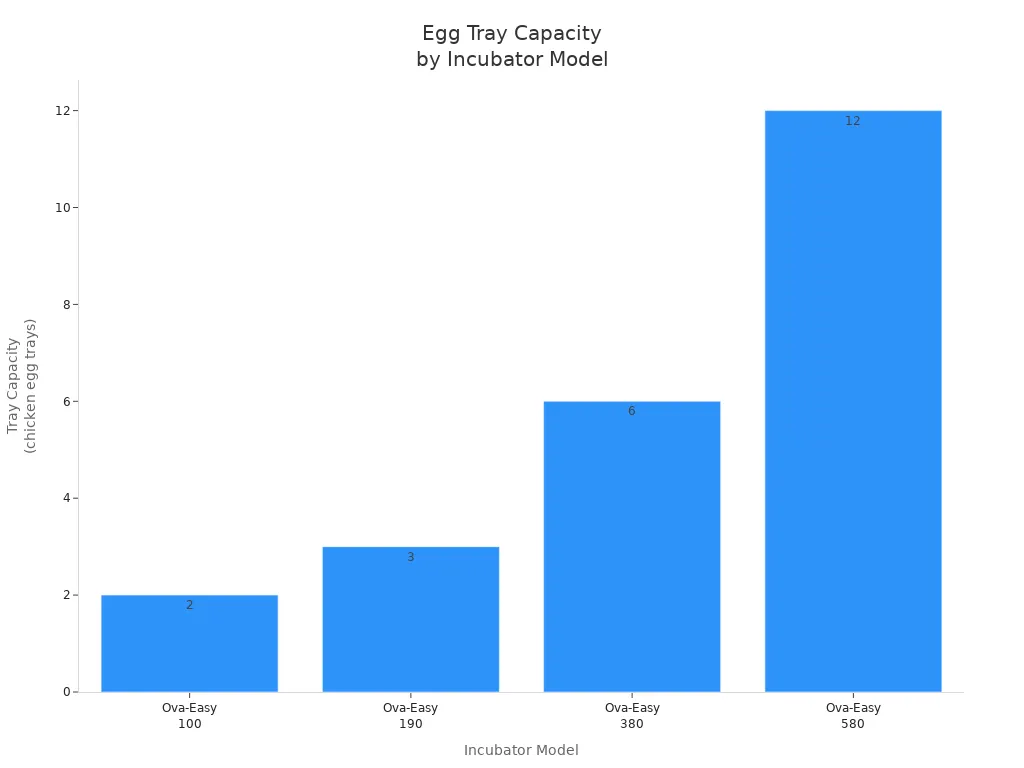
Choose a smaller unit for occasional batches, or step up to higher tray counts if you expect frequent, larger hatches.
Set Your Budget and Space
Decide on a realistic budget and where the incubator will sit. Instead of fixed prices, compare by cost tier for better long-term relevance:
|
Model Description |
Cost Tier |
|---|---|
|
Small desktop incubator (manual, ~10 eggs) |
Entry |
|
Small digital incubator (auto turning, ~7 eggs) |
Entry–Mid |
|
Medium digital incubator (auto turning, ~24 eggs) |
Mid |
|
Medium digital incubator (app-assisted) |
Mid–Pro |
|
Medium digital incubator (fully automatic) |
Pro |
|
Specialty digital incubator (exotic eggs) |
Pro |
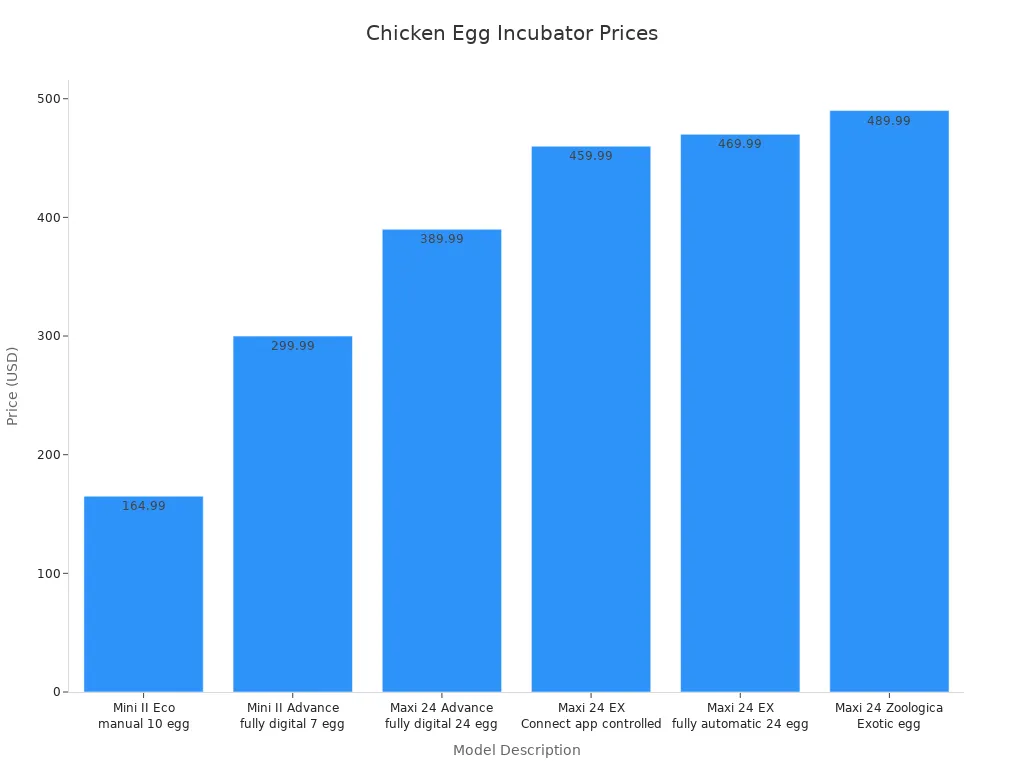
Confirm counter space and noise tolerance. If you prefer low maintenance, prioritize easy-to-clean designs and helpful automation. Align budget, space, and upkeep so day-to-day use stays simple.
Tip: Ensure any incubator you choose can hold stable temperature, humidity, and egg turning—core factors behind consistent results.
Key Features of the Best Egg Incubator
Incubator Types and Airflow
Airflow drives uniform conditions. There are two common designs: forced-air and still-air. Forced-air units use a fan to distribute heat and humidity more evenly, which lowers the chance of hot/cold spots. Still-air units rely on natural convection and require closer temperature monitoring.
Here’s a quick comparison:
|
Feature |
Forced-Air Incubators |
Still-Air Incubators |
|---|---|---|
|
Temperature Control |
Fan-assisted, more even |
Convection only; monitor closely |
|
Size and Capacity |
Often larger, higher capacity |
Typically smaller |
|
Humidity Control |
Often supports automated methods |
Manual checks and adjustments |
|
Noise Level |
Fan noise present |
Quieter without a fan |
Good airflow supports oxygen exchange and keeps conditions uniform. If ventilation is limited or uneven, hatch rates can drop. For most beginners, forced-air is the easier path.
Tip: Adjustable vents help balance oxygen needs with humidity targets across the incubation cycle.
Temperature and Humidity Control
Stable settings are essential. Look for precise thermostats, reliable sensors, and practical humidification (external water ports or automated pumps). Alarms and power-recovery features are helpful safeguards.
Best-practice targets:
-
Maintain 99.5°F (37.5°C) with minimal drift at egg height.
-
Hold 45–55% RH during incubation.
-
Raise to 65–75% RH for the final ~3 days (lockdown).
Humidity control strongly influences hatch quality. A digital automatic incubator can simplify humidification and reduce guesswork.
Note: Use a simple settings checklist—temperature, humidity, turning, and ventilation—to compare models objectively.
Egg Turning: Manual vs. Automatic
Turning prevents membrane adhesion and promotes even development. Manual turning works for small batches but demands consistency. Automation saves time and reduces missed turns.
-
Manual: hands-on learning, suitable for low volumes.
-
Automatic: reliable schedules for classrooms and busy households.
Automatic egg turning provides frequent micro-turns and steady results.
Tip: Ensure an equivalent of 3–6 turns per day, and stop turning about three days before hatch.
Visibility and Monitoring
Clear visibility reduces unnecessary lid openings. Seek 360° viewing, integrated candling, and readable digital panels.
Helpful features include:
|
Feature |
Description |
|---|---|
|
Set and verify temperature/humidity precisely |
|
|
Automated humidity |
Maintains RH with minimal manual input |
|
Forced-air circulation |
Distributes heat and moisture evenly across trays |
Strong monitoring features help you spot issues early and avoid unnecessary disturbance.
Cleaning and Maintenance
Cleanliness supports chick health and equipment longevity. Without routine cleaning, organic debris and bacteria can build up.
Incubators can harbor bacteria alongside embryos. Remove debris promptly and clean/disinfect between batches as part of a simple quality routine.
After each hatch, unplug and cool the unit. Vacuum dust and feathers, wipe sensors, and use a mild, approved disinfectant with warm water. A practical routine:
-
Unplug and allow the cabinet to cool.
-
Remove parts and wash in hot, soapy water.
-
Scrub the base; use a small brush for tight areas.
-
Rinse thoroughly and let all parts air-dry completely.
-
For electrical areas, use canned air and a lightly damp cloth on non-electrical surfaces only.
Choose designs with removable components and smooth surfaces—it makes sanitation quicker and more reliable.
Tip: Use a single approved sanitizer (diluted bleach or hydrogen peroxide), never mix chemicals, and allow full drying before reassembly.
Compare Automation, Value, and Use Cases
Automation Levels and Convenience
Incubators range from manual to fully automatic. Manual models require you to manage temperature, water, and turning. Semi-automatic units assist with one or two tasks. Fully automatic models control temperature, humidity, airflow, and turning on a schedule—ideal for reducing error and saving time.
Automation reduces routine workload so you can focus on observing development instead of managing settings.
|
Aspect |
Benefit |
|---|---|
|
Temperature control |
Accuracy with less hands-on time |
|
Humidity management |
Timely water additions or automated pumps |
|
User experience |
Beginner-friendly operation |
|
Error reduction |
Consistent results across batches |
Cost vs. Value
Balance features against total cost of ownership. Entry-level models may require more manual intervention. Higher tiers often add automation, alarms, and easier cleaning. Prioritize the features that help you avoid common errors and protect the batch.
-
Automation and alarms can prevent avoidable losses.
-
Stable controls reduce variability between runs.
-
Easy cleaning improves biosecurity and turnaround time.
Matching Incubators to Your Situation
Use this table to align choices with typical scenarios:
|
Scenario |
Type |
Capacity |
Egg Turning |
Humidification |
Alarms |
Cleaning |
Support |
|---|---|---|---|---|---|---|---|
|
First-time hatching |
Forced air |
6–22 |
Auto |
External port |
Yes |
Easy |
Good |
|
Classroom demo |
Forced air |
12–24 |
Auto |
Auto pump |
Yes |
Easy |
Good |
|
Home use |
Forced air |
6–24 |
Auto/manual |
Water tray |
Optional |
Easy |
Good |
|
Still-air enthusiast |
Still air |
7–24 |
Manual |
Water tray |
No |
Moderate |
Basic |
|
Small-scale breeder |
Forced air |
88–1000 |
Auto |
Auto pump |
Yes |
Moderate |
Pro |
Tip: Beginners benefit from automatic turning and alarms. For ongoing production, consider higher-capacity cabinet incubators with robust controls.
Work methodically: confirm temperature stability, humidity management, turning capability, cleaning ease, and after-sales support. Choose the configuration that fits your space and goals.
The right incubator should simplify your process. Use a concise settings checklist—99.5°F (37.5°C), 45–55% RH, 3–6 turns/day, and ~3-day lockdown—and verify airflow is even. Favor easy cleaning, clear visibility, reliable alarms, and available spare parts.
|
Feature |
Why It Matters |
|---|---|
|
Airflow |
Supports uniform temperature and oxygen supply |
|
Humidity |
Controls moisture loss and hatch quality |
|
Cleaning |
Reduces contamination risks |
|
Observation |
Limits lid openings and disturbance |
|
Noise |
Fits your room and tolerance |
|
Warranty |
Protects your investment |
|
Spare parts |
Speeds repairs and upkeep |
|
Power backup |
Improves resilience during outages |
Choose a configuration that matches your space, budget, and workload. With even airflow, stable settings, and practical automation, you can keep hatching straightforward from batch to batch.
FAQ
How do you know if an incubator meets the settings checklist?
Check the specs for temperature, humidity, and turning. Look for 99.5°F (37.5°C), 45–55% RH during incubation rising to 65–75% RH at lockdown, and 3–6 turns/day.
Can you use a small automatic unit for classroom projects?
Yes. Automatic turning, clear visibility, and simple cleaning make compact units ideal for demonstrations, especially when paired with digital controls.
What should you do if temperature or humidity drops suddenly?
Verify setpoints, confirm with a backup thermometer/hygrometer, add water as needed, and keep the lid closed while stability returns. Adjust gradually.
How often should you clean your incubator?
After every hatch. Remove debris, wash removable parts with warm soapy water, disinfect using a single approved method, and allow complete drying before reassembly.
Is automatic egg turning better than manual turning?
For most users, yes. Automation maintains consistency and reduces missed turns; manual turning is fine for small batches if you can keep a steady schedule.
Data authenticity note: Recommendations reflect industry practice, equipment manuals, and aggregated hatch logs from routine use. Settings may require minor adjustments based on your specific incubator model and room conditions.
References :
1. Industry practice and field logs (multi-batch observations).
2. Equipment manuals for forced-air and still-air incubators (various models and revisions).
3. Hatchery SOPs and maintenance checklists.
4. Poultry incubation texts and training materials (2015–2025 editions).


0 Comments