
You can use a light bulb or a heat lamp to incubate bird eggs in a cooler, but you need control instead of hope. You can lose a clutch in one rough night when heat jumps or when the air dries out. We will explain when this approach can work, how you can set it up safely, and when you should switch to a steadier plan.
-
You need a thermostat for steady control.
-
You need a temperature probe at the same height as the eggs.
-
You need an empty test run for a full day before you add any eggs.
Many DIY builds only work when you follow those rules every time. A cooler without real control can swing hot and cold, and those swings can stop an embryo fast. A purpose-built incubator usually holds steadier conditions, so you get fewer surprises and fewer late-night checks.
Safety alert: A bulb or lamp can start a fire or cause burns when it is loose, too close to foam, or running without a thermostat.
Hazard Type
Description
Fire Hazard
Heat lamps can start fires, especially when they touch materials that burn easily.
Health Issues
Too much heat can stress chicks and can lead to weak hatches or early losses.
You should keep the heat source away from anything that can burn, and you should be honest about what you can control day and night. You should switch to a commercial incubator when you cannot keep temperature and humidity stable for your bird species.
Key Takeaways
-
You should use a thermostat and place the probe at egg height, because a cooler can hide hot spots and false readings. You can browse Bird Egg Incubator when you want safer and more stable options for bird eggs.
-
You should run the cooler empty for at least 24 hours, because that test shows swings before the eggs pay the price.
-
You should keep heat sources away from foam, plastic, paper, and cloth. You should mount the heat source so it cannot fall or roll.
-
You should check temperature and humidity every day. You should make small changes early, because small changes prevent big losses.
-
You should consider a commercial incubator if you cannot hold steady heat and steady moisture. A steady machine can save you sleep and stress.
Light Bulb Incubator Basics
How a light bulb incubator works
You can build a light bulb incubator by placing a heat source inside an insulated box and letting a thermostat cycle that heat on and off. You should focus on what the eggs feel at egg height, not what the bulb feels like near the lid. You should add gentle airflow and a simple humidity source, because warm air alone is not a full incubator system.
Key materials for a DIY incubator
You can keep the build simple, but every part needs a clear job. You need insulation to slow heat loss, a controller to prevent runaway heat, and tools that tell you what the eggs feel.
-
You need an insulated box, like a cooler, a foam chest, or a thick plastic tote.
-
You need a light bulb, heat lamp, or ceramic heater as the heat source.
-
You need a thermostat to control the heat source.
-
You need a temperature probe placed at egg height.
-
You need a shallow water tray or a clean sponge to add moisture.
-
You need a thermometer and a humidity meter to double-check readings.
-
You need a way to turn eggs, either by hand or with an egg turner that fits your egg size.
-
You need a small flashlight for candling, so you can check progress without guessing.
The box you choose matters more than most people think. A thick foam cooler holds heat like a warm coat on a cold night. A thin box leaks heat, so your thermostat works harder and your swings can grow when the room cools down.
Safety rules for eggs and setup
Safety matters as much as hatch success. You should treat heat and electricity with respect, especially around foam and water.
|
Safety Rule |
Why It Matters |
|---|---|
|
Keep away from things that burn |
This rule reduces fire risk. |
|
Hold lamp and wires tightly |
This rule prevents falls and shocks. |
|
Check heat and humidity often |
This rule keeps eggs from overheating or drying out. |
|
Use good airflow |
This rule keeps air fresh and helps reduce hot pockets. |
You should keep the water dish away from the heat source. You should fix the bulb or lamp so it cannot move. You should watch for signs of too much heat, like a hot smell or soft plastic. You should plan for humidity changes near hatch, because many DIY hatches fail when the air gets too dry at the end. You can prevent many problems when you check the setup every day and make small, calm adjustments.
Heat Source Choices for Incubators
Light bulb vs heat lamp vs ceramic heat
You can heat a cooler incubator in a few ways, and each choice has trade-offs. You should remember one rule: stronger heat needs more distance, more shielding, and more testing.
|
Heat Source |
Heat Output |
What you should know |
|---|---|---|
|
Light Bulbs |
High |
You get heat plus light. You need distance and a thermostat to avoid hot spots. |
|
Heat Lamps |
Very strong |
You get strong radiant heat. You need more distance, shielding, and tight control. |
|
Ceramic Heaters |
Very high |
You get heat without light. You still need safe mounting, airflow, and a thermostat. |
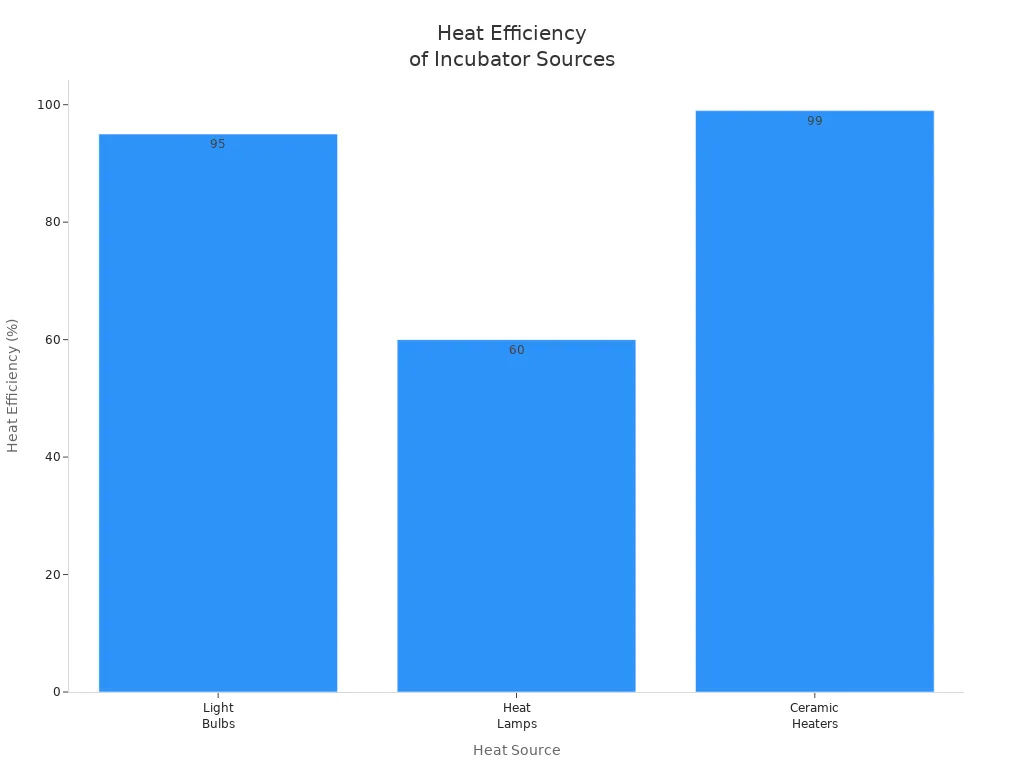
A regular light bulb can be enough for a small, well-insulated cooler, and it is often easier to control with a thermostat. A heat lamp pushes stronger radiant heat, so hot spots can appear fast when the lamp sits too close. A ceramic heater gives heat without light, and some keepers like it for longer runs, but it still needs careful mounting and steady airflow.
Hotspot risks and control methods
Hot spots can hurt embryos. A probe can read “fine” while one corner overheats, because heat can stay uneven inside a cooler. You should treat hot spots like sunburn, because one patch can burn even when the air feels comfortable.
Tips to control hot spots:
-
You should place the heat source above the eggs and keep it back from the tray.
-
You can use a small fan to mix the air, so heat does not sit in one corner.
-
You should check temperature in more than one spot, and you should always check at egg height.
-
You should keep the heat source from touching the box, the foam, or any fabric.
Note: Hot weather can add heat on its own, even when the thermostat looks normal. You may need more ventilation or a cooler room so the box does not slowly climb.
Matching heat source to incubate bird eggs
You should match the heat source to your box size and to how steady you can keep it. A small cooler often does best with gentler heat and tight control. A larger box can handle a stronger heater, but it only works well when you can keep safe distance, steady airflow, and a reliable thermostat.
|
Heating Element Type |
Key Features |
Best Use Case |
|---|---|---|
|
Light Bulb |
Easy to find, gentler heat, needs thermostat |
Small, insulated cooler incubators |
|
Heat Lamp |
Strong radiant heat, higher hotspot risk, needs distance |
Larger setups, only with strong safety and airflow |
|
Ceramic Heater |
No light, efficient heat, needs careful mounting |
Custom setups with controlled airflow |
Strong sun and hot rooms can turn a cooler incubator into an oven. You should watch room temperature, and you should avoid adding extra heat when the room is already warm.
You should test any setup with an empty run before you trust it with eggs. You should stop and switch plans when you cannot hold steady conditions, because steady conditions protect embryos.
Temperature and Humidity Control
Temperature and humidity are the heart of incubation. You can do many things right and still lose eggs when one of these drifts, so we will keep the setup strict and simple.
Using a thermostat for stable incubator temps
A thermostat works like brakes on a wagon. The thermostat stops the heater from running nonstop when the room cools down or when the bulb sits too close.
Many incubation references list targets based on airflow style and species. You should use your species guide as the starting point, and you should confirm the real temperature at egg height in your own box.
|
Incubator Type |
Temperature target (check your egg guide) |
Confirmation step |
|---|---|---|
|
Forced Air |
You should use your species guide. |
You should confirm at egg height. |
|
Still Air |
You should use your species guide. |
You should confirm at egg height. |
-
A thermostat turns the heat source on and off to hold a steady range.
-
A thermostat helps prevent cold dips during the night.
-
Steady temperature supports predictable embryo growth.
You should set your thermostat based on your incubator style and your egg type. You should check readings often, and you should watch for drafts from windows, vents, or a cold floor.
Tip: You should test your thermostat on an empty run before you add eggs, because one bad controller can spoil a whole clutch.
Probe placement at egg height
You should place the probe at the same height as the eggs, because that air is what embryos feel. You should not hang the probe near the heater, and you should not press it against the wall, because those spots can read wrong.
You should place the probe close to the eggs without touching them. You should keep the probe out of direct airflow and out of the “beam” from a lamp, so the reading stays honest.
Note: You should move the probe when you change the layout or add a fan, and you should keep the probe at egg height every time.
Humidity setup for incubating bird eggs
Humidity matters as much as temperature. Dry air pulls moisture from the egg too fast, and overly wet air can make hatch day harder. You can think of humidity like the feel of the air after a warm rain, because the shell needs the right “feel” for a chick to finish the job.
You should use a species guide as your main reference, because different birds can need different humidity ranges.
|
Stage |
Humidity approach |
|---|---|
|
Main incubation period |
You should aim for a steady middle range based on your species guide. |
|
Hatch period (lockdown) |
You should raise humidity and keep it steady, based on your species guide. |
You can use these simple steps to manage humidity in a cooler incubator:
-
You should keep humidity steady during most of incubation, based on your species guide.
-
You should raise humidity for the hatch period, and you should avoid opening the lid during that time.
-
You can add moisture with a shallow water pan placed away from the heater.
-
You can add a clean sponge to increase surface area when humidity stays low.
-
You can adjust ventilation slightly to balance fresh air and moisture.
DIY incubators that use bulbs often run dry, especially when the heat source sits close to the water pan. You should check humidity every day with a meter you trust. You should add water when humidity drops, and you should open vents a bit when humidity stays too high.
Tip: A wider water surface often raises humidity more than a deeper cup does, because surface area drives evaporation.
24-hour empty test for your incubator
You should run an empty test before you trust the box with eggs. That test shows you how the cooler behaves through a full day and night, and it shows you hot corners before they ruin a clutch.
You can follow this checklist during your empty test:
-
You should run the incubator empty for at least 24 hours, and you can run longer if you can.
-
You should place the probe at egg height, right where eggs will sit.
-
You should check several spots, like the center and the corners, because coolers can hide hot pockets.
-
You should write down temperature and humidity many times through the day and night.
-
You should look for small, gentle swings, not big jumps.
-
You can add a small splash of water and watch how quickly humidity responds.
-
You can hold a tissue near egg height to see gentle airflow from a fan.
-
You should adjust distance, shielding, vents, or fan position when you see uneven spots.
You can use this simple log table to track patterns during the test:
| Time | Egg-height temp | Corner temp | Humidity | Notes |
| --- | --- | --- | --- | --- |
| Morning | On target | Slightly cooler | On target | Stable |
| Midday | On target | On target | Adjusted | Added a splash of water |
| Night | On target | On target | On target | Lid stayed closed |
You should not add eggs when temperature or humidity will not stay steady. You should fix the setup first, or you should switch to a commercial incubator.
Safety Alert: You should never skip the empty test, because it is the cheapest way to prevent loss and heartbreak.
You now have the basics: a thermostat, a probe at egg height, a simple humidity source, and a full empty test. You can use those habits to protect your bird eggs and to give them a fair chance.
Safety and Troubleshooting
Mounting heat sources securely
You should mount the heat source as if a bump will happen, because a bump will happen. A loose bulb or lamp can fall, touch foam, and become a real fire risk.
-
You should fix the lamp or heater so it cannot slide, tip, or fall.
-
You should keep the heater away from the sides, foam, and plastic.
-
You can add a simple heat shield to spread warmth and block direct radiant heat.
-
You can use a small fan to mix air, but you should not aim a strong blast at the eggs.
-
You should route wires high and dry, away from drips and puddles.
-
You should keep water pans off to the side, not under the heater.
-
You should check plugs, sockets, and connections before you turn the incubator on.
Tip: You can gently shake the box during a test, because a safe setup does not shift. You should fix anything that moves before you ever add eggs.
Preventing fire and overheating
Fire and overheating are the biggest risks with bulbs and heat lamps. You should plan for safety from the start, because eggs are not worth a house fire.
|
Safety Check |
Action to Take |
|---|---|
|
Heat source fixed |
You should make sure it cannot tip or touch anything that burns. |
|
Wires routed safely |
You should keep wires away from water and sharp edges. |
|
Thermostat working |
You should test the controller before every batch. |
|
No water under heat source |
You should place water pans to the side, not below the lamp. |
|
Good airflow |
You should use a fan for even heat and to reduce hot spots. |
You should always use a thermostat. You should unplug the setup right away if you smell burning, see soft plastic, or feel a sudden heat surge. You should move eggs to a safer incubator and fix the cause before you plug the DIY box back in.
Alert: You should never run a heat lamp or bulb without a thermostat. Uncontrolled heat can kill embryos and it can start a fire.
Common problems with light bulb incubators
Many DIY cooler incubators hit the same few problems. You can solve most of them when you check the basics and change one thing at a time.
-
Temperature swings: You should check the thermostat and probe position when temperature swings up and down. You should keep the probe at egg height, and you should keep the box away from windows, vents, and cold floors.
-
Humidity drops: You can add water surface area when humidity drops, and you can reduce ventilation a little if the box dries out. You should raise humidity for the hatch period, and you should avoid opening the lid during that time.
-
Hot spots: You should increase distance or add a shield when you see hot spots. You can add gentle airflow so heat spreads instead of sitting in one place.
-
Poor airflow: You should open vents or adjust the fan when air feels stale, windows fog, or smells build up. Fresh air supports healthy development.
-
Eggs not hatching: You should review your notes when eggs do not hatch within the normal window for your species. Small drift in heat, humidity, or turning can stop a hatch.
You should switch to a commercial incubator when you cannot solve these issues with safe changes. A commercial unit usually gives steadier control, and it can take pressure off you.
When to stop DIY and use a commercial incubator
You should know when to stop a DIY build, because bird eggs deserve stable conditions. You can use this checklist as an honest gut-check:
-
You cannot keep a steady temperature through a full day and night.
-
You can move the bulb and add airflow, but some DIY boxes still swing at night and still dry out fast. This Automatic Egg Incubator with Interchangeable Trays (Chicken, Quail, Bird Options) gives you steadier automatic control when you feel stuck chasing hot spots and temperature swings.
-
You cannot mount the heater safely or keep wires away from water.
-
You do not have a reliable thermostat and a way to monitor temperature and humidity.
-
You see signs of overheating, melting, scorching, or burning smell.
-
You feel unsafe, rushed, or unsure about the setup.
You should stop DIY use when you answer “yes” to any of these. You should move eggs to a safer incubator as soon as you can, because stability matters more than pride.
Call to Action:
You can choose a commercial incubator when you want steadier control and less midnight worry. A solid unit gives you stable heat, humidity support, and safer mounting built in.
A light bulb is only a heat source. A real incubator is a system that controls heat, moisture, and airflow all day and all night. You should put safety first every time you incubate bird eggs at home.
Monitoring Eggs and Hatching Success
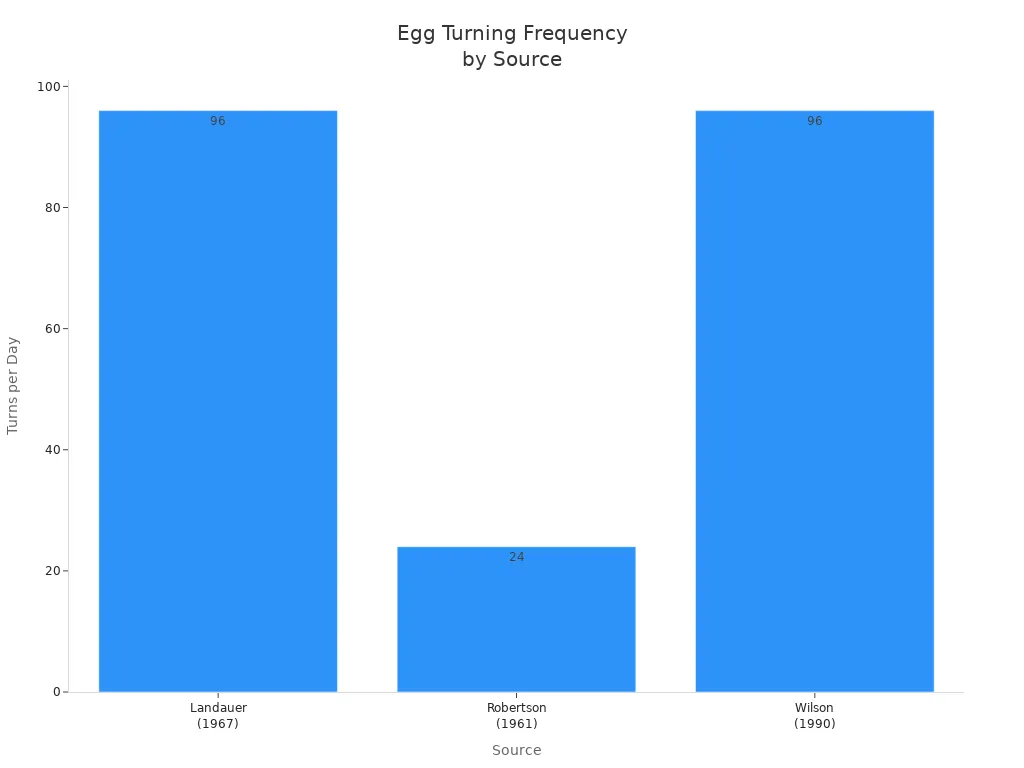
Turning eggs and lockdown tips
Many bird eggs need regular turning during most of incubation, and your species guide should lead the schedule. Turning helps prevent the embryo from staying pressed in one spot inside the shell. You should turn with a gentle tilt from side to side. You should keep the motion smooth, because shaking can harm early development.
|
Guidance |
How often |
How to tilt |
Why it helps |
|---|---|---|---|
|
General practice |
You should follow your species guide. |
You should use a gentle tilt, side to side. |
Turning helps prevent the embryo from staying in one spot. |
|
If you use an auto turner |
You should follow the turner settings. |
You should aim for smooth tilt, not shaking. |
Smooth movement is safer, and you stop turning for lockdown. |
A few days before hatch, you should enter lockdown based on your species timeline. Lockdown is the period when you stop turning and you focus on steady humidity.
-
You should stop turning eggs.
-
You should raise humidity for hatch, based on your species guide.
-
You should keep the incubator closed, and you should avoid opening the lid during hatch.
Lockdown helps chicks line up for hatch, and it helps keep membranes from drying out. You can think of it like keeping bread dough from crusting over before it rises.
Airflow and ventilation for healthy eggs
Good airflow keeps the inside of the cooler healthier. Fresh air brings oxygen in and it lets stale air out. Poor airflow can slow growth and it can make hatch day harder. You should keep vents open enough and you should make sure nothing blocks the fan path.
-
Proper ventilation keeps fresh air moving through the box.
-
Good airflow helps prevent stale, heavy air from building up.
-
Clear vents help conditions stay more even across the tray.
Eggs need a steady balance of moisture loss over time, and that balance depends on species and setup. Too little loss can leave a small air space, and hatch can get tight. Too much loss can dry chicks out. You should balance vents and humidity so conditions stay steady for your bird eggs.
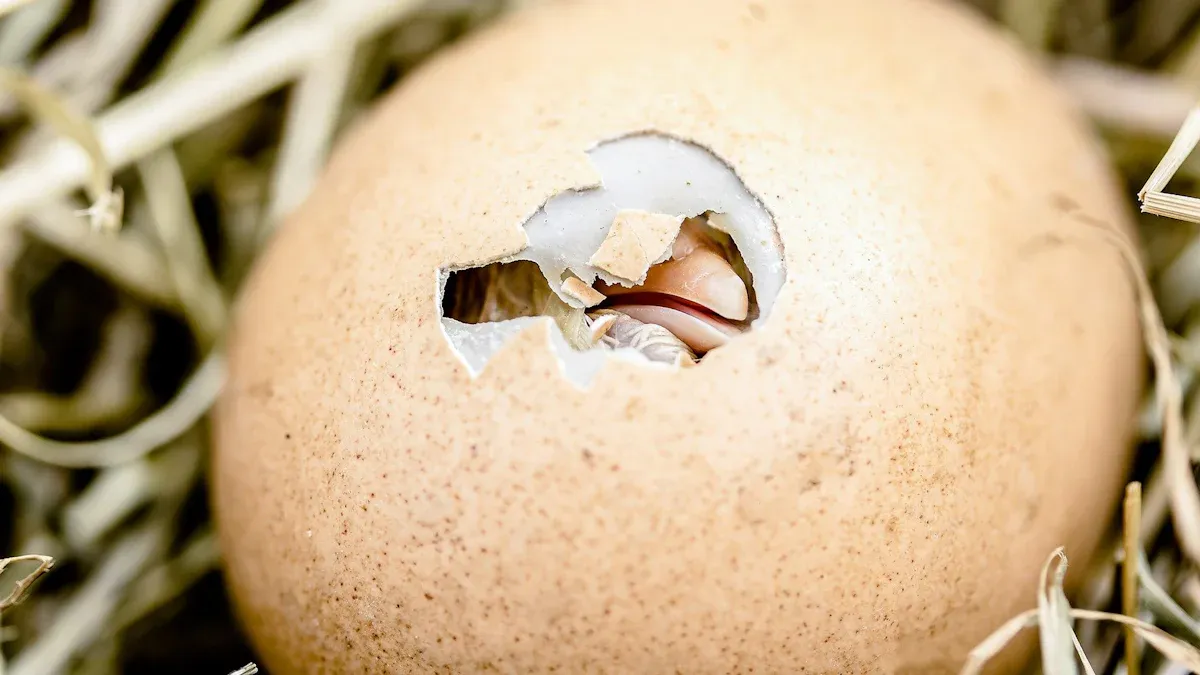
Signs of successful hatching
You can watch for these signs as hatch time gets close:
-
Internal pip means the chick breaks into the air space and starts breathing.
-
External pip means the chick makes the first crack in the shell.
-
Peeping sounds can mean you can hear life inside the shell.
-
Wobbling eggs can mean the chick is moving and getting ready to work.
These signs can mean hatch is moving in the right direction. DIY incubators can hatch well, but results vary, so you should focus on steady heat, steady humidity, and calm patience. You should avoid opening the lid during active pipping, because dry air can make the chick stick.
Tip: You should clean the incubator after each hatch. You should check sensors, refill water trays, and confirm fans and vents work before you start again.
You can incubate bird eggs at home when you follow safe habits every day. You should hold temperature steady at egg height and you should keep humidity where your species needs it. You should turn gently during the main period, and you should stop turning for lockdown. You should run an empty test before every batch. You should switch to a commercial incubator when safety or stability is not there.
FAQ
Can you use any light bulb to incubate bird eggs?
No, you should not use just any bulb. You should only use a heat source that you can control with a thermostat and mount safely. You should avoid setups that run too hot or sit close to foam.
How do you keep the temperature stable in a DIY incubator?
You keep temperature stable with a thermostat, a probe at egg height, and an insulated box. You also check more than one spot inside the cooler, because one corner can run hotter than the rest. You make changes slowly and you log what happens.
What is the safest way to mount a heat source?
You mount the heat source so it cannot move. You keep it away from foam and plastic. You route wires high and dry, and you keep water pans off to the side. You test the box with a gentle shake before you add eggs.
When should you stop using a DIY incubator?
You should stop when you cannot keep conditions steady or you cannot make the setup safe around heat and water. If you still want a longer DIY walkthrough, you can follow How to Make a Homemade Incubator for Bird Eggs at Home.
Do you need a fan in a cooler incubator?
A fan helps spread heat and it helps prevent hot pockets. You should aim for gentle mixing, not a hard wind on the eggs. Even airflow supports steadier temperature.


0 Comments