
You want strong quail chicks. A solid home hatch rate is often 75% to 85% from fertile eggs. When you stay under 70%, the incubator setup or egg handling usually has a repeatable cause. Use this page to diagnose fast, fix one variable at a time, and log what changed so your next batch improves.
For the full egg-to-hatch walkthrough, use our main guide: Quail Egg Incubation: Ultimate Guide.
Key Takeaways
-
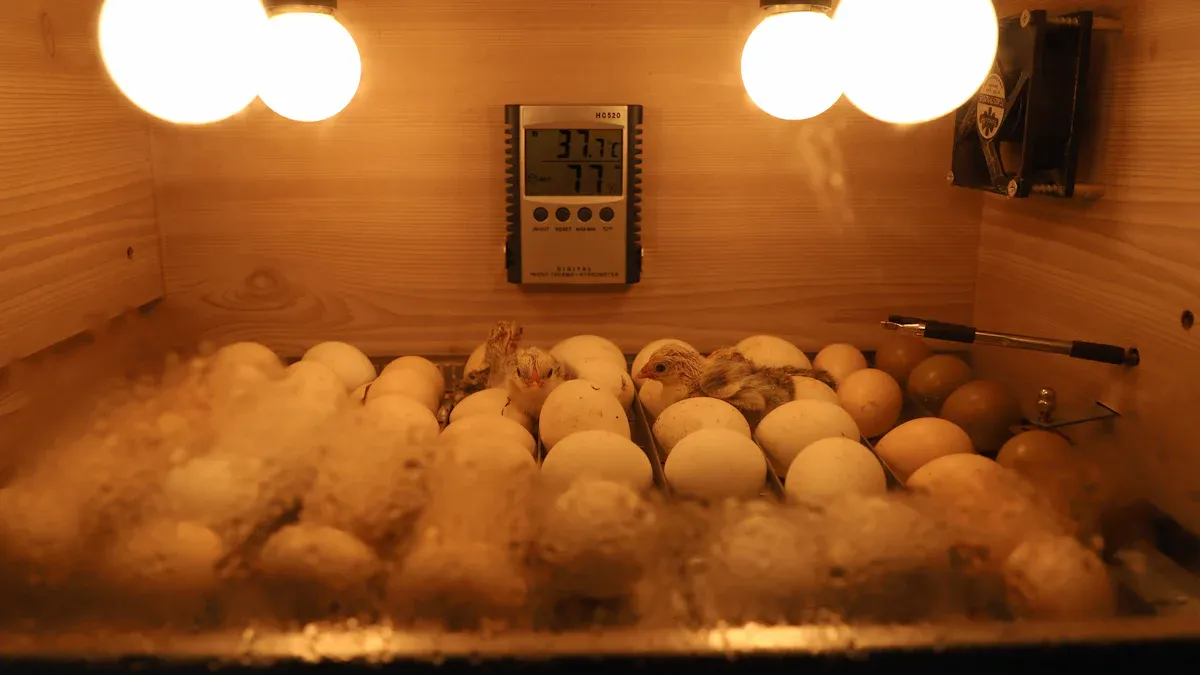
Temperature: Forced-air 37.5°C / 99.5°F. Still-air 38.0–38.3°C / 100.4–100.9°F at egg-top height.
-
Humidity: Start moderate during early incubation, then raise for lockdown. Your best target is the one that grows a normal air cell and avoids dry membranes.
-
Turning and airflow: Turn 3–5 times per day through Day 14, stop at Day 15, and keep vents open for oxygen.
Rule that saves batches: If you change two settings at once, you will not know what fixed the problem. Change one variable, then log results.
Quail Incubation Troubleshooting Checklist
Use this checklist before every batch and whenever hatch rate drops. It keeps you focused on measurement accuracy, egg handling, and stable conditions.
Conclusion: Most “mystery failures” come from wrong readings, unstable placement, or too much lid opening.
-
Verify readings: place sensors at egg height and cross-check with a second thermometer and hygrometer.
-
Stabilize the room: avoid windows, direct sun, and HVAC drafts that swing temperature.
-
Limit disturbance: bundle tasks, open the lid less, and keep vents open for steady airflow.
Temperature Settings
Conclusion: Temperature swings cause embryo loss faster than most humidity mistakes.
-
Forced-air: 37.5°C / 99.5°F.
-
Still-air: 38.0–38.3°C / 100.4–100.9°F at egg-top height.
-
Cause and effect: frequent lid opening and room drafts create swings. Swings show up as mid-term losses and weak late hatchers.
Humidity Levels
Conclusion: Humidity is successful when the air cell grows normally and membranes stay flexible at hatch.
-
Early incubation: keep a moderate band and avoid constant chasing. Stable beats perfect.
-
Lockdown: raise humidity for hatch and keep it steady to reduce dry membranes.
-
Cause and effect: low humidity plus lid opening dries membranes. High humidity plus low airflow raises condensation and odor.
For deeper settings and air-cell checks, use: Quail incubator temperature and humidity guide.
Egg Turning
Conclusion: Turning prevents sticking and helps correct hatch position.
-
Turn 3–5 times per day through Day 14.
-
Stop turning at Day 15 for lockdown.
-
Cause and effect: missed turning often shows up as early quits and poor positioning at hatch.
Step-by-step routine: Turning quail eggs best practices.
Ventilation
Conclusion: Embryos need more oxygen as they grow, especially near hatch.
-
Keep vents open with steady airflow.
-
Avoid direct drafts blowing onto eggs.
-
Cause and effect: low airflow increases late losses and “pipped but stuck” cases.
Egg Selection and Storage
Conclusion: Egg quality sets the ceiling for your hatch rate.
-
Choose clean, normal-shaped eggs with no cracks.
-
Store eggs under 7 days in a cool, dry place.
-
Warm eggs to room temperature before setting to reduce condensation shocks.
Tip: Run this checklist before each batch. Small improvements in measurement and stability can raise hatch rates quickly.
Incubation Troubleshooting Guide: Common Issues
This section is symptom-first. For each problem, you get the likely cause, what to do now, and what to record so you can repeat the fix.
Low Hatch Rate
Symptom: Not enough chicks hatch.
Conclusion: Low hatch rate usually means the average conditions were wrong, not one bad day.
-
Most likely causes: temperature drift, humidity drift, poor airflow, or eggs stored too long.
-
Do this now: verify tools at egg height, keep vents open, and reduce lid opening during hatch.
-
Record: daily temp, daily humidity, lid openings, and storage age of eggs.
Early Embryo Death
Symptom: Embryos die in the first five days.
Conclusion: Early losses often point to egg handling, egg quality, or a strong temperature shock.
-
Most likely causes: unstable temperature, rough handling, dirty eggs, or weak fertility.
-
Do this now: stop moving the incubator, stabilize the room, and set only clean intact eggs.
-
Record: egg age, storage conditions, and any day the incubator was moved or opened for long periods.
Mid-Term Embryo Death
Symptom: Embryos die between days six and twelve.
Conclusion: Mid-term losses usually happen when temperature swings or airflow issues repeat for several days.
-
Most likely causes: temperature oscillations, sensor placement errors, or low ventilation.
-
Do this now: lock the incubator in a stable spot and stop chasing settings every hour.
-
Record: morning and evening readings, plus room temperature changes.
Note: A steady temperature is safer than repeated ups and downs. Fix placement and room stability before you tweak setpoints.
Late Embryo Death
Symptom: Embryos die after day thirteen or before hatch.
Conclusion: Late losses are usually lockdown humidity and airflow problems, not turning.
-
Most likely causes: humidity too low, ventilation too low, or repeated lid opening during hatch.
-
Do this now: keep vents open, raise humidity for hatch, and only open the lid when you can remove multiple dry chicks quickly.
-
Record: pip time, hatch window length, and number of openings during lockdown.
Use candling to confirm development and remove clears early: How to candle quail eggs.
Pipped but Not Hatched
Trigger: Pipped more than 24 hours with no progress.
Symptom: A chick breaks the shell but does not finish hatching.
Conclusion: Most “stuck” chicks need stable humidity and airflow, not fast help.
-
Most likely causes: humidity crash, dry membranes, low airflow, or weak chick position.
-
Do this now: stabilize humidity and ventilation first. Avoid repeated checking.
-
When to consider minimal help: only after 24 hours with no progress and only when blood vessels are fully closed.
-
Wait and keep the incubator closed so humidity stays stable.
-
Check membranes at the pip. White and tight often means the surface dried out.
-
Raise humidity and maintain airflow with vents open.
-
If you must assist, keep hands and tools clean and work in tiny steps.
-
Stop if you see active bleeding.
Note: Helping too early causes bleeding and exhaustion. Stabilizing the environment first saves more chicks.
Deformities and Weak Chicks
Symptom: Chicks hatch with curled toes, splayed legs, weakness, or poor balance.
Conclusion: Weak hatchlings often reflect incubation instability plus slippery brooder footing.
-
Most likely causes: temperature swings, poor humidity control, genetics, or nutrition issues in breeders.
-
Do this now: provide warm stable brooding, dry bedding, and good traction. Review incubation stability before the next batch.
-
Record: how many weak chicks, what day they hatched, and whether problems cluster on the same hatch day.
Bad Odor or Mold
Symptom: The incubator smells musty or you see mold.
Conclusion: Odor and mold happen when moisture sits on surfaces and airflow is too low.
-
Most likely causes: dirty water pans, wet trays, high humidity with low venting, or leftovers after hatch.
-
Do this now: keep vents open, remove eggshell debris, wash trays and water pans, then dry fully.
-
Record: humidity during lockdown and whether condensation formed on walls or lid.
Infertile Eggs
Symptom: Eggs show no development after incubation.
Conclusion: Clears are normal sometimes, but a high clear rate points to breeder setup or storage issues.
-
Most likely causes: eggs stored too long, breeder nutrition issues, or weak fertility.
-
Do this now: set fresher eggs, confirm breeder health and ratios, and candle on a schedule to remove clears.
-
Record: percent clears, egg age at set, and breeder changes made before the batch.
📝 Use this troubleshooting guide for every batch. Small, logged changes improve hatch rates faster than random adjustments.
Key Control Points for Hatching Quail Eggs
Incubation Timeline
Conclusion: A clear timeline prevents late surprises and reduces lid opening during hatch.
-
Day 0: set eggs in the incubator.
-
Day 15: start lockdown and stop turning.
-
Day 17–18: chicks begin to hatch.
Quick Equipment Upgrade That Reduces Handling Errors
Conclusion: Consistent turning and steady airflow reduce human error, especially on busy weeks.
-
If you miss turns or over-handle eggs, an auto-turner reduces that risk.
-
For stable daily turning and fewer “forgotten turns,” consider an auto-turn dual-motor incubator for quail egg hatching.
-
Better consistency makes troubleshooting clearer because fewer variables change day to day.
Cleaning and Record Keeping That Actually Improves Hatch Rates
Cleaning keeps mold and odor down. Record keeping tells you why a batch failed.
Conclusion: If you only track one thing, track stability and openings.
-
Daily log: temperature at egg height, humidity, and vent position.
-
Disturbance log: number of lid openings and how long the lid stayed open.
-
Outcome log: clears, early quits, mid-term loss, late loss, and pipped-not-hatched count.
Cause-to-fix reading: Late loss and pipped-not-hatched usually means lockdown stability. Mid-term loss often means temperature swings. Many clears points to egg age or breeder setup.
FAQ
When should you candle quail eggs?
Many keepers candle on Day 7, Day 12, and again before lockdown. The goal is to confirm development and remove clears early so you keep the incubator cleaner.
How do you check if an egg is fertile without candling?
You may see a small white spot on the yolk in a freshly cracked egg, but that does not replace candling. Candling is the safer way to confirm development in incubated eggs.
Is higher humidity always better for hatching?
No. Higher humidity helps during hatch, but humidity that is too high for too long can increase condensation and cleanliness problems. The best target is the one that keeps membranes flexible at hatch and keeps the incubator clean and well-ventilated.
Data authenticity note: Temperature and humidity targets are common home-incubation ranges for Coturnix quail. Results vary by incubator airflow, sensor placement, room dryness, egg age, and how often the lid is opened.


0 Comments