
You should only perform turkey assisted hatching when the poult cannot escape and faces real danger. Always check for visible blood vessels before you help. If you act too soon, you may cause harm or bleeding. Wait at least 24 hours after the poult makes an external pip. Watch closely and stay patient. Use safety steps to protect the poult and yourself. For better results with thicker shells, consider a turkey egg incubator.
-
Tip: Never rush. If you see fresh red blood vessels, stop and let the poult rest.
Key Takeaways
-
Wait at least 24 hours after the external pip. Many poults take 12–24h, and a few may rest up to ~48h.
-
Always look for fresh blood vessels before helping. If you see bright red vessels, stop right away. Put the egg back in the incubator to keep it safe.
-
Humidity strategy: keep ~45–55% RH during incubation; raise to ~65–70% RH (up to 75%) for lockdown to prevent shrink-wrapping.
-
Use gentle, local assistance only on the air-cell side. Work slowly, keep the membrane moist, and stop with any bleeding.
-
Watch for distress: no progress, dry membrane, or labored breathing are warning signs to prepare careful assistance.
Hatch Timeline & Basics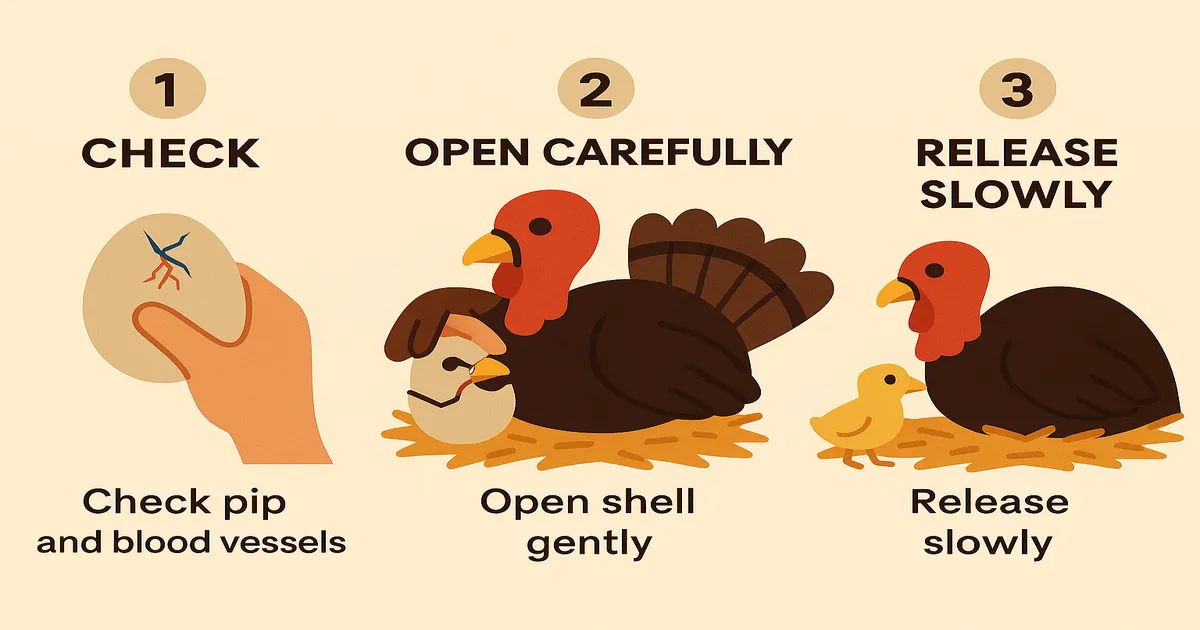
28-Day Incubation Stages
Turkey eggs need a steady environment for the full incubation period. You should expect the process to last about 28 days. During this time, you keep the eggs warm and humid. Most eggs develop normally if you maintain the right conditions. Hatch success varies widely with egg quality, equipment, and settings—stable temperature, appropriate humidity, and patient timing matter most.
Turkeys have thicker shells and membranes than chickens. Their larger size means they need more oxygen, especially near the end of incubation. You may see some eggs struggle to hatch because of these challenges. If you want to help, you must wait and watch for clear signs. Early intervention can cause harm.
Tip: Patience is your best tool. Let the poult rest and try on its own before you consider turkey assisted hatching.
External Pip and Zipping
The first sign of hatching is the external pip. You see a small crack or hole in the shell. After this, the poult starts to zip, which means it breaks the shell in a line to escape. Most poults finish hatching less than 24 hours after the external pip. Some hatch in as little as 1 hour. Others may take up to 18 hours or more. Sometimes, a poult may need up to 48 hours if it rests often.
You should know that intermittent resting is normal. The poult may pause for long periods. Do not rush to help. Wait at least 24 hours after the external pip before you consider any intervention. Watch for movement and peeping sounds. These signs mean the poult is still working to hatch. If you work across species or egg sizes, a universal egg incubator with adjustable trays can help.
-
Key points to remember:
-
The full incubation period is about 28 days.
-
Hatch success is variable; focus on stable temp, humidity, and patient timing.
-
Most poults hatch within 24 hours after external pip.
-
Some may need up to 48 hours.
-
Resting is normal during hatching.
-
When to Intervene
Signs Poults Need Help
You must watch your turkey eggs closely during the final days. Sometimes, a poult cannot break free because of a thick shell or membrane. You may see the following signs that show a poult needs help:
-
The membrane looks dry or starts to shrink around the poult.
-
The poult does not move or peep for a long time.
-
The poult keeps pecking at the same spot but cannot make progress.
-
The poult shows labored breathing or gasps for air.
If you notice these signs and the poult has not made progress, you may need to consider turkey assisted hatching. Always check the membrane and shell before you act. A dry or tight membrane can trap the poult and make it hard to breathe. Thick shells and membranes are common in turkeys, so you must stay alert.
Tip: If you see a dry membrane or no movement, prepare your tools but do not rush. Careful observation helps you decide the right time.
Wait Time After Pip
Patience is the most important part of turkey assisted hatching. You should always wait at least 24 hours after you see the first external pip. The natural hatching process takes time. The poult needs to absorb the veins and yolk before it can safely leave the shell.
-
Wait at least 18 to 24 hours after the external pip before you help.
-
Most poults take between 12 and 24 hours to move from pip to zip; a few may rest up to ~48 hours.
-
Early help can cause bleeding or harm if the poult is not ready.
You should only intervene if there is no progress after 24 hours and you see clear signs of distress. If you act too soon, you risk breaking blood vessels or causing the poult to bleed. Always keep the temperature and humidity stable during this time.
Remember: Only open the air cell window. Never peel away large pieces of shell at once. Work slowly and check for blood vessels at every step.
Red Flags to Stop
You must know when to stop turkey assisted hatching. Some signs mean you should not continue. If you see any of these red flags, stop right away and return the egg to the incubator:
-
Fresh, bright red blood vessels on the membrane. These vessels may look like they pulse or move.
-
The yolk sac is still visible or not fully absorbed.
-
The poult moves actively or tries to push out on its own.
If you see any of these, wait and let the poult rest. Do not cut or tear the membrane if you see blood vessels. You can cause bleeding or even death. Always keep the membrane moist and warm. If you notice bleeding, stop and place the egg back in the incubator to let the vessels finish absorbing.
Here is a quick table to guide safe assistance pacing and checks (replacing medication examples with practical steps):
|
Assistance Focus |
What You Check/Do |
Typical Interval |
|---|---|---|
|
Vessel safety |
Stop with bright red, pulsing vessels; resume only when vessels darken |
Every 10–15 min |
|
Moist membrane |
Lightly moisten exposed membrane with warm saline; avoid flooding nares |
Every 10–15 min |
|
Stepwise release |
Free beak/neck first; peel tiny sections only; pause between steps |
Every 20–40 min |
You want your poults to be active and healthy after hatching. Careful timing and gentle technique help you avoid problems like bleeding, infection, or weak poults.
Alert: If you see fresh blood, unabsorbed yolk, or strong movement, stop all help. Wait for the poult to finish absorbing everything it needs.
Checklist for Safe Intervention:
-
Wait at least 24 hours after external pip.
-
Only open the air cell window.
-
Stop if you see blood or yolk.
-
Keep temperature and humidity stable.
By following these steps, you give your poults the best chance for a safe hatch. Turkey assisted hatching works best when you use patience, careful observation, and respect for the natural process.
Safe Assistance Steps
Air Cell Window
Start turkey assisted hatching by cleaning your workspace. Wash your hands and tools well. Use safe cleaners for surfaces. Keep an automatic egg incubator with temp and humidity control at 99.5°F and humidity above 65% during active assistance. Use a reliable digital hygrometer to check these levels and verify with a second sensor when possible.
|
Feature |
Description |
|---|---|
|
Sensor Type |
Digital hygrometer/thermometer |
|
Measurement |
Shows current relative humidity and temperature |
|
Additional Features |
Displays min/max values for trend checks |
|
Functionality |
Helps maintain stable humidity near targets |
|
Coordination |
Works with water pans/sponges for fine control |
After you see an external pip, use a flashlight to find the air cell. Only open a 1–2 cm window on the air cell side. Do not break the membrane. Chip the shell gently with flat tweezers or a knife. Work slowly and do not rush.
Tip: Open the window a little at a time. Stop and check after each step.
Blood Vessel Check
Before touching the membrane, shine a light to look for blood vessels. If you see fresh, bright red vessels that move, stop. Put the egg back in the incubator for 1–3 hours and check again later. If you see dark red vessels that do not move and the yolk is gone, you can keep going. Never cut or tear the membrane if you see moving blood vessels. Bleeding can hurt the poult.
Follow these steps for safe micro-assistance:
-
Candle the air cell for an external pip. If you only see an internal pip, wait.
-
Look at the membrane color. If it looks dry or white, add moisture.
-
Check for signs of life like peeping or movement. If you are not sure, wait and check again in 30–60 minutes.
-
Chip a tiny window with fine tweezers. Do not poke the membrane.
-
Moisten the membrane with warm saline using a cotton swab. Do not flood the nares.
-
If vessels are bright red and branching, stop and put the egg back for 1–3 hours.
-
When vessels fade, gently lift the outer membrane, then the thin inner membrane, keeping it moist.
-
Work in steps every 20–40 minutes. Let the poult rest so it can absorb the yolk and blood.
-
If needed, wrap the egg in a warm, damp paper towel (leave the beak out) between steps.
-
When the shell is mostly unzipped and membranes have no blood, let the poult push out by itself.
Moist Membrane
Keep the membrane moist during turkey assisted hatching. Use a warm, damp paper towel or a cotton swab with saline. Gently moisten the inner membrane if it sticks to the poult. This helps the poult move inside the shell. Use several moist towels during the day to keep the membrane wet. Keep humidity between 65% and 70% during lockdown. Do not use too much moisture, which can flood the nares or make the poult cold.
Note: A dry membrane can trap the poult and make breathing hard. Always check and add moisture when needed.
Gentle Release
Release the beak and head or neck a little at a time. Wait 10–15 minutes between each step. This lets the poult absorb the yolk and pull back blood vessels. Only finish hatching after all vessels are gone and the yolk is absorbed. If you see bleeding or moving vessels, stop and put the egg back in the incubator.
After hatching, keep the poult in the incubator for 4–8 hours with high humidity. This helps the poult recover and dry off safely.
Recommended Tools for Safe Assistance:
-
Digital automatic egg incubator (stable temp/humidity, auto-turn)
-
Clean hands
-
Flat-tipped tweezers or knife for making a pip
-
Warm, damp paper towel
-
Cotton swabs
-
Fine scissors or tweezers
-
Flashlight or headlamp
-
Good humidity sensors
-
Hydrogen peroxide or safe disinfectant
📝 Always follow local rules for disinfectants and cleaning products.
Turkey assisted hatching needs patience, careful watching, and gentle hands. Work in small steps, keep the membrane moist, and check for blood vessels each time. By following these safe steps, you help your poults start life healthy.
Lockdown & Oxygen
Need a quick overview of models and sizes? Browse our egg incubators.
Temp and Humidity
Get ready for the last part of turkey hatching, called lockdown. Stop turning eggs at days 25–26. Set your incubator to 99.5°F. Keep humidity between 65–75% RH. Use a good humidity sensor to check often. High humidity keeps egg membranes soft. This helps poults hatch safely.
|
Phase |
Temperature (°F) |
Humidity (% RH) |
|---|---|---|
|
Lockdown Phase |
99.5 |
65–75 |
Fill big water pans in your incubator to keep humidity up. Put wet sponges near the eggs. Try not to open the lid much. If you need to touch eggs, work fast. Cover eggs to stop moisture loss. Do not let humidity drop quickly. Dry membranes can stick to poults.
Tip: Check humidity before and after you handle eggs. Keeping humidity steady helps poults hatch without getting hurt.
Venting Needs
Turkey poults need extra oxygen in the last days. Thick shells and membranes make air harder to reach the embryo. Start opening vents slowly in the last 2–3 days. Open vents a little at a time. Avoid strong drafts and sudden humidity drops while adding fresh air.
|
Aspect |
Guidance |
|---|---|
|
Oxygen Supply |
Gradually increase venting; prioritize steady humidity and avoid drafts |
|
Observation |
Watch breathing and activity; reduce venting if membranes dry quickly |
|
Consistency |
Keep settings stable; large, fast changes can hinder hatch |
|
Variation |
Different lines react differently; adjust gradually based on response |
Do not open the lid too much. Too much venting or opening can cause trouble:
-
Low humidity makes hatching hard.
-
Dry membranes can stick to poults and hurt them.
-
Fast humidity drops can trap chicks in shells.
🛑 Only open the incubator when you must. Slow venting and steady humidity help poults hatch safely.
Mistakes & Prevention
Bleeding Risks
You can make several mistakes during turkey assisted hatching. The most serious risk comes from intervening too early or cutting into blood vessels. If you break a vessel, the poult may bleed and weaken. Always check for fresh, bright red blood vessels before you help. Wait until the vessels turn dark and stop pulsing. If you see blood, stop right away and return the egg to the incubator. This gives the poult time to absorb the blood and yolk.
Here are some common mistakes and their effects:
-
You help before 24 hours after pip—this can cause bleeding.
-
You cut into a fresh blood vessel—the poult may bleed and die.
-
You let the membrane dry out—the poult can get stuck and suffocate.
-
You open the shell too much at once—this can cause the membrane to tear.
-
You ignore temperature and humidity—the poult may become weak or fail to hatch.
Alert: If bleeding starts, stop all help and keep the egg warm and humid.
Dry Membrane
A dry membrane is a common problem in turkey hatching. Low humidity or too much venting can cause the membrane to stick to the poult. This makes it hard for the poult to move or breathe. You must keep humidity above 65% during lockdown. Use a warm, damp cloth or cotton swab to moisten the membrane if it looks dry. Never let the membrane turn white or hard. Dry membranes can trap the poult and lead to death.
Many hatching failures come from poor humidity control. For example, chicks can die in the shell or hatch with sticky shells if humidity drops too low. Weak or poorly healed poults often result from temperature swings or low humidity.
Quick Reference
You can prevent most mistakes by following a simple checklist. Always check for blood vessels, keep the membrane moist, and use the right timing. Here is a quick reference table for safe turkey assisted hatching:
|
Step/Factor |
Description |
|---|---|
|
Hatching Duration |
Turkeys incubate for about 28 days (stop turning at days 25–26). |
|
Humidity Maintenance |
Keep ~45–55% RH during incubation; raise to ~65–70% RH (up to 75%) at lockdown. |
|
Timing of Assistance |
Wait at least 24 hours after external pip; assist only after vessel safety checks. |
📝 Use this checklist before you assist. Careful steps help you avoid bleeding and dry membranes. Always wait, watch, and work gently.
You can safely assist turkey hatching when you wait at least 24 hours after external pip and check for vessel safety. Use gentle steps and always watch for signs of distress. Follow your checklist and keep the environment stable. After hatching, help your poults thrive:
-
Keep them warm and quiet until fully dry.
-
Offer water first; dip the beak if needed.
-
Use non-slip bedding and place starter feed nearby.
-
Watch their movement, breathing, and hydration.
-
Isolate weak poults and keep the brooder clean.
Stay patient and review troubleshooting tips if you face challenges.
For full settings and checkpoints, see our turkey egg incubation guide.
FAQ
How long should you wait before helping a turkey poult hatch?
You should wait at least 24 hours after you see the external pip. This gives the poult time to absorb the yolk and blood vessels. Early help can cause bleeding.
What humidity level is best during lockdown?
Keep humidity between 65% and 75% during lockdown. High humidity keeps membranes soft and helps poults hatch safely. Use a reliable sensor to check levels often.
What should you do if you see fresh blood vessels?
Stop all assistance if you see fresh, bright red blood vessels. Return the egg to the incubator. Wait until vessels turn dark and stop pulsing before you continue.
Which tools help you safely assist hatching?
You need clean hands, flat-tipped tweezers, warm damp towels, cotton swabs, fine scissors, a flashlight, and a good humidity sensor. Disinfect all tools before use.
How do you keep the membrane moist?
Use a warm, damp paper towel or a cotton swab with saline. Gently moisten the membrane every 20–40 minutes if it looks dry. This helps the poult move and breathe.


0 Comments