
Yes, you can hatch eggs indoors during the cold months and raise strong, healthy chicks for early spring. Winter chicken care and proper indoor incubation give you safer hatching and better results. You get chicks that start laying eggs as soon as the weather warms up. Many beginners worry about the cold, but you only need a few adjustments to succeed. With the right setup, you can enjoy a thriving flock and fresh eggs sooner.
Key Takeaways
-
You can hatch chicken eggs inside during winter if you set things up right. Modern incubators keep eggs warm, so hatching in winter works well. Set your incubator to 99.5°F for forced-air or 101–102°F for still-air. This is true no matter what time of year it is. Keep humidity at 45–55% while eggs are incubating, then raise it to 65–75% for the last three days to help chicks hatch. Collect eggs fast when it is freezing outside so they do not freeze, and put your incubator in a warm room with no drafts so the temperature and humidity stay steady. If you hatch chicks in winter, they will lay eggs by summer and you will get fresh eggs when people want them most.
Can Chicks Hatch in Winter? Myths and Facts
Can you hatch eggs in winter? Yes, you absolutely can hatch chicks indoors during the cold months. Modern incubators make it possible to create a safe, warm environment for your eggs, even when snow falls outside. You only need to manage the incubator settings and keep the room conditions stable. Many families enjoy starting their flock early and getting fresh eggs by summer.
Common Myths About Winter Hatching
You may hear people say that can chicks hatch in winter is impossible or risky. These myths often come from worries about cold weather and old-fashioned methods. Let’s look at some of the most common misconceptions and the real facts:
-
You cannot hatch eggs in winter because it is too cold.
-
You should not buy an incubator in winter because it will not work well.
-
Chicks hatched in winter will not survive.
-
Eggs left outside in the cold will never hatch.
-
Indoor air is too dry for hatching eggs.
Tip: Incubators create their own warm micro-climate. Most homes stay between 65–72°F in winter, which is perfect for running an incubator. Buying an incubator in the off-season gives you better choices and more time to practice before spring.
You do need to collect eggs quickly in freezing weather. Cold can harm embryos if eggs freeze, so bring them inside as soon as possible. Roosters with frostbite may have lower fertility until they heal. Hens need extra energy to stay warm, which can affect egg quality. Make sure your flock has unfrozen water and plenty of food to keep eggs healthy.
Here are some helpful winter hatching tips:
-
Bring eggs to room temperature before setting them in the incubator to prevent condensation.
-
Some experienced keepers use a very light mist of diluted disinfectant, such as 10% Oxine or 50% Gold Listerine, strictly following the product label. Avoid soaking or scrubbing shells hard, and if you are unsure, it is safer to skip chemical sprays and simply discard heavily soiled eggs.
-
Candle eggs regularly to check for development and remove any that are not growing.
How Modern Incubators Work in Cold Weather
Modern incubators solve many winter hatching problems. They use built-in heaters, fans, and thermostats to keep eggs at the right temperature and humidity. You do not need to change the target settings for winter. The incubator will work a bit harder if your room is cooler or drier, but the eggs stay safe inside.
|
Incubation Group |
Cooling Period |
Hatchability Rate (%) |
|---|---|---|
|
Without Cooling |
No |
82.5 |
|
Without Cooling |
No |
90 |
|
With Cooling |
Yes |
94.9 |
|
With Cooling |
Yes |
100 |
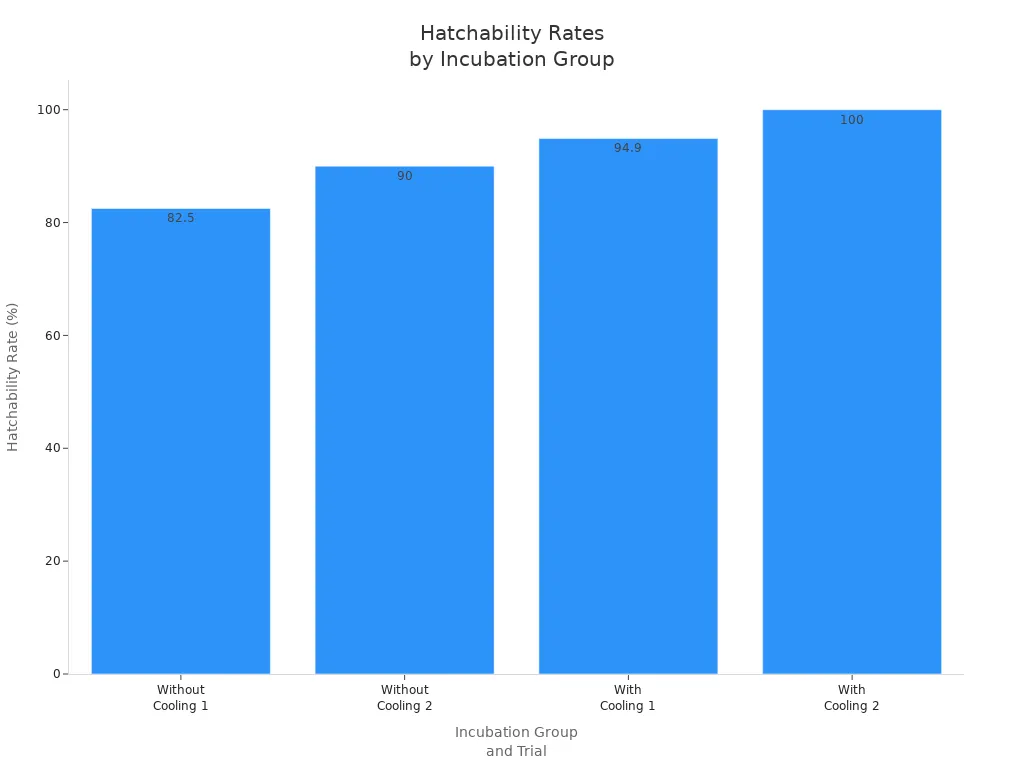
These figures are example results from controlled hatch tests that included short, planned cooling periods. They show that eggs can still hatch well indoors in winter when overall conditions stay stable, but they are not a guarantee for every flock. For beginners, there is no need to intentionally cool eggs; focus instead on keeping the incubator in a draft-free room and checking the temperature and humidity every day. Most homes have dry air in winter, so you may need to add extra water or use a sponge in the incubator to keep humidity in the right range.
Winter to Spring: Early Chicks, Early Eggs
When you hatch chicks in winter, you give your flock a head start. Chicks that hatch in late winter or early spring grow up just in time for the best laying season. Most backyard breeds start laying eggs at 18–24 weeks old. If you hatch in January or February, your pullets will begin laying by June or July. This timing matches the peak demand for eggs and the best outdoor foraging.
Note: Early chicks mean you enjoy fresh eggs sooner and have strong, healthy birds ready for summer.
You do not need to worry about the cold outside as long as you keep your incubator and brooder in a warm, stable room. With a little planning, you can hatch chicks any time of year and enjoy a thriving flock.
Incubation Settings for Winter Success
Temperature Targets for Chicken Eggs
You need to keep your incubator at the right temperature for a successful hatch. The target temperature does not change in winter, but your incubator may need to work harder to stay steady. Forced-air incubators use a fan to move air, so you should set them at 99.5°F. Still-air incubators do not have a fan, so you should set them a bit higher, around 101–102°F, measured at the top of the eggs.
|
Incubator Type |
Target Temperature (°F) |
Where to Measure |
|---|---|---|
|
Forced-Air |
99.5 |
At egg level |
|
Still-Air |
101–102 |
At top of the eggs |
Try to keep the temperature swing within 0.5°F of your target. If the temperature goes too high or too low for several hours, it can harm the chicks inside the eggs. In winter, check your incubator’s display often, especially if your room gets cold at night.
Five Tips for Managing Incubator Temperature in Winter:
-
Place your incubator in a room that stays between 65–75°F.
-
Avoid putting it near windows, doors, or heater vents.
-
Let your incubator run for 24 hours before setting eggs to make sure it holds steady.
-
Use a foam pad or towel under the incubator to block cold drafts.
-
Check the temperature at least twice a day, morning and evening.
Tip: The temperature setting for chicken eggs stays the same all year. What changes in winter is how hard your incubator works to keep that setting.
Humidity Ranges for Incubation and Hatch
Humidity is just as important as temperature. Dry winter air can make it harder to keep the right humidity inside your incubator. For most of the incubation period (days 1–18), aim for 45–55% relative humidity. When you reach the last three days (lockdown), raise the humidity to 65–75%. This helps chicks break out of their shells more easily.
|
Stage |
Humidity Range (%) |
What to Do |
|---|---|---|
|
Days 1–18 (Incubation) |
45–55 |
Fill water channels, check daily |
|
Days 19–21 (Hatch) |
65–75 |
Add extra water, use a sponge |
If your home feels very dry, you may need to add more water surface inside the incubator. You can use shallow trays or place a wet sponge inside. Try not to open the lid too often, especially during the last days.
Step-by-Step: Keeping Humidity Right in Winter
-
Fill all water channels before you start.
-
Check humidity with a digital hygrometer.
-
Add a small jar or tray with a wet sponge if humidity drops.
-
Watch the air cell size by candling eggs at day 18.
-
During lockdown, add more water and avoid opening the incubator.
Note: Humidity targets do not change for winter incubation, but you may need to work harder to keep them steady.
Turning Schedule and Lockdown Days
Turning eggs is a key part of incubation. You need to turn each egg at least three times a day, but five times is even better. Turning keeps the embryo from sticking to the shell and helps it grow strong. Many incubators have automatic turners that move eggs every hour or even more often.
|
Aspect |
Recommendation |
|---|---|
|
Turning Frequency |
At least 3 times a day; 5 is better |
|
Automatic Turners |
Some turn every hour or continuously |
|
Lockdown Period |
Stop turning 3 days before hatch date |
Three days before your expected hatch date, stop turning the eggs. This is called "lockdown." At this point, raise the humidity and do not open the incubator. The chicks need a steady, moist environment to pip and break out of their shells.
Reminder: Mark your calendar for lockdown day so you do not forget to stop turning and boost humidity.
By following these settings and tips, you give your chicks the best chance to hatch strong and healthy, even during the coldest months.
Incubator vs. Broody Hen in Winter
When you want to hatch eggs in winter, you face a big choice: use an incubator or rely on a broody hen. Each method has its place, but winter brings special challenges for hens.
A broody hen can hatch eggs naturally. She keeps them warm with her body and turns them with her beak. In winter, though, hens rarely go broody. Cold weather makes it hard for a hen to keep eggs at the right temperature. If she leaves the nest, even for a short time, the eggs can chill and stop developing. Snow, wind, and freezing air put both the hen and her eggs at risk.
An incubator gives you more control and flexibility. You can hatch eggs at any time of year, not just when a hen feels broody. This means you can plan for early spring chicks and get fresh eggs sooner.
Here are some key advantages of using an incubator in winter:
-
You can hatch eggs whenever you want, even in the coldest months.
-
You control the temperature and humidity, so eggs stay safe and warm.
-
You can watch the hatching process closely and make adjustments if needed.
-
Incubators hold more eggs than a single hen, so you can grow your flock faster.
Tip: Incubators create a stable, warm environment that does not depend on the weather or a hen’s mood. This gives your chicks the best chance to hatch strong and healthy.
A broody hen may still work for small hatches in mild climates, but most backyard keepers find incubators much more reliable in winter. You do not need to wait for a hen to go broody. You do not need to worry about sudden cold snaps or frozen eggs. With an incubator, you set the temperature to 99.5°F for forced-air or 101–102°F for still-air, and you keep humidity in the right range. The settings stay the same all year, but you may need to check them more often in winter.
If you want early spring layers, start your hatch indoors with an incubator. Your chicks will grow up in a safe, warm space and reach point of lay just as the days get longer and families want more eggs. This perfect timing helps you enjoy a steady supply of fresh eggs and a healthy, thriving flock.
Best Incubators for Cold Rooms
Picking the right incubator for winter is important. Cold rooms can make hatching harder. You need features that help keep the temperature steady. Good insulation, a tight lid, and a quiet fan help a lot. These things help the heater work less and stop big temperature changes. Your eggs stay warm, and you do not hear loud noises at night.
Insulation and Heater Wattage
Insulation is very important for hatching in winter. Thick walls and a snug lid keep heat inside. This means the heater does not run as much. Many new incubators use closed-cell foam or other good materials. These help keep the temperature steady, even if your room is cold.
Heater wattage is also important. New incubators use heaters that save energy. They keep eggs warm but do not use much electricity. Some cabinet incubators use only 25 watts. Older models might use 100–150 watts. Digital controls help the heater turn on and off at the right times. This saves energy and keeps eggs safe.
|
Feature |
Description |
|---|---|
|
Insulation |
Thick foam or urethane walls for stable temperature |
|
Heater Wattage |
Energy-efficient, often 25–45 watts for small units |
|
Lid Fit |
Tight seal to prevent heat loss and drafts |
|
Digital Controls |
Maintain precise temperature with less energy use |
A well-insulated incubator with a tight lid and a good heater keeps eggs warm and saves money, even in winter.
Importance of Fan and Thermostat
A fan and thermostat are very important for winter hatching. The fan moves warm air around the eggs. This helps every egg get the same temperature. It stops cold spots and helps chicks grow evenly. The thermostat checks the temperature and turns the heater on or off.
-
Fans move heat around and stop cold spots.
-
Thermostats keep the temperature steady, even if the room gets cold.
-
Good air flow keeps humidity even and stops too much moisture.
With a fan and thermostat, your incubator can handle winter changes and keep eggs safe.
Desktop vs. Cabinet Incubators
You can pick desktop or cabinet incubators. Each type is good for winter in different ways.
Desktop Incubators
These small desktop incubators work well in warm homes. They use less electricity—about 12–45 watts. It costs roughly the price of a cup of coffee for a 21-day hatch in many areas, though actual costs vary with your power rate. They hold fewer eggs but are easy to use and move. Most have good insulation and a quiet fan. They stay steady in a warm room.
Cabinet Incubators
Cabinet incubators are bigger and hold more eggs. They have thick insulation, strong heaters, and smart controls. These work well in cold rooms or for big flocks. They use more electricity but control temperature and humidity better for many eggs.
|
Type |
Capacity |
Energy Use (21 days) |
Best For |
|---|---|---|---|
|
Desktop Incubator |
7–56 eggs |
~6 kWh (example estimate) |
Small flocks, beginners |
|
Cabinet Incubator |
100+ eggs |
~113 kWh (example estimate) |
Large flocks, cold rooms |
Most backyard keepers like desktop incubators for winter hatching. They are made for warm homes and work well all year.
No matter which one you pick, look for good insulation, a tight lid, a quiet fan, and a good thermostat. These things help you hatch healthy chicks in winter and get early spring eggs.
Setting Up Your Winter Incubator Room
Ideal Room Temperature and Humidity
You want your incubator room to feel comfortable and steady. The best temperature for winter incubation sits between 65°F and 75°F (18°C to 24°C). Try to keep the room from dropping below 50°F. Cold air makes your incubator work harder and can cause temperature swings inside the unit. Most homes stay in the right range, but always check with a thermometer.
Humidity matters, too. Aim for a room humidity of 50–55%, with a target of about 52% relative humidity. Dry winter air can pull moisture from your incubator, making it tough to keep the right humidity for your eggs. You can use a small digital hygrometer to check the room. If the air feels very dry, a small humidifier helps keep things balanced.
Tip: A warm, steady room helps your incubator hold the right temperature and humidity. This gives your chicks the best start.
Avoiding Drafts and Cold Spots
Drafts and cold spots can ruin a good hatch. You want to pick a spot that stays warm and does not get sudden chills. Interior rooms work best. Try a home office, spare bedroom, or laundry room. Stay away from garages, porches, or sheds. These places get too cold and make it hard for your incubator to keep up.
Here are some easy ways to avoid drafts and cold spots:
-
Keep all windows and doors closed in the incubator room.
-
Use towels to block cold air from sneaking in under doors.
-
Move the incubator away from outside walls or drafty corners.
-
If you feel cold air, shift the incubator to a better spot.
You can also wrap a scarf or blanket around the incubator to help hold in heat. Just make sure you do not block the air vents. Good airflow is still important for healthy chicks.
Simple Ways to Buffer Heat Loss
Winter air can steal heat from your incubator. You can fight this with a few simple tricks. Place your incubator on a foam pad or a folded towel. This keeps cold from coming up through the table or floor. Set up a cardboard windbreak around the sides. This blocks chilly drafts but lets air move through the vents.
If you face a cold snap, wrapping a blanket around the incubator (without covering the vents) can help keep warmth inside. Always check that the incubator’s air holes stay open. You want to keep heat in, but your eggs still need fresh air.
Quick Checklist for a Cozy Incubator Room:
-
Room temperature: 65–75°F (18–24°C)
-
Humidity: 50–55% RH
-
No drafts or cold spots
-
Incubator on foam pad or towel
-
Cardboard windbreak if needed
-
Blanket or scarf for extra warmth (keep vents clear)
🐣 A well-prepared room helps your incubator work less and keeps your eggs safe. This means more healthy chicks and early spring layers for your flock!
Managing Humidity in Dry Winter Air
Why Winter Air Is Dry Indoors
You might see your house feels drier in winter. This is because heaters warm the air but take away moisture. When you heat cold air from outside, it cannot hold much water. This makes the air inside your house dry. Dry air can make you feel colder, so you turn up the heat. This uses more energy and makes the air even drier. Dry air also makes your body lose heat faster, so you feel chilly. Using a humidifier adds moisture and helps your house feel warmer.
Tip: Dry air in winter is normal, but it makes hatching eggs harder. Chicks need the right humidity to grow and hatch well.
Humidity Targets for Incubation and Hatch
Chicken eggs need steady humidity to hatch healthy chicks. The targets do not change in winter. For most of the time (days 1–18), keep 45–55% relative humidity in your incubator. In the last three days (lockdown), raise it to 65–75%. This helps chicks break out of their shells.
|
Incubation Stage |
Humidity Range (%) |
What to Do |
|---|---|---|
|
Days 1–18 |
45–55 |
Fill water channels, check daily |
|
Days 19–21 (Hatch) |
65–75 |
Add extra water, use a sponge |
You do not need to change these numbers for winter. What changes is how much you must work to keep them steady. Dry winter air can pull water from your incubator, so check humidity often.
Raising Humidity in Dry Homes
There are many ways to raise humidity for your incubator in winter. Some ways use machines, and some use simple tricks.
-
Use a humidifier: A small or big humidifier adds water to the air. Steam humidifiers let you control the amount.
-
Increase water surface in the incubator: Fill all water channels. Add shallow trays or jars with wet sponges or paper towels. More water surface means more evaporation.
-
Limit lid openings: Each time you open the incubator, you lose warm, wet air. Try to look through a window or only open the lid when needed.
-
Improve room conditions: Sealing and insulation help keep water in the air. Good ventilation systems, like HRVs or ERVs, help keep humidity balanced.
-
Behavioral habits: Dry clothes outside if you can. Use kitchen fans and bathroom fans only when needed so you do not lose too much moisture.
🐣 Note: Raising humidity helps chicks grow right and hatch on time. Small changes in your house and incubator can help a lot.
By keeping humidity steady, you help your chicks hatch strong and healthy, even when winter air is dry. This step is important for a good winter hatch and early spring chicks.
Winter Chicken Care for Chicks and Brooders
Brooder Temperatures by Week
When your chicks first leave the incubator, they need a warm and safe brooder. The right temperature helps them grow strong and healthy. Start with 95°F for the first week. Lower the temperature by 5°F each week until the chicks have feathers and can handle room temperature. Use a thermometer to check the heat at chick level. Watch your chicks for signs of comfort. If they huddle under the heat source, they feel cold. If they spread out and pant, they feel too hot. Adjust the lamp or heater as needed.
|
Week |
Temperature |
|---|---|
|
0-1 week |
95°F |
|
1-2 weeks |
90°F |
|
2-3 weeks |
85°F |
|
3-4 weeks |
80°F |
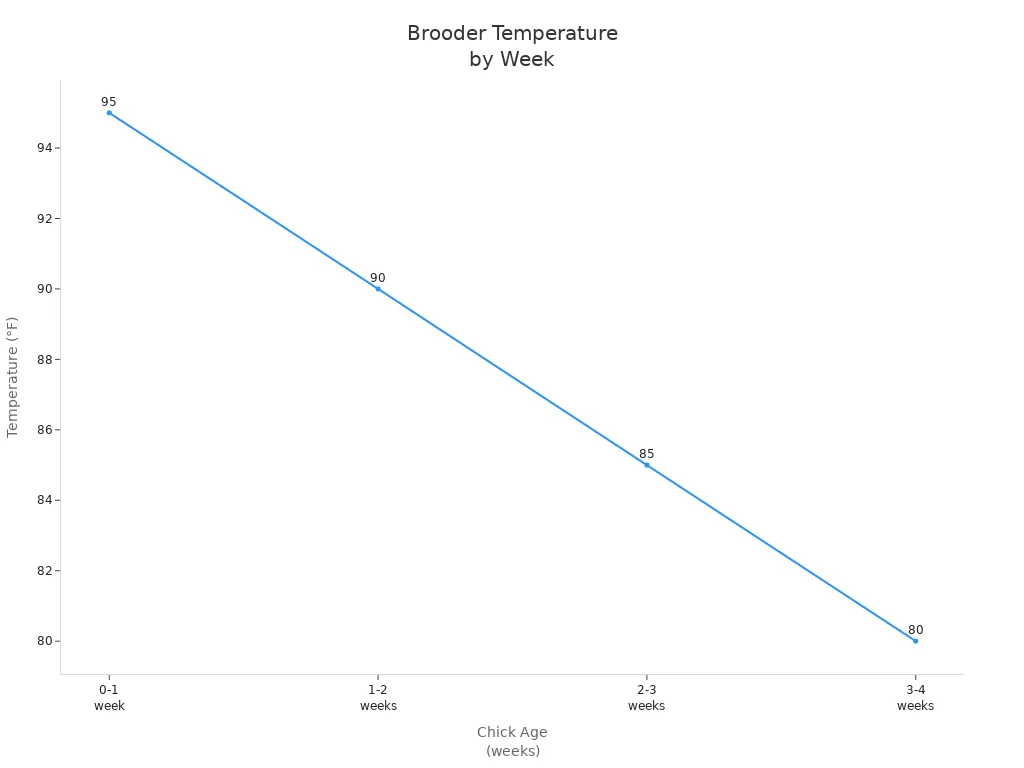
-
Monitor the temperature with a thermometer.
-
Adjust the heat lamp’s height based on chick behavior.
Tip: Place the heat lamp or heater securely. Keep it far enough from the chicks to avoid overheating and follow all manufacturer fire-safety instructions.
Safe Brooder Locations in Winter
Pick a spot for your brooder that stays warm and dry. Many people use a utility room, laundry room, or a corner of the kitchen. These places keep chicks close and easy to check. If you use a garage or shed, make sure it stays above 60°F and has no drafts. Always keep the brooder away from direct wind. Use a draft shield, like cardboard or plastic, to block cold air but leave space for fresh air to flow.
-
Choose an indoor spot, like a home or heated garage.
-
Make sure the area is weather-proof and not drafty.
-
Keep the brooder dry to prevent frostbite.
-
Use a heat lamp to create a warm area and let chicks move to cooler spots if needed.
-
Check for an electrical outlet for your heater.
Note: Good ventilation keeps the air fresh and helps control moisture.
Backup Heat and Power Tips
Winter storms can cause power outages. You need a plan to keep your chicks warm if the heat goes out. Several backup options work well:
-
Ceramic heat emitter bulbs give steady warmth without light, so chicks rest better at night.
-
Heat plates mimic a mother hen and help chicks wean off heat faster.
-
Homemade brooder heaters can work in cold weather and save money if built and used safely.
If you expect a storm, prepare extra blankets or towels to wrap around the brooder for short-term warmth. Keep a battery-powered or propane heater ready if you live in an area with frequent outages. Always check that any backup heat source is safe for indoor use, rated for the space, and placed away from flammable materials.
🐥 Keeping your brooder warm and draft-free helps your chicks thrive after they hatch chicks in winter. With the right setup, you can hatch early and enjoy strong, healthy birds ready for spring.
Winter Hatching Economics and Timing
Incubator Electricity Use and Cost
You might wonder how much it costs to run an incubator in winter. The good news is that hatching eggs indoors usually uses very little electricity for a small batch. A typical foam incubator draws about 40 watts and runs for about half the day. Over a 21-day hatch, this often adds up to roughly the cost of a cup of coffee on a typical electric bill, but real numbers depend on your local power rates and room conditions. Even if you run several hatches through the cold months, the cost stays modest. Larger cabinet incubators use more power, but most backyard keepers use small desktop models. These units are energy-efficient and easy to manage in a warm room.
💡 Tip: Placing your incubator in a draft-free, heated room helps it use less energy. The heater does not need to work as hard, so you save money and keep temperatures steady for your eggs.
Early Chicks for Spring Layers
Hatching chicks in winter gives your flock a head start. When you set eggs in January or February, your chicks will reach point of lay by early summer. Most laying breeds start producing eggs at 18 to 24 weeks old. This means you get fresh eggs right when your family wants them most—during summer picnics and outdoor breakfasts.
Here is a simple timeline for winter hatching:
-
Set eggs indoors in late January or early February.
-
Chicks hatch after 21 days.
-
Raise chicks in a warm brooder for 4 to 6 weeks.
-
Move pullets outside when fully feathered and weather warms up.
-
Expect first eggs by June or July.
This timing matches the best foraging season and peak egg demand. Your hens will be healthy, strong, and ready to lay just as the days get longer.
🥚 Note: Early chicks mean more eggs sooner. You also avoid the spring rush for chicks at local stores.
Buying Incubators in the Off-Season
Winter is a smart time to buy an incubator. Many stores offer discounts after the fall hatching season. You have more choices and can take your time learning how your incubator works. Practicing in winter helps you master temperature and humidity control before the busy spring months.
Benefits of buying in winter:
-
Lower prices and better selection
-
More time to read instructions and test settings
-
Less competition for popular models
-
Early practice leads to better hatch rates in spring
🛒 Tip: Set up your incubator early and run a test cycle before adding eggs. This helps you spot any issues and gives your chicks the best chance to thrive.
Winter hatching saves money, gives you early eggs, and helps you build a strong, productive flock for the year ahead.
Winter Incubation Checklist and Tracking
Setup and Daily Check List
A checklist helps you stay on track and not forget steps during winter incubation. Print this list and keep it close to your incubator. Mark off each task as you finish it.
Before You Start:
-
Pick a warm, draft-free room (65–75°F).
-
Put your incubator on a foam pad or towel.
-
Plug in the incubator and let it warm up for 24 hours.
-
Fill all water channels to keep humidity up.
-
Place a digital thermometer and hygrometer inside.
-
Gather your supplies: brooder pen, heat source, thermometer, chick feed, chick grit, feeders, and waterers.
Daily Tasks:
-
Check the incubator’s temperature and humidity every morning and night.
-
Add water if the humidity is too low.
-
Turn eggs at least three times a day, unless you have an automatic turner.
-
Candle eggs on Day 7, then every 3–4 days to see if they are growing.
-
Write down egg weights and air cell size if you can.
-
Watch for problems, like sudden drops in temperature or humidity.
📝 Keeping a daily log helps you find problems early and get better hatching results.
Troubleshooting Flowchart
Winter can make incubation tricky. Use this easy chart to fix common problems:
|
Problem |
What to Check |
What to Do |
|---|---|---|
|
Temperature too low |
Room draft, heater working |
Move incubator, check power |
|
Humidity too low |
Water channels empty, dry air |
Add water, use sponge or tray |
|
Eggs not developing |
Egg freshness, turning |
Candle eggs, remove clears |
|
Chicks late to hatch |
Low temp, low humidity |
Review logs, adjust next time |
|
Power outage |
Backup heat ready? |
Use blankets, restore power fast |
⚡ Always have a backup plan for heat and power, especially if winter storms hit.
Notes for Room and Hatch Results
You can get better results by tracking your room and hatch rates. Keep a notebook or use a digital diary. Number each egg and write down its weight every day. Eggs should lose about 10–15% of their weight in 21 days. Write down the room’s temperature and humidity each day. Note when you candle eggs and which ones are growing. After hatching, record how many chicks hatched and any problems you saw.
This record shows what works best in your house. You can change your setup for better results next time. Tracking your winter incubation helps you get more healthy chicks and a stronger flock for spring.
You can succeed with winter hatching by following a few simple steps. Keep your incubator in a warm, draft-free room and watch the temperature and humidity every day. Use the checklist to track your progress. A careful cold-weather plan gives you early spring layers, healthy chicks, and a strong flock. With good preparation, you enjoy the rewards of early eggs and a happy flock, even when there is snow outside.
FAQ
How long does it take to hatch chicken eggs in winter?
You will need about 21 days to hatch chicken eggs, just like in any other season. The process does not change in winter if you keep the incubator at the right temperature and humidity.
Do I need to change incubator settings for winter?
No, you do not need to change the target temperature or humidity. Keep forced-air incubators at 99.5°F and humidity at 45–55% for most of the hatch. Only the room conditions may need extra attention.
Can I collect eggs from outside in freezing weather?
Yes, you can collect eggs in winter. Bring them inside quickly so they do not freeze. Cold eggs may not hatch well. Store them at room temperature before placing them in the incubator.
How much does it cost to run an incubator in winter?
A small incubator typically uses only a few kilowatt-hours of electricity for a 21-day hatch. Cabinet incubators cost more. Placing your incubator in a warm room helps save energy.
What should I do if the power goes out during incubation?
If the power goes out, wrap the incubator in blankets to keep heat in. Restore power as soon as possible. Short outages usually do not harm eggs, but longer ones can lower hatch rates.
When will my winter chicks start laying eggs?
Chicks hatched in late winter will start laying at 18–24 weeks old. You can expect your first eggs by early or mid-summer. This timing gives you fresh eggs when your family wants them most.
Can I use a broody hen to hatch eggs in winter?
Most hens do not go broody in winter. Cold weather makes it hard for hens to keep eggs warm. An incubator gives you better control and safer hatching during the cold months.
Data authenticity note: The temperature, humidity, incubation time, brooder temperature, and example electricity-use ranges in this guide are drawn from standard poultry-incubation handbooks, small-flock and backyard chicken guides, household incubator manuals, and aggregated hatch logs from keepers in cold and moderate climates. Values are rounded into practical working ranges for home use rather than strict laboratory limits. Always follow the instructions for your specific incubator and heat sources, monitor your own climate and results, and consult a poultry vet or local extension agent if you have welfare or disease concerns.
References
-
Poultry incubation and hatchery-management textbooks describing recommended temperature, humidity, turning schedules, and brooder temperatures for chicken eggs.
-
Household egg-incubator user manuals outlining digital controls, heater wattage, and winter operating guidance for desktop and cabinet incubators.
-
Small-flock and backyard chicken guides from agricultural extension services on winter housing, power-outage planning, and cold-weather chick care.
-
Aggregated hatch logs and notes from hobby keepers tracking winter room temperatures, humidity, egg weight loss, and hatch outcomes across multiple seasons.
-
General avian veterinary advice on safe brooder heating options, hand-rearing risks, and when to seek professional help for chicks and adult birds.


0 Comments