

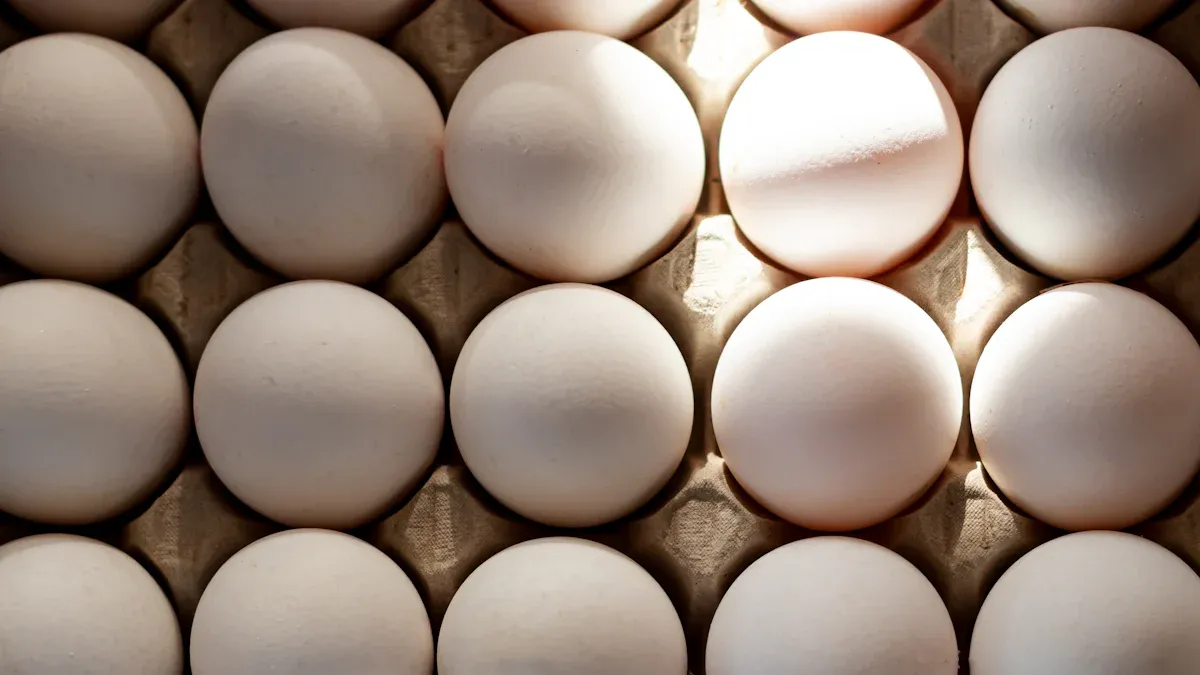
When you buy an incubator for hen eggs with trays and turners, you want healthy chicks. You should look at tray fit, turner type, turning angle, and how often it turns. You also need to check temperature and humidity control. Make sure the incubator is reliable. These things help chicks grow strong and increase hatch rates.
Tip: Pick an automatic egg incubator with simple trays and a good turner. This helps you get more chicks from your eggs.
See how real numbers show why these features matter:
|
Feature |
Value |
|---|---|
|
Temperature |
37.5 °C |
|
Humidity |
55% |
|
Tray Fit |
Tilting trays mechanism |
|
Hatchability |
89.47% |
|
Hatched Eggs |
85 out of 95 fertile eggs |
If you are new to this, a smallholder, a teacher, or a hobby breeder, pick an easy-to-use incubator. The right incubator makes hatching eggs simple and fun. These numbers are illustrative; actual results depend on your setup and should be judged by air-cell growth and weight-loss targets.
Key Takeaways
-
Pick an incubator that turns eggs by itself and has trays that fit your eggs. This helps more chicks hatch and keeps them healthier.
-
Keep the temperature and humidity at the right levels. Set forced-air incubators to 99.5°F. Start humidity around 45–55% and adjust by air-cell growth and egg weight; aim for about 12–14% total weight loss by day 18.
-
Stop turning the eggs on day 18 to get ready for hatching. This is important so chicks can settle and breathe well. For a full 21-day flow, see the automatic incubator setup guide.
-
Use universal trays if you have different egg sizes. This makes sure all eggs have enough space and warmth.
-
Test your incubator before you use it. This helps you find problems with temperature or humidity early.
Trays and Turners
When you look at an automatic egg incubator, trays and turners make a big difference in your hatch results. Let’s break down what you need to know.
Tray Styles
You’ll find a few main tray styles in most incubators:
-
Universal trays: These hold different egg sizes, from bantam to large hen eggs. You can use them for mixed batches.
-
Fixed-size trays: These fit one egg size best. They work well if you always hatch the same type.
-
Rolling trays: These let eggs roll gently as the turner moves. They’re great for even turning.
A good tray keeps each egg safe and spaced out. This helps air flow and makes sure every egg gets the same warmth. If you use a universal tray, check that your eggs don’t touch each other or the tray walls.
Tip: Mark a small “X” and “O” on each egg shell. Watch how the eggs turn. This helps you check if your egg incubator turner works right.
Turner Types
Egg incubator turner types matter a lot. You’ll see:
-
Automatic turners: These move eggs for you. You set them and let the incubator do the work.
-
Manual turners: You turn eggs by hand. This takes more time and you might forget a turn.
-
Rocking turners: These tilt the tray back and forth. They give a gentle, even turn.
Turning angle and frequency are key. The best angle is about 43° per side. Too shallow? Chicks can stick to the shell. Too steep? Eggs might roll too much. Most automatic turners in a good automatic egg incubator hit the sweet spot.
How often should you turn? Turning on a steady rhythm helps. Check out this table (illustrative):
|
Turning Frequency (times/day) |
Hatchability Rate (%) |
Early Mortality (%) |
Late Mortality (%) |
|---|---|---|---|
|
24 |
91.84 |
2.84 |
3.57 |
|
12 |
85.23 |
14.31 |
8.05 |
|
6 |
76.33 |
— |
— |
|
3 |
72.14 |
— |
— |
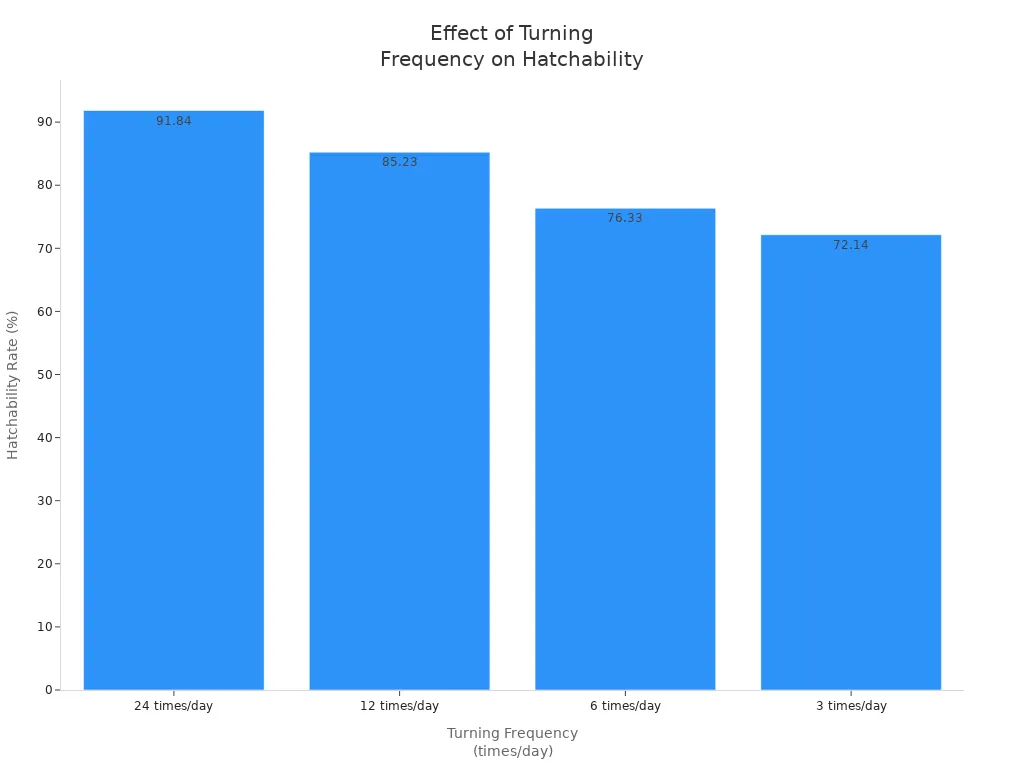
You want your egg incubator turner to follow a consistent schedule: about every 60–120 minutes works well for most home setups. If you use automatic turners, you reduce missed turns and keep conditions steady.
Note: To check your egg incubator turner, mark the shell and time one full cycle. This quick test helps you spot problems before you set all your eggs.
Choose an incubator with automatic turners and trays that fit your eggs. This makes hatching easier and boosts your success.
Incubator for Hen Eggs
Forced-Air vs Still-Air
When you pick an incubator for hen eggs, you will see two main types. These are forced-air and still-air. They work in different ways. Your choice can change how many chicks hatch.
Forced-air incubators have a fan that moves air around. This keeps the temperature even everywhere inside. Most beginners like forced-air incubators because they are simple and stable.
Still-air incubators do not have a fan. Air moves on its own. This makes warm and cool layers inside. You need to check the temperature more often and measure it at the top of the eggs.
Here is a table to show how these two types compare:
|
Incubator Type |
Hatch Rate Comparison |
Additional Notes |
|---|---|---|
|
Still-Air |
Often lower |
Needs more checking, costs less |
|
Forced-Air |
Often higher |
Even temperature, easier to care for |
Tip: If you want fewer adjustments, choose a forced-air incubator for hen eggs. In home use, many keepers report higher success than with still-air models.
You must set the right temperature for each type. Forced-air incubators work best at 99.5°F. Still-air incubators need a higher temperature, about 102.0°F, at the top of the eggs. Keeping the temperature steady helps eggs grow well and hatch better.
-
Forced-air incubator for hen eggs: Set to 99.5°F (37.5°C).
-
Still-air incubator for hen eggs: Set to 102.0°F (38.9°C) at egg-top.
If you use a forced-air automatic egg incubator, you get even heat. You do not have to move eggs or check for hot spots. Just set the temperature and let the incubator work.
Sensor Placement
Where you put the sensor matters in any incubator for hen eggs. In a forced-air incubator, the fan mixes the air, so readings are more even.
Still-air incubators need more care. Warm air goes up and cool air goes down. This makes layers inside. You must put the sensor at the same height as the eggs. If it is too high or too low, you get the wrong temperature. This can hurt the eggs and lower hatch rates.
|
Sensor Placement |
Why It Matters |
|---|---|
|
Forced-Air |
Fan mixes air; readings more uniform |
|
Still-Air |
Put sensor at egg-top to stop hot/cold spots |
Note: Always check your temperature before you set eggs. Run your incubator for hen eggs for a few hours and watch the numbers. This helps you find problems early and gives your chicks a good start.
If you want easy hatching and less work, pick a forced-air automatic egg incubator. You get steady temperature, better hatch rates, and more success.
Capacity and Fit
Choosing the right incubator means you need to think about egg capacity and how your eggs fit inside. If you pick an incubator that matches your needs, you make hatching easier and boost your chances of success.
Standard, Bantam, Oversized Eggs
Eggs come in different sizes. You might have standard hen eggs, bantam eggs, or even oversized eggs. Not every incubator tray fits all types. Some trays work best for one size, while others can handle a mix.
Here’s a quick look at how incubator types match up with egg capacity and user needs:
|
Incubator Type |
Egg Capacity Range |
Ideal User Description |
|---|---|---|
|
Mini Incubators |
1-12 eggs |
Great for classrooms, science projects, or kids. |
|
Tabletop Incubators |
1-130 eggs |
Perfect for backyard breeders or personal use. |
|
Cabinet Incubators |
50-500 chicken eggs |
Good for small farms starting out. |
|
Commercial Incubators |
1000+ chicken eggs |
Made for large-scale operations. |
If you have standard eggs, most tabletop incubators will work. Bantam eggs are smaller, so you need trays that hold them snugly. Oversized eggs need more space, so check the tray design before you buy.
Tip: Always count your eggs before you set them. Make sure the tray holds each egg safely and leaves space for air to move.
Mixed Sizes
Sometimes you want to hatch different egg sizes at once. Mixing bantam and large eggs in one incubator is possible, but you need to compromise on egg capacity and fit. Universal trays help, but you should keep larger eggs near the middle and smaller eggs on the sides.
Here’s what you can do:
-
Use universal trays for mixed batches.
-
Place larger eggs where the turning angle is gentle.
-
Make sure every egg gets enough space.
-
Adjust the tray if you see eggs touching.
If you use an automatic egg incubator, check the egg capacity for mixed sizes. Some incubators list egg capacity for standard eggs only, so you may fit fewer oversized eggs or more bantam eggs. Always check the manual for exact egg capacity numbers.
Egg capacity matters for every hatch. If you fill the incubator too much, eggs may not get enough air or heat. If you use too few eggs, you waste space and energy. Find the balance that fits your needs and helps you reach success.
Turning Settings
Angle
Getting the turning angle right in your incubator makes a big difference for your chicks. If you use an egg incubator turner, you want each egg to tilt between 38° and 45° to each side. This range keeps the embryo in the best position and helps it grow strong. Angles less than 35° can cause chicks to get stuck or not hatch at all. A turning angle close to 45° gives you the best hatch rates.
-
Set your egg incubator turner to tilt each egg about 43° per side.
-
Avoid shallow angles. These can lead to more embryo deaths.
-
Too much tilt can make eggs roll or bump into each other.
If you use mixed egg sizes, like bantam and large eggs, set the angle for the largest egg. This way, every egg gets enough movement without risking damage.
Tip: Mark your eggs with an “X” on one side and an “O” on the other. Watch how your egg incubator turner moves them. This helps you spot problems early.
Frequency
How often you turn eggs in your incubator matters just as much as the angle. Turning keeps the embryo from sticking to the shell and helps it develop right. If you use an automatic egg incubator, set it to turn eggs every 60–120 minutes. This schedule works well for most hatches.
-
Turn eggs at least five times a day for good results.
-
The minimum is three times a day, but a steadier rhythm helps.
-
Automatic turning every 60–120 minutes gives you a reliable baseline.
Manual turning takes more effort. If you do it by hand, set a timer so you do not miss a turn. For mixed egg sizes, keep the same turning schedule. Just make sure the angle fits the largest egg.
A good egg incubator turner and the right settings help you get healthy chicks and a higher hatch rate.
Humidity and Temperature
Getting humidity and temperature right in your incubator is the secret to strong chicks and high hatch success rates. You want to create the best environment for every egg. Let’s break down what you need to do at each stage.
Set Stage
During the set stage, which covers days 0 to 17, you need to keep a close eye on temperature and humidity. Your incubator should hold a steady temperature between 37.5°C and 37.8°C. This range helps the embryo start development and keeps things safe for your eggs.
For humidity, begin around 45–55% RH and adjust using air-cell growth and weigh-ins. The practical goal is roughly 12–14% total weight loss by day 18. If air cells grow too slowly, lower RH a little; if too fast, raise it.
Here’s a quick checklist for the set stage:
-
Temperature: 37.5–37.8°C (99.5°F)
-
Humidity: start 45–55% and fine-tune by air-cell/weights
-
Use your incubator’s humidity control features to stay in range
-
Check temperature and humidity daily
Tip: Use a digital thermometer and hygrometer. These tools help you spot changes fast and keep your automatic egg incubator running smoothly.
Hatch Stage
When you reach days 18 to 21, you enter the hatch stage. Now, you need to adjust temperature and humidity for the final push. Keep temperature at 99–100°F. Raise humidity to 65–70% (68% is a safe default). This higher humidity helps chicks break out of their shells without sticking.
Proper humidity and temperature during the hatch stage are key for hatchability. Eggs should lose about 12–14% of their starting weight by hatch day. This weight loss shows that moisture is leaving the egg at the right pace.
-
Temperature: 99–100°F
-
Humidity: 65–70% (use 68% as default)
-
Target egg weight loss: 12–14% by hatch
Note: If you use an incubator with automatic humidity control, you make things easier. You just set the numbers and let the incubator do the work.
Keep your incubator’s temperature and humidity steady. Watch your eggs and make small changes if needed. Good control means better hatch success rates and healthy chicks.
Lockdown and Hatcher
When to Stop Turning
You reach a big milestone on day 18 of your hatch. This is when you start the lockdown period. You need to stop turning every egg at this point. Here’s why:
-
The embryo moves into position for hatching.
-
The chick starts to breathe air and needs to settle.
-
Turning after day 18 can hurt the chick’s chances.
Once you stop turning, raise the humidity in your incubator to at least 65%. This helps the chick break through the shell. Close the incubator lid and keep it closed. You want to keep the temperature and humidity steady for the best hatch results.
Tip: Mark your calendar for day 18. That’s your signal to start lockdown and stop turning every egg.
Hatch Workflow
During lockdown, you need to follow a simple workflow to boost your hatch success:
-
Set your incubator to 98.5°F (37.5°C) and 65–70% humidity.
-
If you use a separate hatcher, move the eggs gently at this stage.
-
Make sure the incubator has good ventilation. Open vents a little to let in fresh air, but don’t create drafts.
-
Avoid opening the incubator during lockdown. Each time you open it, you lose heat and humidity. This can make it harder for chicks to hatch.
Here’s a quick table for hatcher settings:
|
Stage of Incubation |
Temperature (°C) |
Humidity (%) |
|---|---|---|
|
Hatching |
37.5 |
65–75 |
Keep the incubator in a spot with good airflow. Don’t put it in a closed room. Chicks need more oxygen as they hatch. Good air quality helps prevent problems like ammonia buildup.
Note: Once you see the first pip (a small crack in the shell), do not open the incubator. The high humidity keeps the membrane soft so chicks can hatch easily.
Lockdown is your final step before chicks arrive. If you follow these steps, you give every egg the best chance for a healthy hatch.
Room and Power
Placement
Where you put your incubator can make a big difference in your hatch results. You want a spot that stays quiet and has a steady temperature. Avoid placing your incubator near windows, heaters, or air conditioners. Sunlight and drafts can mess with the temperature inside and hurt your eggs.
Pick a table or shelf that is flat and strong. Make sure you can reach the incubator easily. You need to check the controls and water tray without moving the incubator. If you have pets or small kids, keep the incubator out of their reach.
Here’s a quick checklist for the best placement:
-
Choose a room with little foot traffic.
-
Keep the incubator away from direct sunlight.
-
Avoid spots near doors or vents.
-
Make sure the power cord is safe and not stretched across walkways.
Tip: Plug your incubator into a surge protector. This helps protect your eggs if the power flickers or goes out.
Test-Run and Storage
Before you set your first egg, run a test with your incubator. Plug it in and let it run for at least 24 hours. Watch the temperature and humidity. Make sure the controls work and the turner moves smoothly. If you spot any problems, fix them before you add eggs.
When you store eggs before setting, follow these steps:
-
Store eggs for no more than 7 days at 53-59°F with 75-85% humidity.
-
Always keep eggs pointy-end down.
-
Turn eggs once a day to keep the yolk from sticking.
-
Avoid cleaning eggs unless you must. If you do, use warm water.
-
Discard any cracked, misshapen, or very large or small eggs.
A good test-run and proper storage help you avoid surprises. You give your eggs the best chance for success. Your incubator works best when you prepare the room and follow these simple steps.
Shopping Checklist
When you shop for an incubator, you want it to be easy to use. You also want your chicks to be healthy. Use this checklist to help you pick the best one for your eggs.
Features
Look for these features when you choose an incubator:
-
Pick a size that fits your needs, like mini, tabletop, or cabinet.
-
A viewing window lets you see eggs without opening the lid.
-
External water fill or automatic watering makes humidity control simple.
-
Alarms or app monitoring warn you if temperature or humidity changes.
-
Trays and surfaces should be easy to clean to stop germs.
-
Spare parts and sensor calibration help your incubator last longer.
-
Make sure the voltage and plug type work in your home.
Tip: Automatic watering keeps humidity steady. You do not need to open the incubator. This helps keep the temperature stable and makes hatching easier.
Here is a table that explains what each feature does:
|
Feature |
Explanation |
|---|---|
|
Automatic turning |
Moves eggs often, so you open the lid less |
|
Auto-humidity or external water ports |
Keeps humidity steady, which is important at the end |
|
Alarms / App monitoring |
Lets you know about problems quickly |
|
Easy cleaning |
Stops germs and saves time |
|
Low noise & viewing window |
Good for classrooms and homes |
|
Sensor calibration & spare parts |
Makes your incubator last longer |
Modern incubators have smart features that help you. See how these upgrades make things better:
|
Feature |
Benefit |
|---|---|
|
Automatic Watering |
Keeps humidity steady and saves you work |
|
Energy Efficiency |
Uses less electricity than old models |
|
Digital Control Systems |
Holds temperature steady and saves more energy |
|
Automatic Turning |
Helps more chicks hatch and saves energy by keeping the lid closed |
Maintenance
Taking care of your incubator helps you get more chicks. Here is what you should do:
-
Clean trays and turners after every hatch to stop germs.
-
Check the egg incubator turner before each use to make sure it moves well.
-
Calibrate sensors once a season to keep readings right.
-
Replace old parts with new ones from the maker.
-
Store your incubator in a cool, dry place when you are not using it.
Note: Cleaning and checking sensors often helps you avoid problems. A clean incubator means more chicks and less stress.
Quick Buying Checklist
-
Does the incubator hold the number of eggs you want?
-
Can you fill water from outside or use automatic watering?
-
Is there a clear window to see the eggs?
-
Are alarms or app controls included?
-
Is it easy to clean after each hatch?
-
Can you get spare parts and help if needed?
-
Does the voltage and plug work in your home?
FAQ
Q: How many eggs can I hatch at once?
A: Check the incubator’s size. Mini models hold 1–12 eggs. Tabletop models hold up to 130 eggs. Cabinets can hold 50–500 eggs.
Q: Why do I need automatic turning?
A: An egg incubator turner moves eggs for you. This helps more chicks hatch and keeps embryos healthy.
Q: How do I keep humidity steady?
A: Use an incubator with automatic watering or an external water fill. Start at 45–55% during days 0–17 and adjust by air-cell growth/weights; raise to about 68% for the last three days.
Q: What if the temperature changes?
A: Alarms or app monitoring warn you fast. You can fix problems before they hurt your eggs.
Q: How do I clean my incubator?
A: Take out trays and turners. Wash them with warm water and mild soap. Dry everything before you use it again.
Product Recommendation
If you want an incubator with all the right features, try the EggBloom Automatic Egg Incubator — 3 Trays. It has automatic turning, easy cleaning, a clear window, and external water fill. The digital controls keep temperature and humidity steady. This incubator is good for small and medium hatches. It is great for beginners and hobbyists. You can focus on your eggs and enjoy hatching with less worry.
Troubleshooting
Common Issues
Sometimes, you may have problems with your incubator for eggs. Most problems are easy to fix. Here are some common issues and what you can do:
-
Power failure: Check if the power is working. Make sure the incubator is plugged in right.
-
Unstable temperature: Put the incubator in a room with steady temperature. Stay away from windows, heaters, or air conditioners.
-
Low humidity: Check water reservoirs and increase water surface area (sponges/channels) if RH drops, especially during hatch days.
-
Ventilation balance: Do not close vents just to raise humidity. Keep fresh air and adjust water surface area instead.
-
Wrong incubation temperatures: Always set the incubator to the right temperature. This helps stop chicks from being weak or deformed.
-
Wrong egg position: Put eggs with the small end down. Turn them at least three times a day if you use a manual turner.
-
Sick or weak breeder flock: Use eggs from healthy hens. Ask for NPIP blood tests if you are not sure.
Tip: If you get weak chicks or low hatch rates, check temperature and humidity first. Small changes can help your hatch do better.
Calibration
Calibrating your incubator’s sensors keeps your eggs safe. You want the temperature and humidity to be correct. Here is why calibration is important:
-
Right temperature helps embryos grow well.
-
Good humidity stops eggs from drying out or getting germs.
-
Even conditions help all eggs grow the same.
-
Calibration helps you get more chicks and better quality.
-
Good data helps you make smart choices next time.
How do you calibrate your incubator?
-
For temperature: Put your digital sensor at the same height as a mercury thermometer. Do this when the incubator is empty for best results.
-
For humidity: Use a simple saturated-salt test in a sealed bag or box (about 75% RH) to check your hygrometer, then rely on air-cell growth and weight-loss records to guide real-world settings.
Note: Calibrate often to find problems early. Do this after cleaning or before you start a new batch of eggs.
If you follow these steps, you will fix most problems and help your eggs hatch well.
When you choose an incubator for hen eggs, think about what is most important. Pick one with easy temperature and humidity controls. Make sure it has automatic turning and trays that fit your eggs well. Reliable incubators with clear windows let you watch your eggs and keep things tidy. A high hatch rate means your hard work is worth it.
|
Factor |
Why It Matters |
|---|---|
|
Turning Mechanisms |
Keeps embryos healthy |
|
Airflow |
Gives eggs fresh air |
|
Temperature Control |
Stops harmful swings |
|
Humidity Control |
Helps chicks hatch strong |
|
Easy Observation |
Lets you check progress |
|
Cleaning Ease |
Prevents germs |
|
Cost |
Matches your budget |
Quick Checklist:
-
Automatic turner and good trays
-
Simple controls and alarms
-
Easy to clean
-
Good support and spare parts
Pick an incubator that makes hatching easy and fun. You will get better chicks and feel less worried.
Data authenticity note: temperatures, humidities, angles, frequencies, and stop-days in this guide reflect common poultry-hatching practice, equipment manuals, and aggregated keeper logs. We avoid external links here; if you need, we can provide a brief source description list without URLs.


0 Comments