
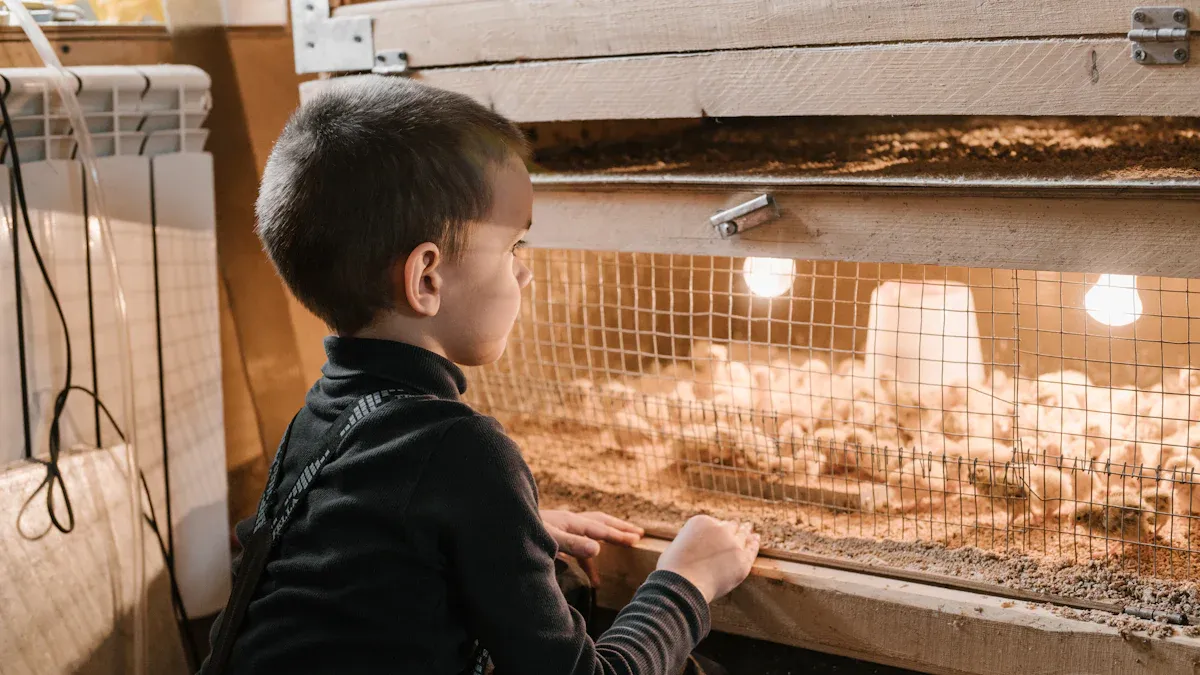
You want your chicks warm. You also want a setup that feels safe. A brooder plate fits the first weeks because chicks can tuck in, then step out. A wall heater fits the coop stage because it supports the space on cold nights. If you want one place that covers coop heat and adult care, start here: Coop Heating and Adult Care.
What you need to know fast
- Use a brooder plate for week 0 to week 4. Chicks slip under it like they would under a hen.
- Use coop heat after that when nights get sharp. A wall heater supports the coop space when birds sleep out there.
- Watch the chicks. Calm and spread out means they are fine. A tight pile means they feel cold.
Pick the heat by chick stage
Choosing heat can feel messy. Chicks grow fast. Weather flips fast. We can still make this simple, so you know what to use tonight.
Weeks 0 to 4 Brooder plate
During the first weeks, chicks cannot hold their own body heat well. A brooder plate gives them one warm spot they can choose, and that keeps the brooder calmer. If you want a simple, low-watt option that fits small flocks, take a look at our safe chicken brooder heater plate.
This is the simple schedule most extension guides use. You measure at chick level under the heat source. You adjust based on chick behavior.
|
Week |
Temperature (°F) |
Temperature (°C) |
|---|---|---|
|
1 |
95 |
35 |
|
2 |
90 |
32.2 |
|
3 |
85 |
29.4 |
|
4 |
80 |
26.7 |
|
5 |
75 |
23.9 |
|
6 |
70 | 21.1 |
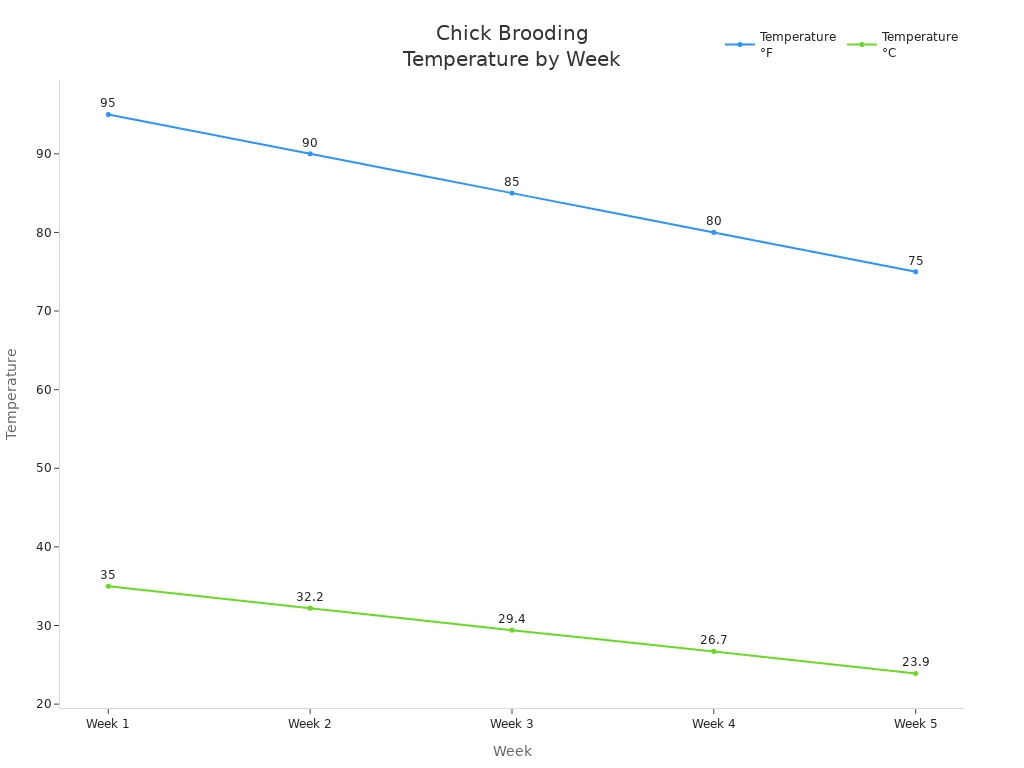
You want to keep the temperature at chick level, right under the plate. Lower the plate as chicks grow, so they always feel cozy but not crowded. Watch their behavior for clues:
-
Chicks spread out evenly and peep softly when comfortable.
-
If they huddle tightly under the plate and chirp loudly, they feel cold.
-
If they avoid the plate, pant, or look droopy, it’s too hot.
You can make this simple. You watch the birds. You adjust one thing at a time. That is how you keep a calm brooder and a steady coop.
Wall Heater for 4+ Weeks or Cold Nights
Once your chicks hit four weeks, they start growing feathers and need less direct heat. If you live somewhere with chilly nights or drafty coops, a wall heater can help keep the whole space warm. Wall heaters don’t touch the chicks. Instead, they raise the air temperature in the coop, making sure your growing flock stays comfortable as they explore and roost.
You will want to watch temperature at bird height, not up by the ceiling. On the common schedule, week five sits near 75°F under the heat source, and week six sits near 70°F. You keep stepping down toward normal temperatures if the birds stay calm, and you avoid big swings at night.
Tip: Place a thermometer at chick level in the coop. If the temperature drops below 70°F and your chicks huddle or avoid roosting, turn on the wall heater for extra warmth.
If you’re curious about which wall heater works best for your setup, visit our wall heater product page for options and safety tips.
The 6-Week Transition for Chickens
The 4–6 week window is where most chicken keepers get stuck. Your chicks look bigger, but they’re not always ready for the full chill of the coop, especially if nights get cold or the coop has drafts. This stage is all about watching your chicks and the weather.
Here’s what to look for:
-
Feathers help a lot, but wind and damp can still bite. You should watch how the birds sleep at night and adjust from there.
-
If you see them piling up, shivering, or avoiding the roost, they need more heat.
-
If they spread out, sleep quietly, and use the roost, they’re comfortable.
During this transition, you might use both a brooder plate and a wall heater, especially if you have a big temperature swing at night. Move the plate into the coop for a few nights, or run the wall heater on low. Always check for drafts and dampness, since these make chicks lose heat faster.
If you want a step-by-step guide for this tricky stage, see our checklist for moving chicks from brooder to coop.
Remember: Every flock and every coop is different. Trust your eyes and ears. Happy, active chicks mean you’ve got the heat just right.
How a brooder plate helps chicks
It feels like a hen above them
A brooder plate gives your chicks the kind of warmth they would get from a mother hen. This setup mimics mother hen by letting chicks slip under the plate whenever they feel cold. You’ll notice that chicks can come and go as they please, just like they would with a real hen. Here’s what happens when you use a brooder plate:
-
Chicks huddle under the plate for warmth, then wander out to eat, drink, or explore.
-
The plate provides safe radiant heat from above, which feels natural and comforting.
-
Chicks learn to regulate their own temperature by choosing when to warm up or cool off.
-
The warmth stays focused at chick level, so you don’t overheat the whole brooder.
This natural approach helps chicks grow strong and confident. You create a space that feels familiar and secure, which supports their welfare.
Preventing Piling and Panic
Using heat plates helps reduce piling and panic among chicks. When chicks feel cold or scared, they tend to pile up in corners. This can lead to injuries or even smothering. With a brooder plate, you give them a safe spot to gather, which lowers stress and keeps them calm. As chicks mature, they start to roost instead of piling, showing that they feel secure in their environment.
Observing Chick Behavior Under the Plate
You can learn a lot by watching your chicks under the brooder plate. Look for these signs:
-
Chicks spread out evenly and move in and out of the plate area.
-
If they huddle tightly or chirp loudly, the temperature may be too low.
-
If they avoid the plate or seem lethargic, the temperature might be too high.
You can make this simple. You watch the birds. You adjust one thing at a time. That is how you keep a calm brooder and a steady coop.
How a wall heater helps in the coop
It warms the coop zone, not one chick
When feathers come in and the birds start spending nights in the coop, the job changes. You are not warming a single corner anymore. You are taking the sting out of cold air and drafts.
Here’s a quick look at energy use:
|
Heating Method |
Wattage |
Energy Efficiency Comparison |
|---|---|---|
|
Brooder Plate |
Low watt | Often lower power than a heat lamp. Exact use depends on the model. |
|
Wall Heater |
Low to mid watt | Usually still modest, but it supports more space. Placement matters more than raw numbers. |
When Wall Heaters Are Needed
You should consider a wall heater when the temperature drops below freezing or if you notice waterers starting to ice up. Chicks need extra heat in winter, especially in cold climates. Products like the Heater Plate and Coop Heater work well for keeping chicks warm during harsh weather. If your coop feels drafty or damp, a wall heater can help maintain a safe temperature for your chickens.
Tip: The main goal is to keep the temperature above freezing for your chicks, not to make the coop feel warm for people.
Quick Safety Tips for Wall Heaters
Safety matters when you add heat to your coop. Follow these steps to keep your chicks safe:
-
Secure your heater so it cannot fall, and make sure the heating surface is enclosed.
-
Pick a heater made for small spaces.
-
Keep at least 6 inches between the heater and the ground or any bedding.
-
Use a device like to regulate temperature automatically.
-
Ventilate the coop to prevent overheating.
-
Keep a backup generator ready for power outages.
You want to avoid fire hazards. Never use a heat lamp in the coop, since loose wires and exposed bulbs can ignite bedding like straw or wood shavings. Always check your setup before turning on the heat.
If you need more details, check out our coop heating guide or visit the wall heater product page for safe options.
Brooder plate vs wall heater side by side
Pros and cons by stage
You want your chicks to grow strong and healthy. Choosing between a brooder plate and a wall heater depends on your chicks’ age and your setup. Let’s break it down so you can make the right call.
|
Feature |
Brooder Plate (0–4 Weeks) |
Wall Heater (4+ Weeks/Cold Nights) |
|---|---|---|
|
Safety |
No fire risk, safe for chicks |
Safe if mounted, but not for direct chick contact |
|
Energy Efficiency |
Uses less energy, saves money |
Uses more energy, heats the whole coop |
|
Natural Heat |
Mimics mother hen, lets chicks self-regulate |
Warms air, not as focused as plates |
|
Adjustment |
Easy to raise as chicks grow |
Fixed position, not for tiny chicks |
|
Cost |
Higher upfront, lower long-term cost |
Good for winter, not needed for young chicks |
|
Best Use |
Early brooder heat, small groups |
Older chicks, cold weather, large coops |
A brooder plate gives gentle, focused heat for young chicks. Plates let chicks slip under for warmth, just like with a hen. Wall heaters work best when your chickens move to the coop and need help on cold nights. Wall heaters keep the air warm but do not replace a brooder plate for tiny chicks.
Note: A wall heater is not a brooder plate. Use a brooder plate for chicks under four weeks. Switch to a wall heater only when your flock is older and the coop gets cold.
Common Mistakes to Avoid
You want to avoid these common errors:
-
Using a wall heater for baby chicks. Chicks need direct brooder heat from plates, not just warm air.
-
Leaving a brooder plate in the coop after chicks feather out. Older chicks may not need extra heat.
-
Ignoring chick behavior. If chicks pile up or avoid the heat, check your setup.
-
Setting the temperature too high or too low. Aim for a temperature of 95 degrees f in week one, then lower it each week.
-
Relying on a traditional heat lamp. Heat lamps can cause fire and overheat chicks.
You can make this simple. You watch the birds. You adjust one thing at a time. That is how you keep a calm brooder and a steady coop.
The 4 to 6 week checkpoint
This 4 to 6 week stretch is where many people feel stuck. You move chicks toward the coop, and then a cold night hits. Use this checklist and you will make a safer call.
Tonight decision steps
-
Check the temperature at chick level in your brooder or coop. A common week-six target is about 70°F at chick level under the heat source, then you keep stepping down if the chicks stay comfortable.
-
Watch your chicks for signs of comfort. Are they spread out and quiet, or huddled together?
-
Feel the bedding and walls. If they feel cold or damp, your chicks may need more warmth.
-
Adjust your heat source if needed. Lower the brooder plate or heat lamp by an inch or two if chicks seem cold.
-
Look for drafts. Use a flashlight at night to spot cracks or holes where cold air sneaks in.
-
Make sure your wall heater or brooder plate is working safely.
-
Download our free heat-and-winter checklist or brooder setup checklist for more tips. Subscribe with your email to get it delivered right to your inbox!
Tip: Using heat plates helps you give chicks the warmth they need without overheating the whole coop.
Signs Your Chicks Need More Heat
-
Chicks huddle tightly together, especially under the heat source.
-
You hear loud peeping or see restless movement.
-
Chicks fluff their feathers, shiver, or look sleepy.
-
Cold feet or avoiding the roost at night.
-
Chicks seek out any source of warmth.
If you spot these signs, adjust your heat source right away. Chick comfort and welfare depend on quick action.
Fixing Drafts in the Brooder or Coop
-
Seal doors and windows to block drafts.
-
Check for cracks or holes and patch them up.
-
Use a flashlight at night to find spots where light escapes.
-
Keep ventilation above the chickens’ heads, not at chick level.
-
Avoid placing vents where wind blows directly on your chicks.
-
Make sure you have enough airflow to prevent moisture and frost.
You can make this simple. You watch the birds. You adjust one thing at a time. That is how you keep a calm brooder and a steady coop.
Quick questions about brooder plates
Can I Use a Wall Heater for Baby Chicks?
You might wonder if a wall heater can do the brooder job. It usually cannot. Tiny chicks need warm air right where their bodies are, and they need it all night.
-
Most extension guides start chicks at about 95°F at chick level under the heat source for the first week, then you step it down by about 5°F each week as long as chicks stay comfortable.
-
A heat lamp or brooder plate works best for direct, focused warmth.
-
Wall heaters warm the air but may not keep chicks cozy enough.
-
Always use a thermostat to avoid overheating or chilling your chicks.
-
Lower the heat source or move it farther away each week to help chicks adjust.
If you want your chicks to thrive, stick with a brooder plate or heat lamp until they grow bigger. Wall heaters work better once your flock moves to the coop.
When to Stop Using a Brooder Plate?
You can usually stop using a brooder plate when your chicks reach about six weeks old. By this age, they have most of their feathers and can handle cooler temperatures. Many chicken keepers move their chicks to the coop around this time. Watch your chicks—if they spread out, sleep quietly, and don’t huddle for warmth, they’re ready for the next stage.
What’s Safer in a Small Brooder?
Safety matters, especially in a small brooder. Many experienced keepers choose chick heat plates for indoor setups because:
-
They lower fire risk compared to a heat lamp.
-
Chicks act more naturally, moving in and out for warmth.
-
Heat plates use less electricity, saving you money over time.
If you want peace of mind and happy chicks, a heat plate is a smart choice for small spaces. You’ll keep your chickens safe and help them grow strong.
What to look for when you shop
Shopping is easier when you know what to look for. You do not need a long list. You need a few checks that match your stage.
Here is what matters when you compare options at the store or online.
- Brooder plate: Pick one with steady gentle heat and legs you can raise as chicks grow.
- Wall heater: Pick a mounted panel style that keeps bedding away and gives birds a warm zone.
- Cold-weather plan: Spend time on dry bedding and draft control, then add low, steady heat if you still need it.
When you pick a heat source, think about safety and how natural it feels for your chicks. Heating plates act like a mother hen. Chicks can move in and out, so they stay comfortable without overheating. Heat lamps work, but they can be risky because of fire hazards and harsh light.
You do not need to buy everything at once. A brooder plate gets you through the early weeks. A wall heater is the longer play for coop nights and winter. If you want the safety basics in plain talk, read Chicken Coop Heaters: When Heat Helps—and How to Use It Safely.
You can make this simple. You watch the birds. You adjust one thing at a time. That is how you keep a calm brooder and a steady coop.
You can make this simple. You watch the birds. You adjust one thing at a time. That is how you keep a calm brooder and a steady coop.
More quick answers
Can I use a wall heater for baby chicks?
No, you should not. Baby chicks need direct warmth from a brooder plate. Wall heaters work best for older, feathered chicks in the coop.
When should I stop using a brooder plate?
You can stop when your chicks have full feathers, usually around six weeks. Watch for them sleeping apart and acting comfortable without extra heat.
What’s safer in a small brooder: plate or wall heater?
You can make this simple. You watch the birds. You adjust one thing at a time. That is how you keep a calm brooder and a steady coop.


0 Comments