
Starting a classroom incubation project gives you a unique way to explore life science with your students. You can expect different hatch rates depending on the source of your eggs:
- Local eggs can achieve a hatch rate of approximately 80%.
- Shipped eggs usually have a hatch rate between 25% and 50%.
During a classroom embryology project, you might face challenges. Sometimes, eggs do not hatch, which can be disappointing. Careful environmental management matters because temperature and humidity affect success. A teacher's guide helps you prepare for both successful and unsuccessful outcomes. This guide supports responsible care and ethical decisions throughout the process.
Key Takeaways
- Starting a classroom incubation project offers hands-on learning about life cycles and biology. Students observe the transformation from egg to chick over 21 days.
- Assign daily tasks to students to foster responsibility and empathy. Caring for eggs and chicks teaches them the importance of nurturing living things.
- Monitor temperature and humidity closely to ensure successful hatching. Use a thermometer and hygrometer to maintain optimal conditions.
- Plan for the chicks' future before starting the project. Ensure you have suitable homes lined up to avoid ethical concerns after hatching.
- Engage students in daily tasks like candling eggs and recording observations. This involvement enhances their learning experience and builds essential skills.
Classroom Incubation Educational Benefits
Science and Life Cycle Learning
You give your students a hands-on learning experience when you start a classroom incubation project. Students see the life cycle of a chick from start to finish. They watch as a single cell grows into a chick over 21 days. This process helps students understand important biology concepts.
- Students learn about embryonic development.
- They see how temperature and humidity affect chick survival.
- They explore the cycle of life, seeing how eggs become chickens and chickens lay eggs.
You can teach students to record data on temperature, humidity, and egg turning. This practice helps them understand how environmental conditions support life. Students also learn that careful observation and data collection are important in science.
Responsibility and Empathy
You help students build responsibility by letting them care for eggs and chicks. Each student can take turns watching the incubator and making sure the eggs stay safe. Students learn that living things need attention and care.
Tip: Assign daily tasks so everyone feels involved and learns to care for animals.
As students care for the chicks, they develop empathy. They see how their actions affect the well-being of another living thing. This lesson stays with them long after the project ends.
Teamwork and Observation Skills
Classroom incubation encourages teamwork. Students work together to share responsibilities. They take turns checking the incubator and caring for the chicks.
- Students learn to listen to each other’s ideas.
- They share their observations and ask questions.
- They develop patience as they wait for the eggs to hatch.
You will notice students communicating more and working as a team. They learn that science is not just about facts, but also about working together and sharing discoveries.
Classroom Incubation Planning and Preparation Guide
Setting Goals and Expectations
You set the foundation for a successful classroom incubation project by establishing clear goals and expectations. Begin by researching the science and technology behind incubating eggs. This knowledge helps you explain the process to your students and answer their questions. Create a checklist of all the materials you need, such as an incubator, thermometer, and fertile chicken eggs. Gather these materials before you start, checking that each item works properly.
Plan your lessons to cover the entire incubation period, which usually lasts three to four weeks. Design activities that teach students about the life cycle, proper care, and the importance of maintaining temperature and humidity. Prepare your students by explaining the guidelines for incubating and hatching, setting ground rules for safety and responsibility. Choose a spot in your classroom that is safe, stable, and away from drafts. If you need help, reach out to local farmers or poultry experts for advice.
Tip: Train students to measure temperature and humidity in the incubator. Have them record data in their incubation logs to monitor conditions and learn about environmental factors.
Sourcing Fertile Eggs from Reputable Suppliers
You increase your chances of a successful hatch by choosing fertile eggs from reputable suppliers. Look for eggs that are clean and free from contamination. Inspect the eggshells for cracks or thin spots, as these can lower hatchability. Select eggs with strong, intact shells and avoid those with loose air cells. These steps help you provide the best environment for incubating eggs and support healthy chick development.
Note: Always handle eggs gently and store them in a cool, stable place before incubation begins.
Choosing the Right Incubator for Your Classroom
Selecting the right incubator makes the process easier and more reliable. Compare features to find a model that fits your classroom needs. The table below highlights important features to consider:
| Feature | Description |
|---|---|
| Temperature Stability | Ensures a consistent temperature throughout the incubation period. |
| Humidity Control | Maintains the right environment, especially for longer incubation periods. |
| Automatic Features | Reduces the need for constant monitoring and adjustments, making it easier for classroom use. |
| Ease of Use | Simplifies setup and operation, which is crucial for teachers with limited time. |
Test your incubator at least two weeks before you begin incubating and hatching. Use a min/max thermometer to find the best location for temperature stability. Consider using a hygrometer to monitor humidity, especially if you plan to incubate for the full 21 days.
Tip: Reliable equipment and careful planning help you create a safe and educational experience for your students.
Gathering Essential Supplies and Materials
You need to gather all the right tools before you start your classroom egg incubation project. Having everything ready helps you avoid problems and keeps the process smooth. Here is a list of essential items you should prepare:
- Incubator: Choose one that fits your classroom size and has good temperature and humidity controls.
- Thermometer and Hygrometer: Use these to check the temperature and humidity inside the incubator.
- Fertile Eggs: Get these from a trusted supplier to increase your chances of a successful hatch.
- Egg Turner (optional): This device helps turn the eggs automatically, so you do not have to do it by hand.
- Water Source: Keep water nearby to maintain the right humidity in the incubator.
- Candling Light: Use this tool to check the development of the embryos inside the eggs.
- Incubation Log or Journal: Record daily observations, temperature, and humidity readings.
- Brooder Box: Prepare a safe space for chicks after they hatch.
- Chick Feeder and Waterer: Make sure the chicks have easy access to food and water.
- Starter Feed: Buy special feed made for baby chicks.
- Bedding Material: Use paper towels or pine shavings for the brooder box.
Tip: Organize your materials in a labeled box or bin. This makes it easy for students to find what they need and helps keep the classroom tidy.
Planning for Chicks After Hatching
You must plan ahead for what happens after the chicks hatch. Chicks need a warm, safe place to grow during their first weeks. Set up a brooder box before hatch day. Place it in a quiet area of your classroom, away from drafts and loud noises.
A brooder box should have:
- A heat lamp or brooder plate to keep chicks warm (about 95°F for the first week)
- Clean bedding that you can change often
- A chick feeder filled with starter feed
- A waterer that is shallow and easy for chicks to reach
Check the brooder temperature every day. Lower the heat by 5°F each week as the chicks grow. Watch the chicks for signs of stress. If they huddle under the lamp, they may be cold. If they move away from the heat, they may be too warm.
Plan for the chicks’ future. Decide where the chicks will go after they leave your classroom. Contact local farms, 4-H clubs, or families who can care for them. Make sure you follow all school and local rules about keeping animals.
Note: Always have a rehoming plan in place before you start. This ensures the chicks have a safe and healthy life after your project ends.
Incubator Setup in the Classroom
Selecting a Safe and Stable Location
You need to choose a spot in your classroom that keeps the incubator safe and steady. Place it on a flat surface, such as a sturdy table or counter. Avoid areas near windows, doors, or vents. These places can cause drafts or sudden changes in temperature. Keep the incubator away from direct sunlight and busy walkways. Students should be able to see the eggs, but not bump into the incubator.
Tip: Mark the area around the incubator with tape or signs. This helps remind everyone to be careful.
Preparing the Incubator for Operation
Before you start, gather all your materials. Make sure the incubator is clean and dry. Plug it in and let it run for at least 24 hours before adding chicken eggs. This step helps you check if the temperature and humidity stay steady. Fill the water tray inside the incubator to help control humidity. Set up the thermometer and hygrometer so you can monitor the environment. If your incubator has an automatic egg turner, test it to make sure it works.
- Wipe down the incubator with a damp cloth.
- Check that all parts are working.
- Place the thermometer and hygrometer where you can read them easily.
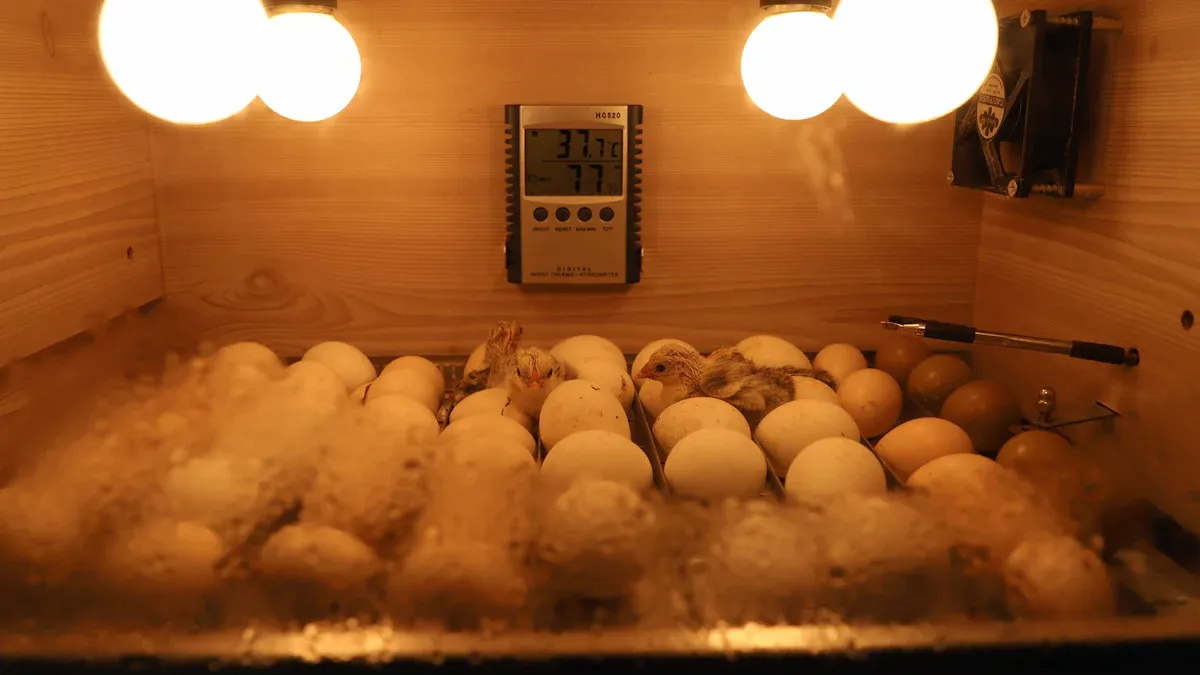
Checking Temperature and Humidity Levels
You must keep the right temperature and humidity for the eggs to develop. Most classroom incubators work best at 99.5°F (37.5°C). Humidity should stay between 45% and 50% for chicken eggs during most of the incubation period. For the last three days, raise the humidity to 65-75%. Use the table below to check the recommended settings for different types of eggs:
| Type of Egg | Temperature (°F/°C) | Humidity (%) | Incubation Days |
|---|---|---|---|
| Chickens | 99.5°F / 37.5°C | 45-50% | 21 |
| Ducks | 99.5°F / 37.5°C | 50-60% | 28 |
| Geese | 99.5°F / 37.5°C | 50-60% | 28-32 |
| Quail | 99.9°F / 37.5°C | 45-50% | 16-23 |
| Lockdown | - | 65-75% | Last 3 days |
- Keep humidity at about 50-65% until the last three days.
- Increase humidity to 70-90% during the final days before hatching.
Check the readings every morning and afternoon. Write down the numbers in your incubation log. If you notice changes, adjust the water tray or move the incubator to a better spot. Careful monitoring helps your eggs develop into healthy chicks.
Placing Eggs in the Incubator
You have checked the temperature and humidity. Now you are ready to place the eggs in the incubator. Handle each egg with clean, dry hands. Oils or dirt from your skin can block the tiny pores on the eggshell. This can harm the growing chick inside.
Follow these steps to place the eggs safely:
- Mark the Eggs: Use a pencil to draw a small "X" on one side and an "O" on the other. This helps you remember which eggs you have turned each day.
- Arrange the Eggs: Lay the eggs on their sides. Make sure the pointed end faces slightly downward. This position helps the embryo develop in the right spot.
- Space the Eggs: Leave a small gap between each egg. Good airflow is important for even temperature and humidity.
- Close the Lid: Once all eggs are in place, close the incubator lid gently. Avoid opening it unless you need to add water or turn the eggs.
Tip: If your incubator has an automatic egg turner, place the eggs according to the manufacturer's instructions. Double-check that the turner works before you leave the eggs unattended.
Check the eggs twice a day. Turn them gently if you do not have an automatic turner. Always wash your hands before and after handling the eggs. Keep a daily log of your actions and any changes you notice.
A table can help you track your egg placement and turning schedule:
| Egg Number | Date Placed | Last Turned | Notes |
|---|---|---|---|
| 1 | MM/DD | AM/PM | No cracks |
| 2 | MM/DD | AM/PM | Small spot |
| 3 | MM/DD | AM/PM | Good shell |
Careful placement and regular monitoring give your eggs the best chance to hatch healthy chicks.
Classroom Incubation Process Guide
Daily Egg Care and Monitoring
You play a key role in keeping eggs healthy during classroom incubation. Each day, you need to check several things to make sure the eggs develop well. Follow this guide to help you remember your tasks:
-
Temperature Management
Check the incubator temperature every morning and afternoon. Keep the temperature between 100°F and 102°F. Stable temperature helps the embryos grow. Avoid making frequent adjustments unless you see a problem. -
Humidity Control
Look at the humidity level inside the incubator. Aim for about 43–44%. Fill half the water troughs with warm water to keep the humidity steady. If the air feels dry, add a little more water. -
Egg Turning
Turn the eggs three times a day. Mark each egg with a pencil to track which ones you have turned. Stop turning the eggs on the 18th day. This helps the chicks get ready to hatch. -
Candling
Use a bright light in a dark room to check the eggs. Look for signs of embryo growth. Candling helps you spot eggs that are not developing.
Tip: Write down your daily checks in a log. This record helps you spot changes and solve problems quickly.
Turning Eggs Properly
Turning eggs is important for healthy chick development. You need to turn the eggs to keep the embryos from sticking to the shell. Follow these steps to turn eggs the right way:
- Turn chicken eggs about 80 degrees every hour. This movement copies what a mother hen does.
- For parrot eggs, turn them about 180 degrees a few times each hour. These eggs need more frequent and larger turns.
- Mark each egg with an "X" on one side and an "O" on the other. This helps you remember which eggs you have turned.
- Always use clean hands when turning eggs. Handle them gently to avoid cracks.
- Stop turning eggs two days before hatching. For chickens, this means you stop on Day 19.
Note: If you use an automatic egg turner, check that it works properly. Manual turning helps you stay involved in the process.
Candling Eggs to Check Development
Candling lets you see inside the eggs without opening them. You use a bright light in a dark room to check for embryo growth. Follow these steps to candle eggs:
- Hold the egg with clean hands.
- Shine a flashlight or candling lamp at the large end of the egg.
- Look for veins, a dark spot, or movement inside the egg. These signs show that the embryo is growing.
- If you see a clear egg with no veins or dark spot after seven days, the egg may not be fertile.
- Write down your findings in your incubation log.
Candling helps you spot eggs that are not developing. Remove eggs that show no growth to keep the incubator clean and safe.
Tip: Candle eggs on Day 7 and Day 14. This schedule helps you track progress and make decisions about which eggs to keep.
Common problems can happen during classroom incubation. Use the table below to help you solve issues:
| Problem Description | Resolution |
|---|---|
| Chicks having trouble hatching | Decide whether to help based on the chick's condition and discuss with students. |
| Low humidity causing chicks to be too dry | Increase humidity to help chicks hatch. |
| Chicks helped out may have deformities | Be careful when assisting hatching to avoid harm. |
You may also notice low temperature, poor ventilation, or eggs set in the wrong position. Keep the incubator at the right temperature, increase ventilation if needed, and set eggs with the small end down. Turn eggs at least three times daily.
Remember: Careful monitoring and gentle handling help you create a safe environment for eggs and chicks.
Troubleshooting Common Incubation Issues
You may encounter several challenges while incubating eggs in your classroom. This guide helps you identify problems early and take action to improve hatch rates. Careful observation and quick responses keep your project on track.
1. Temperature Fluctuations
Eggs need a stable environment. If the incubator temperature drops or rises, embryos may not develop properly.
- Check the temperature at least twice daily.
- Place the incubator away from windows, vents, and direct sunlight.
- If you notice a sudden change, adjust the settings and monitor closely.
Tip: Use a backup thermometer to confirm the incubator’s reading. Record any changes in your incubation log.
2. Humidity Problems
Humidity affects how chicks develop and hatch. Low humidity can cause chicks to stick to the shell. High humidity may lead to weak chicks.
- Fill the water tray as needed to maintain proper humidity.
- Use a hygrometer to check levels.
- Increase humidity during the last three days before hatching.
| Issue | Signs | Solution |
|---|---|---|
| Low Humidity | Dry shells, stuck chicks | Add water, cover vents |
| High Humidity | Weak chicks, wet shells | Reduce water, open vents |
3. Poor Egg Turning
Turning eggs prevents embryos from sticking to the shell. If you forget to turn eggs, chicks may not develop correctly.
- Mark eggs with a pencil to track turning.
- Turn eggs at least three times a day.
- Stop turning eggs three days before hatching.
Note: Automatic turners help, but always check that they work as expected.
4. Egg Contamination
Dirty eggs or hands can introduce bacteria. Contamination may cause eggs to rot or smell bad.
- Wash your hands before handling eggs.
- Clean the incubator before starting a new batch.
- Remove any eggs that crack or leak.
5. Poor Hatch Rates
Sometimes, only a few eggs hatch. Several factors can cause this issue.
- Source eggs from healthy, reputable suppliers.
- Avoid using eggs with cracks or thin shells.
- Monitor temperature and humidity closely.
| Cause | Prevention |
|---|---|
| Old or infertile eggs | Use fresh, fertile eggs |
| Rough handling | Handle eggs gently |
| Unstable environment | Keep conditions consistent |
6. Chicks Struggling to Hatch
Some chicks may have trouble breaking out of their shells.
- Wait and watch before helping. Chicks often need time.
- If a chick struggles for more than 24 hours, consider gentle assistance.
- Discuss with students why intervention should be rare.
Alert: Helping too soon can harm the chick. Only intervene if you see clear signs of distress.
7. Mold or Bad Odors
Mold or foul smells signal a problem inside the incubator.
- Remove affected eggs immediately.
- Clean the incubator with a mild disinfectant.
- Check for leaks or cracks in eggs.
Quick Troubleshooting Table
| Problem | What You See | What You Do |
|---|---|---|
| Temperature drops | Cold incubator | Adjust settings, check power |
| Humidity too low | Dry air, stuck chicks | Add water, close vents |
| No embryo growth | Clear eggs | Candle eggs, remove infertile |
| Moldy eggs | Spots, bad smell | Remove, clean incubator |
| Chicks not hatching | No movement | Wait, check humidity/temp |
Remember: Careful monitoring and quick action help you solve most incubation problems. Share your findings with students to teach problem-solving skills.
Guide to Hatching and Immediate Chick Care

Recognizing Signs of Hatching
You can spot the first signs of hatching eggs by watching and listening closely. Chicks begin the process by making a small crack in the shell, called a "pip." You might hear soft peeping sounds coming from inside the incubator even before you see any cracks. These sounds mean the chicks are getting ready to break out. After pipping, chicks start "zipping," which means they create a line around the shell so they can push themselves out.
Look for these signs during classroom hatching:
- Small cracks or holes in the eggshell (pips)
- Peeping or chirping sounds from inside the eggs
- A line forming around the shell as the chick moves to break free
Stay patient during this stage. The hatching process can take several hours.
When and How to Intervene
You may feel tempted to help chicks during incubating and hatching, but it is important to wait. Most chicks can hatch on their own if you follow best practices for hatching.
Resisting the urge to "help" is crucial. Intervening can injure or kill the chick. There is usually a good reason if a chick doesn’t hatch, and intervening can cripple or infect it.
If you have no experience with hatching eggs, do not pull away pieces of shell or try to assist. Let nature take its course. Only consider intervention if you see clear signs of distress and have guidance from an expert.
First Steps After Chicks Hatch
When the chicks hatch, you need to provide immediate care to keep them healthy. Wait until the chicks are dry and fluffy before moving them from the incubator. Place them in a warm brooder box set to 95-100°F for the first week. Give them fresh water right away. Use a shallow dish with marbles or small stones to prevent drowning. Keep the waterer away from the heat source and clean it daily. After a couple of days, introduce commercial chick starter feed.
These steps help your chicks adjust to their new environment and support their growth after hatching eggs in the classroom.
Post-Hatch Care and Safety Guide
Setting Up a Brooder in the Classroom
You need to prepare a safe and warm space for chicks after hatching eggs. A brooder keeps them comfortable as they grow. You can use a cardboard box about 2' x 2' x 1' for up to 12 chicks. Place the brooder in a quiet area away from pets and drafts. Keep the temperature between 90-95°F with a heat lamp or heat plate. Make sure the heat lamp has a metal guard and is clamped securely.
For bedding, use 1 to 2 inches of untreated pine shavings or chopped straw. This bedding absorbs moisture and gives chicks a non-slip surface. Avoid using newspaper because it can cause leg problems. Clean the brooder often to keep the environment healthy.
- Use a waterer that prevents drowning, like a dish with marbles.
- Place the brooder in a spot with little noise so chicks can rest.
Tip: Always check the temperature and bedding daily to keep chicks safe and comfortable.
Feeding and Watering Chicks
Chicks need water right after you move them to the brooder. They absorb the yolk sac for their first nutrition, but you should offer water immediately. Use shallow dishes or canning jars with marbles to prevent accidents. Give chick starter feed within a couple of days after hatching. Make sure fresh food and water are available twice a day.
- Change water and feed daily to prevent illness.
- Use commercial chick starter mash for balanced nutrition.
Note: Clean feeders and waterers every day to reduce the risk of disease.
Safe Handling and Student Involvement
You can let students help care for chicks, but always supervise them. Teach students to wash their hands with soap and warm water for at least 20 seconds after touching chicks or the brooder. Remind them not to touch their faces, mouths, or eyes during or after handling. Do not allow nuzzling or kissing the chicks.
| Health Issue | Monitoring Practice |
|---|---|
| Salmonella contamination | Practice good hygiene and supervise all handling. |
| Deformities from poor care | Keep chicks in a secure enclosure and monitor their environment. |
| Health problems from neglect | Inform parents and ensure chicks receive proper care. |
| Infectious disease risk | Limit direct contact and always wash hands after handling chicks or their habitat. |
Always use hand sanitizer if running water is not available.
You help students learn responsibility and empathy by involving them in incubating and hatching. Careful supervision keeps everyone safe and healthy.
Monitoring Chick Health
You play an important role in keeping your classroom chicks healthy. Careful observation helps you spot problems early and take action. Start by watching the chicks each day. Look for signs that show they feel well, such as active movement, bright eyes, and steady peeping. Healthy chicks eat and drink often. They move around the brooder and rest quietly when tired.
Use this checklist to help you monitor chick health:
- Check for alertness and activity.
- Watch for steady breathing and clean nostrils.
- Look at their eyes. Healthy eyes appear clear and bright.
- Make sure their legs and feet look straight and strong.
- Listen for normal peeping sounds.
If you notice any of these warning signs, act quickly:
| Warning Sign | What to Do |
|---|---|
| Lethargy | Move the chick closer to warmth. |
| Loss of appetite | Offer fresh food and water. |
| Labored breathing | Check for drafts or dust. |
| Droopy wings | Observe for other symptoms. |
| Pasty vent | Gently clean with warm water. |
Tip: Keep a daily health log for your chicks. Write down any changes in behavior or appearance. This record helps you track patterns and share information with a veterinarian if needed.
You can teach students to help with health checks. Assign simple tasks, such as counting chicks or checking water levels. Remind everyone to wash hands before and after handling. Good hygiene keeps both students and chicks safe.
If you see a chick that looks sick or weak, separate it from the group. This step prevents the spread of illness. Contact a local veterinarian or poultry expert for advice if you have concerns.
Classroom Incubation Rehoming and Long-Term Planning
Finding Suitable Homes for Chicks
You need to plan for the future of your chicks before you start hatching eggs in the classroom. Responsible rehoming ensures that every chick has a safe and caring environment after the project ends. Many teachers find success by reaching out to their own networks and local communities. Here are some effective strategies:
- Ask friends and family if they would like to adopt the chicks.
- Contact local organizations such as 4-H or Future Farmers of America. These groups often have members who are experienced in caring for young birds.
- Search online for local farms that may want to add new chicks to their flocks.
- Join social media groups focused on backyard chicken keeping. These groups can help you connect with people interested in adopting chicks.
Start your search early. This gives you enough time to find the best homes for your classroom hatch. Always check that adopters understand the needs of young birds and can provide proper care.
Legal and Ethical Considerations
You must think about both legal and ethical issues when planning a classroom hatching project. Many schools forget to plan for the fate of chicks after hatching. This can lead to unnecessary suffering or even death for the animals. Local animal shelters often cannot care for large numbers of chicks, so you should never rely on them for rehoming. Teaching students to care for chicks and then allowing harm to come to them sends the wrong message about animal welfare.
Follow these important steps:
- Arrange permanent homes for all vertebrates, including chicks, before you bring eggs into the classroom.
- Do not start a hatching project if you cannot guarantee a suitable home for every chick.
- Never release domestic animals into the wild.
You can also consider alternatives to live animal projects. Models, films, and guest speakers can teach students about biology and animal care without the ethical concerns of live hatching.
Classroom Incubation Tips and Student Engagement Guide
Involving Students in Daily Incubation Tasks
You can make your classroom incubation project more meaningful by giving students hands-on roles each day. When students take part in daily tasks, they feel responsible and excited about the process. Try these engaging activities:
- Candling eggs: Let students shine a light through the eggshell to observe embryo development. This activity helps them see the life cycle in action.
- Egg anatomy exploration: Have students break open a grocery store egg to study its parts. They learn what each part does and why it matters for survival.
- Temperature and humidity monitoring: Assign students to check and record the incubator’s conditions. They learn how these factors affect hatching success.
Tip: Rotate tasks so everyone gets a chance to participate and learn new skills.
Integrating Incubation into Lesson Plans
You can connect egg incubation to many subjects in your curriculum. This project gives students a direct way to understand biology and life sciences. Students see how reproduction and life cycles work by observing the incubation process and hatching.
- In science, students manage temperature and humidity, learning about environmental needs.
- In math, students track incubation days and calculate hatch rates.
- In art, students draw the stages of chick development.
- In language arts, students write stories or reports about their experiences.
These activities help students apply classroom knowledge to real-life situations and deepen their appreciation for nature.
Encouraging Observation and Journaling
You help students build important skills when you encourage them to keep observation journals. Journaling makes students active participants in the incubation process. They track egg development, monitor conditions, and reflect on their experiences. This practice fosters responsibility and empathy as they care for the chicks.
| Subject | Benefits of Observation Journals |
|---|---|
| Science | Students document stages of development, enhancing understanding of biology. |
| Math | Students track growth rates and calculate incubation periods, applying mathematical concepts. |
| Art | Students create drawings inspired by the chicks, fostering creativity. |
| Language Arts | Students write journals and stories, improving writing skills and engagement. |
Encourage students to write or draw in their journals every day. This habit helps them notice changes and ask thoughtful questions.
Classroom Incubation Checklist and Key Reminders
Pre-Incubation Checklist
You set your classroom up for success when you prepare before starting your egg incubation project. Use this checklist to make sure you have everything ready:
- Gather all supplies: incubator, thermometer, hygrometer, fertile eggs, candling light, brooder box, feed, and bedding.
- Check that the incubator works and holds a steady temperature.
- Store fertile eggs for no more than one week. Keep them at 50°F–65°F with about 70% humidity.
- Inspect eggs for cracks or dirt. Eggs should be clean and free from manure or organic matter. Do not wash eggs with water before incubation.
- Choose a safe, stable spot in your classroom for the incubator.
- Plan for the care and rehoming of chicks after they hatch.
Tip: Review your checklist with students so everyone understands the steps in this guide.
Daily and Weekly Task List
You help your eggs develop well when you follow a regular routine. Here is a simple list to keep you on track:
Daily Tasks
- Check and record incubator temperature and humidity.
- Turn eggs at least three times a day if you do not use an automatic turner.
- Add water to maintain humidity as needed.
- Observe eggs for any signs of damage or contamination.
Weekly Tasks
- Candle eggs to check for development.
- Clean around the incubator and brooder area.
- Review your records and update your incubation log.
| Task | Frequency | Who Can Help? |
|---|---|---|
| Temperature check | Daily | Students |
| Egg turning | Daily | Students/Teacher |
| Candling | Weekly | Teacher |
| Brooder cleaning | Weekly | Teacher/Students |
Safety and Hygiene Reminders
You protect yourself and your students when you follow good hygiene practices during incubation. Keep these reminders in mind:
- Wash your hands before and after handling eggs, chicks, or any equipment.
- Do not eat or drink near the incubator or brooder.
- Keep eggs clean but never wash them with water before incubation.
- Sanitize all tools and surfaces before and after use.
- Store eggs properly and avoid using eggs that are dirty or cracked.
- Supervise students closely when they handle chicks or equipment.
Remember: Good hygiene reduces health risks and keeps your classroom safe for everyone.
Classroom Incubation Further Resources Guide
Recommended Books and Websites
You can find many helpful resources to support your classroom incubation project. Books and websites give you extra information and ideas for activities. These resources help you answer student questions and solve problems during the project.
Books:
- Hatching Chicks in Room 6 by Caroline Arnold
This book shows real classroom incubation with clear photos and simple explanations. - A Chicken’s Life by Nancy Dickmann
You learn about the life cycle of chickens, from egg to adult. - From Egg to Chicken by Gerald Legg
This book explains each stage of chick development in easy language.
Websites:
- University of Illinois Extension: Incubation and Embryology
- American Egg Board: Eggcyclopedia
- Backyard Chickens Classroom Resources
Tip: Bookmark these sites so you can find answers quickly during your project.
Local Support and Community Contacts
You can connect with local experts to make your classroom incubation project even better. Local farmers, 4-H clubs, and agricultural extension offices often offer advice and hands-on help. These contacts can visit your classroom or answer questions about caring for chicks.
| Resource Type | How They Can Help |
|---|---|
| Local farmers | Share tips and may provide fertile eggs |
| 4-H clubs | Offer youth programs and chick care info |
| Extension offices | Give science-based advice and materials |
| Feed stores | Supply feed and equipment for your chicks |
You can also ask your school district if they have a science coordinator or animal care guide. These people may know about local rules or extra resources.
Note: Building a network helps you solve problems and gives your students a richer learning experience.
You can lead a successful classroom incubation project by preparing carefully, monitoring daily, and planning for the chicks’ future. When you guide students through hatching, you help them learn science and empathy. Reach out to local experts and use trusted resources for extra support. Share your experiences with other teachers to inspire more classrooms to try this rewarding project.
FAQ
What should you do if none of the eggs hatch?
You should review your incubation log for temperature or humidity problems. Check if the eggs were fertile. Clean the incubator before trying again. Talk with a local poultry expert for advice.
Tip: Use this as a learning moment to discuss life cycles and science experiments.
How often should you turn the eggs?
You should turn the eggs at least three times each day. This prevents the embryo from sticking to the shell. Stop turning the eggs three days before the expected hatch date.
- Use a pencil to mark each egg for easy tracking.
Can you keep the chicks in the classroom after they hatch?
You can keep chicks in the classroom for about one to two weeks. Chicks need a warm, safe brooder. Plan for their future homes before starting the project.
Note: Never release chicks into the wild.
What if a chick looks sick or weak?
You should separate the sick chick from the others. Check its food, water, and warmth. Write down any symptoms in your log. Contact a local veterinarian or poultry expert for help.
Always wash your hands after handling chicks.
Is it safe for students to handle chicks?
You can let students handle chicks with supervision. Teach everyone to wash hands before and after touching chicks. Limit handling time to keep chicks calm and healthy.
| Safety Rule | Why It Matters | |---------------------|--------------------------| | Wash hands | Prevents illness | | Gentle handling | Keeps chicks safe | | Supervise students | Ensures proper care |


0 Comments