
You will see a muscovy incubation chart that assists you daily with every Muscovy duck egg. This Muscovy Duck Egg Incubation Guide discusses essential factors such as temperature, humidity, turning, candling, misting, and other important steps. Many beginners achieve a 90% hatch rate by utilizing the muscovy incubation chart. Muscovy ducks require 35 days to hatch, while other duck breeds typically hatch in 28 days.
|
Duck Type |
Incubation Period |
|---|---|
|
Muscovy Ducks |
35 Days |
|
Normal Ducks |
28 Days |


- 15
- 30
It is advisable to print or save the muscovy incubation chart for daily reference. Using Duck Egg Incubators and the Auto-Turn Dual-Motor Egg Incubator will help you adhere to the correct incubator settings for Muscovy duck hatchi.
Key Takeaways
-
Muscovy duck eggs take 35 days to hatch. Use the daily incubation chart for the best results.
-
Keep the right temperature and humidity during incubation. Change the settings as days go by to help the embryos stay healthy.
-
Turn the eggs often and begin cooling and misting on day 10. This copies what happens in nature and helps more eggs hatch.
Muscovy Incubation Chart: Day-by-Day Guide
To hatch muscovy duck eggs, you need a simple guide. This chart tells you what to do each day. It covers things like temperature, humidity, turning, cooling, misting, and candling. Muscovy duck eggs need more care than other duck eggs. You must follow every step to get healthy ducklings.
Temperature and Humidity by Day
Keep muscovy duck eggs at the right temperature and humidity. The chart below shows what settings to use. Change your incubator as the days go by.
|
Day Range |
Temperature (°C) |
Humidity (%) |
Notes |
|---|---|---|---|
|
Day 1–7 |
37.2 |
55–60 |
Start incubation, monitor closely |
|
Day 8–21 |
37.2 |
60–65 |
Slight humidity increase |
|
Day 22–30 |
37.0 |
65–70 |
Prepare for misting and cooling |
|
Day 31–35 |
37.0 |
75–80 |
Lockdown, boost humidity for hatching |
Raise humidity in the last days to help ducklings hatch. Use a water pan or a wet sponge to keep it high. Do not open the incubator during the last three days.
Turning and Cooling Schedule
Turning the eggs helps the embryos grow well. Turn the eggs at least four times each day. If you have an automatic incubator, it turns the eggs every hour. Muscovy duck eggs need cooling too. Start cooling the eggs every day from day 10.
-
Turn muscovy duck eggs four times daily.
-
Use an automatic turner for hourly turning.
-
Begin cooling on day 10. Take eggs out for 30 minutes each day. Spray them with water at room temperature. Do not let eggs get colder than 86ºF.
-
Cooling and misting copy what happens in a nest. These steps make embryos stronger and help more ducklings hatch.
Misting and Humidity Boost
Misting is important for muscovy duck eggs. Start misting on day 10 and keep going until day 25. Spray eggs with warm water after cooling. This keeps humidity steady and helps embryos grow.
|
Day Range |
Action |
Purpose |
|---|---|---|
|
Day 10-25 |
Misting with warm water |
Maintains humidity, cools eggs, prevents drowning at hatching |
Raise humidity to 65–70% in the last three days. Add a big sponge or more water to boost humidity. Good humidity stops chicks from sticking to the shell or having rough navels. Too much humidity can cause problems with the yolk sac.
Tip: Always use clean, warm water for misting. Never mist before day 10.
Candling Muscovy Duck Eggs
Candling lets you see how the eggs are growing. Candle the eggs on day 7, day 10, day 12, day 22, and day 26–27. Look for veins, movement, and bill activity near the air sac. Take out any eggs that are not growing.
|
Day |
Indicators |
Actions |
|---|---|---|
|
Day 7 |
Dark spot near air cell, live embryo |
Remove infertile eggs |
|
Day 10 |
Healthy veins, visible embryo |
Remove nonviable eggs |
|
Day 12 |
Movement, clear veins |
Monitor development |
|
Day 22 |
Embryo fills egg, air sac visible |
Prepare for hatching |
|
Day 26-27 |
Bill movement inside air sac |
Final checks before hatching |
Candling helps you find problems early. Blood rings mean the embryo died. Veins and movement show the egg is healthy. By day 12, you may see the embryo move. By day 22, the embryo fills most of the egg. On day 26 or 27, bill movement means hatching is close.
Key Milestones and Troubleshooting
Watch for important steps while incubating muscovy duck eggs. Use this chart to avoid problems.
-
Day 1: Start incubation. Set temperature and humidity.
-
Day 2: Check settings. Turn the eggs.
-
Day 3: Keep turning. Watch humidity.
-
Day 4: Turn eggs. Check temperature.
-
Day 5: Keep turning. Watch humidity.
-
Day 6: Turn eggs. Get ready to candle.
-
Day 7: Candle eggs. Remove bad eggs.
-
Day 8: Raise humidity a little. Keep turning.
-
Day 9: Turn eggs. Watch humidity.
-
Day 10: Start cooling and misting. Candle for veins.
-
Day 11: Keep cooling and misting. Turn eggs.
-
Day 12: Candle for movement. Mist and cool daily.
-
Day 13: Mist, cool, and turn eggs.
-
Day 14: Mist, cool, and turn eggs.
-
Day 15: Mist, cool, and turn eggs.
If you see blood rings or no veins, remove those eggs. If humidity is low, add water or sponges. If humidity is too high, use less water. Always check temperature and humidity every day.
Note: Muscovy duck eggs need cooling and misting every day after day 10. Other duck eggs do not need this.
This chart gives you a simple guide for hatching muscovy duck eggs. Print it and use it every day. Following these steps will help you hatch healthy ducklings.
Why Each Step Matters in Muscovy Incubation
Temperature and Humidity Importance
You need to keep muscovy duck eggs at the right temperature and humidity. These settings help the embryos grow inside the eggs. If the temperature is too high or too low, the embryos might die. Humidity controls how much water leaves the eggs. If humidity is too low, the eggs can dry out. If it is too high, the yolk sac can have problems.
The environment during incubation affects how embryos grow. After the egg is laid, the embryo depends on outside temperature. Growth changes if the temperature changes. Embryos grow best when conditions are just right. They are sensitive to low or high temperatures. Low temperatures slow down growth. High temperatures make embryos grow faster and use nutrients quickly. Dehydration or too much water is a risk. Humidity during incubation and hatching affects this. Lower humidity can make chicks weigh less.
Research shows muscovy duck eggs hatch best with humidity between 60% and 70%. The temperature should be close to 37.5°C. The muscovy incubation chart helps you keep these numbers for healthy ducklings.
Turning and Cooling Explained
Turning duck eggs helps embryos get air and keeps them from sticking to the shell. You should turn muscovy duck eggs many times each day. Cooling is special for muscovy eggs. Take them out every day to cool and mist. This copies what happens in a nest and helps embryos get stronger.
A study looked at temperature and humidity effects on muscovy duck eggs. It found that keeping the temperature at 37.5°C and spraying and cooling eggs helped more ducklings hatch. The study said egg weight and how fast embryos use energy are important for hatching.
Misting and Humidity for Hatching Duck Eggs
Misting muscovy duck eggs keeps humidity steady and helps the membranes stay wet. Start misting after day 10 and keep going until day 25. This step helps ducklings hatch without trouble.
-
Misting helps keep humidity right for muscovy duck eggs.
-
Good humidity stops membranes from drying out, which helps ducklings hatch.
-
Low humidity makes hatching harder for muscovy ducklings.
The muscovy incubation chart tells you when to mist and how to raise humidity for the best hatch.
Candling for Healthy Development
Candling duck eggs lets you check for a living embryo and look for veins. Use a light to see inside muscovy duck eggs. Look for veins and movement. By day 12, you can see the embryo move. On days 22 to 27, the embryo fills the egg and you might see the bill move.
-
Candling helps you see veins, which means the embryo is alive.
-
By day 12, you can see movement, showing the embryo is growing.
-
On days 22 to 27, the embryo fills the egg and you can see the bill move.
Use candling to take out eggs that do not show veins or movement. This step helps you follow the incubation guide and get more ducklings to hatch.
Week-by-Week Muscovy Incubation Guide
Days 1-7: Setup and Early Care
Start by setting up your incubator. Set the temperature to 37.2°C. Keep humidity between 55% and 60%. Turn the eggs four times each day. Check the muscovy incubation chart every day. On day 7, candle the eggs. Look for a dark spot and veins. Take out eggs that do not grow. This week helps ducklings start healthy.
Days 8-14: Growth and Monitoring
Watch the eggs closely this week. Growth signs show how the eggs are doing. Use the muscovy incubation chart. Candle eggs on days 10 and 14. Look for these signs:
|
Day |
Growth Indicator Description |
|---|---|
|
10 |
Bill, legs, and wing buds start to form. The embryo shape can be seen. |
|
12 |
You see movement when candling. This means the embryo is active. |
|
14 |
Candle again. The embryo moves when you turn the egg. Veins are easy to see. |
Keep turning the eggs. Keep humidity at 60% to 65%. The guide helps you follow each step.
Days 15-21: Misting and Cooling
Begin misting and cooling the eggs every day. This makes embryos stronger. Follow these routines:
|
Days |
Cooling Duration |
Misting Frequency |
|---|---|---|
|
15 - 21 |
Cool eggs for 15 minutes. |
Mist eggs once each day. |
Mist eggs with warm water after cooling. Keep turning the eggs. Check the chart for reminders.
Days 22-28: Pre-Lockdown Checks
Get ready for lockdown by raising humidity to 65% to 70%. Candle eggs on day 22. See if embryos fill the shell. Mist and cool eggs for 20 minutes each day. Remove eggs that do not move. Watch eggs closely at this stage.
Days 29-35: Lockdown and Hatching Duck Eggs
Lockdown starts in the last days. Stop turning the eggs now. Raise humidity for hatching. Follow these steps:
-
Keep humidity at 35% to 40% before lockdown.
-
Raise humidity to 75% during lockdown for hatching.
-
Change humidity if your climate is different. Watch the air cell size.
Do not open the incubator during lockdown. Look for pipping and hatching. The chart helps you finish the incubation period.
How Early and How Late Can Muscovy Duck Eggs Hatch?
Most Muscovy duck eggs hatch at 35 days, but a normal hatch window ranges from 34 to 37 days. Muscovy embryos naturally develop more slowly than other domestic duck breeds, so a delay of 1–2 days is very common and usually not a sign of trouble.
Earliest Possible Hatch (Day 34)
A small number of Muscovy eggs may hatch on Day 34, usually when:
Incubator temperature has been slightly high
Eggs were stored warm before incubation
The embryo develops faster than average
These early hatches are less common but still normal.
Latest Normal Hatch (Day 36–37)
Hatching on Day 36 or 37 is still normal for Muscovies. Reasons for a late hatch include:
Slightly low incubator temperature
Higher humidity slowing moisture loss
Larger or thicker-shelled eggs
Natural variation between embryos
When You Should Be Concerned
Evaluate the eggs more closely if:
It is past Day 37 with no internal pip
The air cell is not fully enlarged
There is no movement during candling
The incubator has had major temperature drops
By Day 38, carefully candle each egg. If there is no movement or internal pip, the embryo is likely non-viable.
Muscovy eggs should not be assisted before confirming an internal pip, as they develop at a slower pace than other duck breeds.
Lockdown and Hatching Duck Eggs
When to Stop Turning
You should stop turning muscovy duck eggs near the end. Most people stop turning eggs three days before hatching. If you see signs like pipping or peeping, stop turning sooner. Stopping helps ducklings get ready to hatch.
-
Stop turning muscovy duck eggs three days before they hatch.
-
If you see hatching signs, you can stop turning earlier.
Final Humidity and Misting
During lockdown, raise humidity for muscovy duck eggs. High humidity helps ducklings break the shell. It also keeps them from sticking. Use a hydrometer to check humidity. Open vents more when ducklings start to pip.
|
Stage of Incubation |
Humidity Level |
Additional Notes |
|---|---|---|
|
Day 1 - Day 25 |
55-58% |
Wet bulb: 86% |
|
Day 26 |
65% |
|
|
Day 26 - 28 |
70-80% |
Open vents by 50% when ducklings pip |
|
Hatch |
70% |
Open all vents so ducklings can breathe and dry |
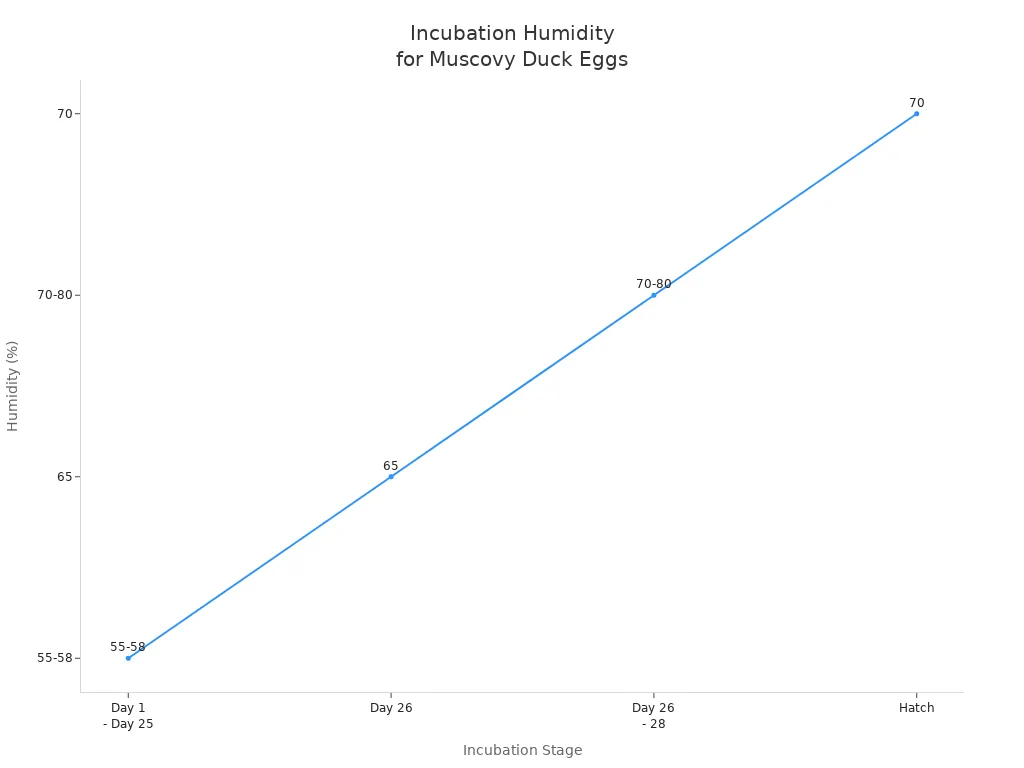
Stop misting muscovy duck eggs after day 25. Before lockdown, cool and mist eggs every day. During lockdown, focus on humidity and air flow.
Signs of Hatching in Muscovy Duck Eggs
Watch muscovy duck eggs for hatching signs.
-
Internal pipping starts around day 32.
-
You might see the duckling’s bill in the air cell.
-
Listen for peeping sounds inside the eggs.
-
Candle eggs to check for pips.
-
If you do not see signs, wait one or two more days.
Troubleshooting Late or Difficult Hatches
If muscovy duck eggs hatch late or have trouble, check these things:
-
Keep humidity high in the last days.
-
Use a hydrometer to watch humidity.
-
Only let a broody muscovy sit on about 12 eggs.
-
Do not bother broody muscovy ducks or candle eggs too much.
-
Pick good brooders for future hatching.
-
Keep the broody muscovy in a safe, closed space.
Tip: Keeping humidity steady and handling eggs gently helps muscovy duck eggs hatch well. The muscovy incubation chart and daily guide help you get healthy ducklings.
Printable Muscovy Incubation Chart & Resources
How to Use the Printable Chart
A printable muscovy incubation chart helps you track each step. Use the chart to write down important things every day. Keep the chart close to your incubator. Fill it out daily. Write the temperature and humidity numbers. Mark when you turn the eggs or check the auto-turner. Write what you see when candling and checking air-cell growth on days 7 and 14. If you add water or open vents, write it down. At the end, count how many duck eggs hatched and record it. This helps you find patterns and get better at hatching muscovy duck eggs.
|
Task |
Description |
|---|---|
|
Record date/time, temperature, and humidity |
Track daily conditions for muscovy duck eggs |
|
Tick each turn or verify auto-turner |
Ensure regular turning for even development |
|
Note candling results and air-cell growth |
Monitor embryo progress on key days |
|
Flag any adjustments |
Document changes to improve future hatches |
|
Log hatch count |
Review success and plan for next incubation |
Tip: Print a few copies of the muscovy incubation chart. Use a new sheet for each batch of duck eggs.
Download and Reference Tips
You can download a muscovy incubation chart from the internet. Many websites have printable PDFs for your daily guide. The Muscovy Hatching Chart is a good resource. It gives you a clear schedule for muscovy duck eggs. Save the chart on your device or print it out. Keep it safe and near your incubator. Use the chart to check off steps and write notes. This helps you follow the muscovy incubation chart and do better with your duck eggs.
Remember to look at your finished chart after each hatch. This helps you learn from each muscovy incubation and get better at hatching duck eggs.
You can hatch more ducklings if you use the muscovy incubation chart. Studies say a shorter muscovy cycle means more ducklings. You must pay attention and wait during the 35 days. Check your printed muscovy chart every day. The daily guide shows you each muscovy step.
Hatching muscovy ducklings is fun and helps you learn about life.
FAQ
How long does it take for muscovy duck eggs to hatch?
You can expect muscovy duck eggs to hatch in about 35 days. This period is longer than most other duck breeds.
Why do muscovy eggs need misting and cooling?
Muscovy eggs need misting and cooling to mimic natural nest conditions. These steps help muscovy embryos grow strong and improve your hatch rate.
Can you use a regular incubator for muscovy eggs?
You can use a regular incubator for muscovy eggs. Make sure you follow the muscovy incubation chart and adjust for misting, cooling, and humidity.


0 Comments